Handling Multiple Applications in Argo CD
Hello again 👋🏻
In my Introduction to GitOps and Argo CD article, we have made a small introduction to Argo CD and GitOps. After this article, I completed Codefresh’s GitOps at Scale course and I wanted to continue with this article. This course
- ApplicationSet Generators
- Promoting relases
- Argo Image Updater
- Sync phases/hooks
- Sync waves
includes important topics such as.
In this post, I only want to talk about multi cluster deployment. I will talk about other topics in other posts.
Firstly, we will create the cluster where Argo CD will be installed with kind and the dev and prod clusters where the applications will be deployed. Then we will deploy applications to these clusters first with Cluster Generator and then with List Generator.
In this demo, we will create clusters with Kind.
❯ brew install kind
Let’s write our manifests for each cluster. Let the name of the cluster where Argo CD will be installed be cls-argo-cd-01 and I can access it from port 8080. I also set 1.27 as Kubernetes version in all clusters.
kind: Cluster
apiVersion: kind.x-k8s.io/v1alpha4
name: cls-argo-cd-01
nodes:
- role: control-plane
  image: kindest/node:v1.27.2@sha256:3966ac761ae0136263ffdb6cfd4db23ef8a83cba8a463690e98317add2c9ba72
  extraPortMappings:
  - containerPort: 30080
    hostPort: 8080
I want to have 1 worker node in my prod cluster and I define 3 ports. Since I cannot add / delete these ports later, let’s be generous at the beginning. The name of this cluster is cls-prod-app-01.
We will connect to Dev and Prod clusters with Private IP Address. Therefore, you need to write your own address in the apiServerAddress section, and it is better to make this address static.
kind: Cluster
apiVersion: kind.x-k8s.io/v1alpha4
name: cls-prod-app-01
nodes:
- role: control-plane
  image: kindest/node:v1.27.2@sha256:3966ac761ae0136263ffdb6cfd4db23ef8a83cba8a463690e98317add2c9ba72
  extraPortMappings:
    - containerPort: 30091
      hostPort: 9091
    - containerPort: 30092
      hostPort: 9092
    - containerPort: 30093
      hostPort: 9093
- role: worker
  image: kindest/node:v1.27.2@sha256:3966ac761ae0136263ffdb6cfd4db23ef8a83cba8a463690e98317add2c9ba72
networking:
  apiServerAddress: "192.168.1.61"
  apiServerPort: 9443
Let’s create a cluster of the dev environment named cls-dev-app-01. Make sure that the ports do not overlap when making definitions
kind: Cluster
apiVersion: kind.x-k8s.io/v1alpha4
name: cls-dev-app-01
nodes:
- role: control-plane
  image: kindest/node:v1.27.2@sha256:3966ac761ae0136263ffdb6cfd4db23ef8a83cba8a463690e98317add2c9ba72
  extraPortMappings:
    - containerPort: 30081
      hostPort: 8081
    - containerPort: 30082
      hostPort: 8082
    - containerPort: 30083
      hostPort: 8083
networking:
  apiServerAddress: "192.168.1.61"
  apiServerPort: 8443
Finally, let’s create clusters through these files
kind create cluster --config kind-argo-cd.yml
kind create cluster --config kind-prod-app.yml
kind create cluster --config kind-dev-app.yml
You can check the list of existing clusters with kubectl config get-contexts -o name. I use the kubectx tool and I recommend it to you.
❯ kubectx
kind-cls-argo-cd-01
kind-cls-dev-app-01
kind-cls-prod-app-01
Argo CD Installation #
Since we did this part in the previous article, let’s skip it quickly.
❯ kubectx kind-cls-argo-cd-01


❯ kubectl create namespace argocd
❯ kubectl apply -n argocd -f https://raw.githubusercontent.com/argoproj/argo-cd/stable/manifests/install.yaml

❯ kubectl patch svc  argocd-server -n argocd --type='json' -p '[{"op":"replace","path":"/spec/type","value":"NodePort"},{"op":"replace","path":"/spec/ports/0/nodePort","value":30080}]'

❯ kubectl -n argocd patch secret argocd-secret \
  -p '{"stringData": {
    "admin.password": "$2a$12$.x2u70lXke0aHrUNiYda2u2SPMcCXYOPck5k/wBFHBfwCBsREkQvC",
    "admin.passwordMtime": "'$(date +%FT%T%Z)'"
  }}'
If the installation completed without any problems, you can access the interface at 127.0.0.1:8080.
❯ argocd login 127.0.0.1:8080
Register the Dev and Prod clusters. I also added labels when registering. Labelling is more important especially if there are many clusters. According to these labels, we can specify where the applications will be deployed
❯ argocd cluster add kind-cls-dev-app-01 --name cls-dev-app-01 --label env=dev
❯ argocd cluster add kind-cls-prod-app-01 --name cls-prod-app-01 --label env=prod

WARNING: This will create a service account `argocd-manager` on the cluster referenced by context `kind-cls-prod-app-01` with full cluster level privileges. Do you want to continue [y/N]? y
INFO[0001] ServiceAccount "argocd-manager" created in namespace "kube-system"
INFO[0001] ClusterRole "argocd-manager-role" created
INFO[0001] ClusterRoleBinding "argocd-manager-role-binding" created
INFO[0006] Created bearer token secret for ServiceAccount "argocd-manager"
Cluster 'https://192.168.1.61:9443' added
When registering, it tells us that it will create a Service Account named argocd-manager with full authority in the cluster and creates the required ClusterRole and ClusterRoleBinding.
So how does Argo CD store the clusters ?
❯ kubectl get secret -n argocd
NAME                              TYPE     DATA   AGE
argocd-notifications-secret       Opaque   0      8m20s
argocd-secret                     Opaque   5      8m20s
cluster-192.168.1.61-1851709207   Opaque   3      58s
cluster-192.168.1.61-3188948006   Opaque   3      2m21s
Secret. Argo CD stores clusters as secret under its own namespace. When you look at the secret, you see the label you added and the default argocd.argoproj.io/secret-type: cluster label.
❯ kubectl get secret cluster-192.168.1.61-3188948006 -n argocd -o yaml
labels kısmında
  labels:
    argocd.argoproj.io/secret-type: cluster
    env: dev
In the data section, the name and server parts are stored in base64 format.
  name: Y2xzLWRldi1hcHAtMDE=
  server: aHR0cHM6Ly8xOTIuMTY4LjEuNjE6ODQ0Mw==
If we decode them, we can find our cluster name and address.
❯ echo 'aHR0cHM6Ly8xOTIuMTY4LjEuNjE6ODQ0Mw==' | base64 -d
https://192.168.1.61:8443

❯ echo 'Y2xzLWRldi1hcHAtMDE=' | base64 -d
cls-dev-app-01
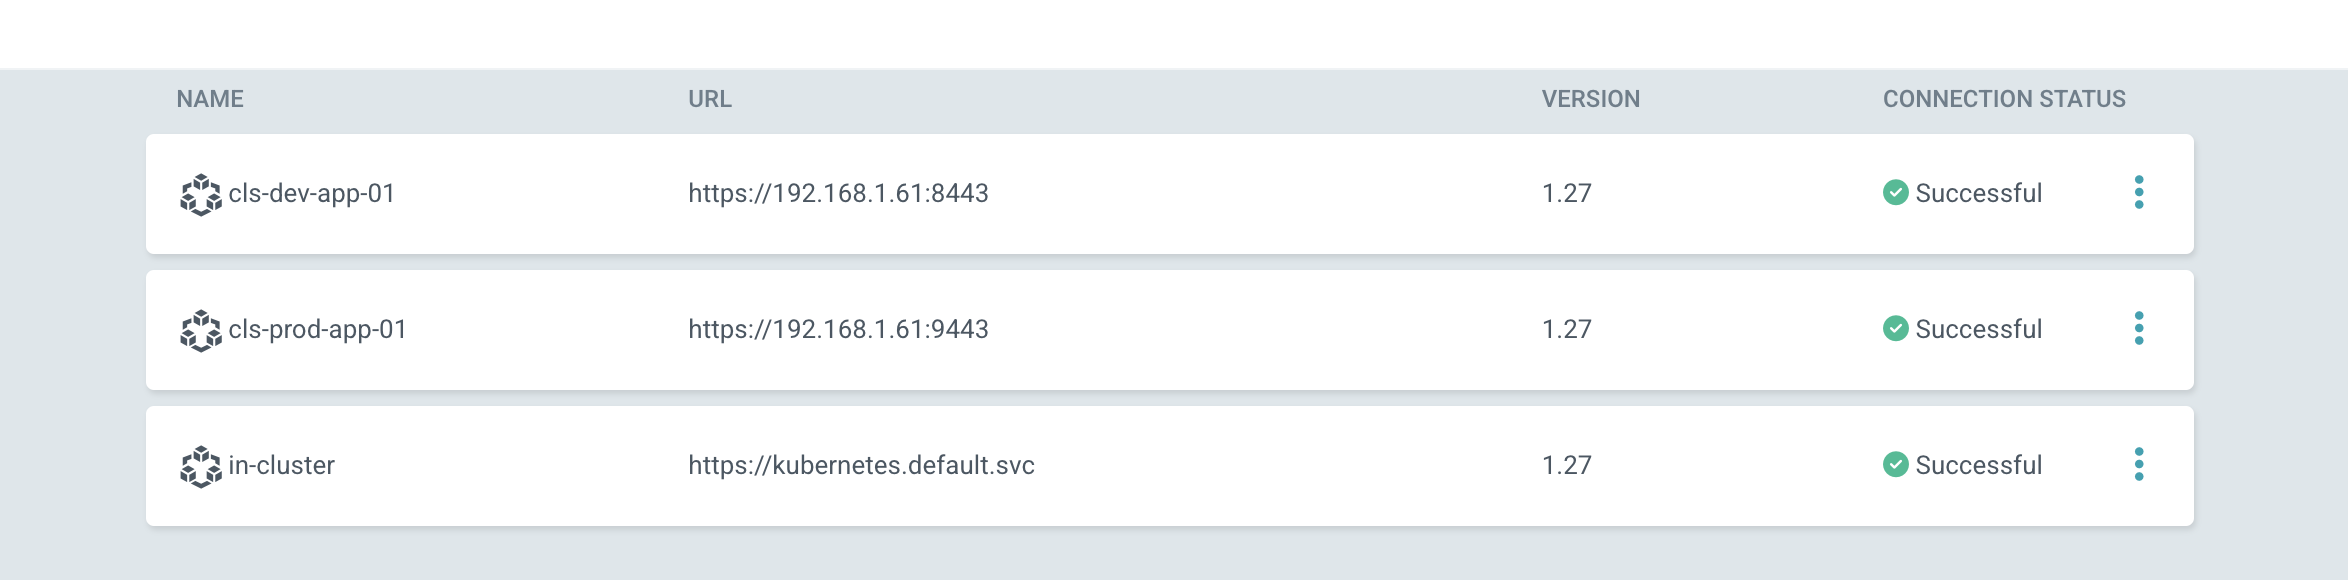
You can also check all this in settings/cluster.
ApplicationSet #
With Application, we can deploy an application to a cluster. With Apps Of App, we can deploy many applications to a cluster. But these are not enough for larger scale environments. As the number of Application and Cluster increases, workload and manual work will become increasingly difficult.
With ApplicationSet and its generators, many things have become even easier. In 2019 support multiple clusters (destinations) for an Application in this issue, multi destination support was requested for Application. Previously, it was necessary to define a separate Application for each cluster. In a way it is good to read this thread at this time, so you can see why people need it
In 2021, ApplicationSet is announced. When we look at from here, we can see the v.0.1.0 version. Currently in v0.4.1 version.
gitlab.com/emreberber/manifests we had such a repo. let’s continue from here. I created a directory called applications-sets.
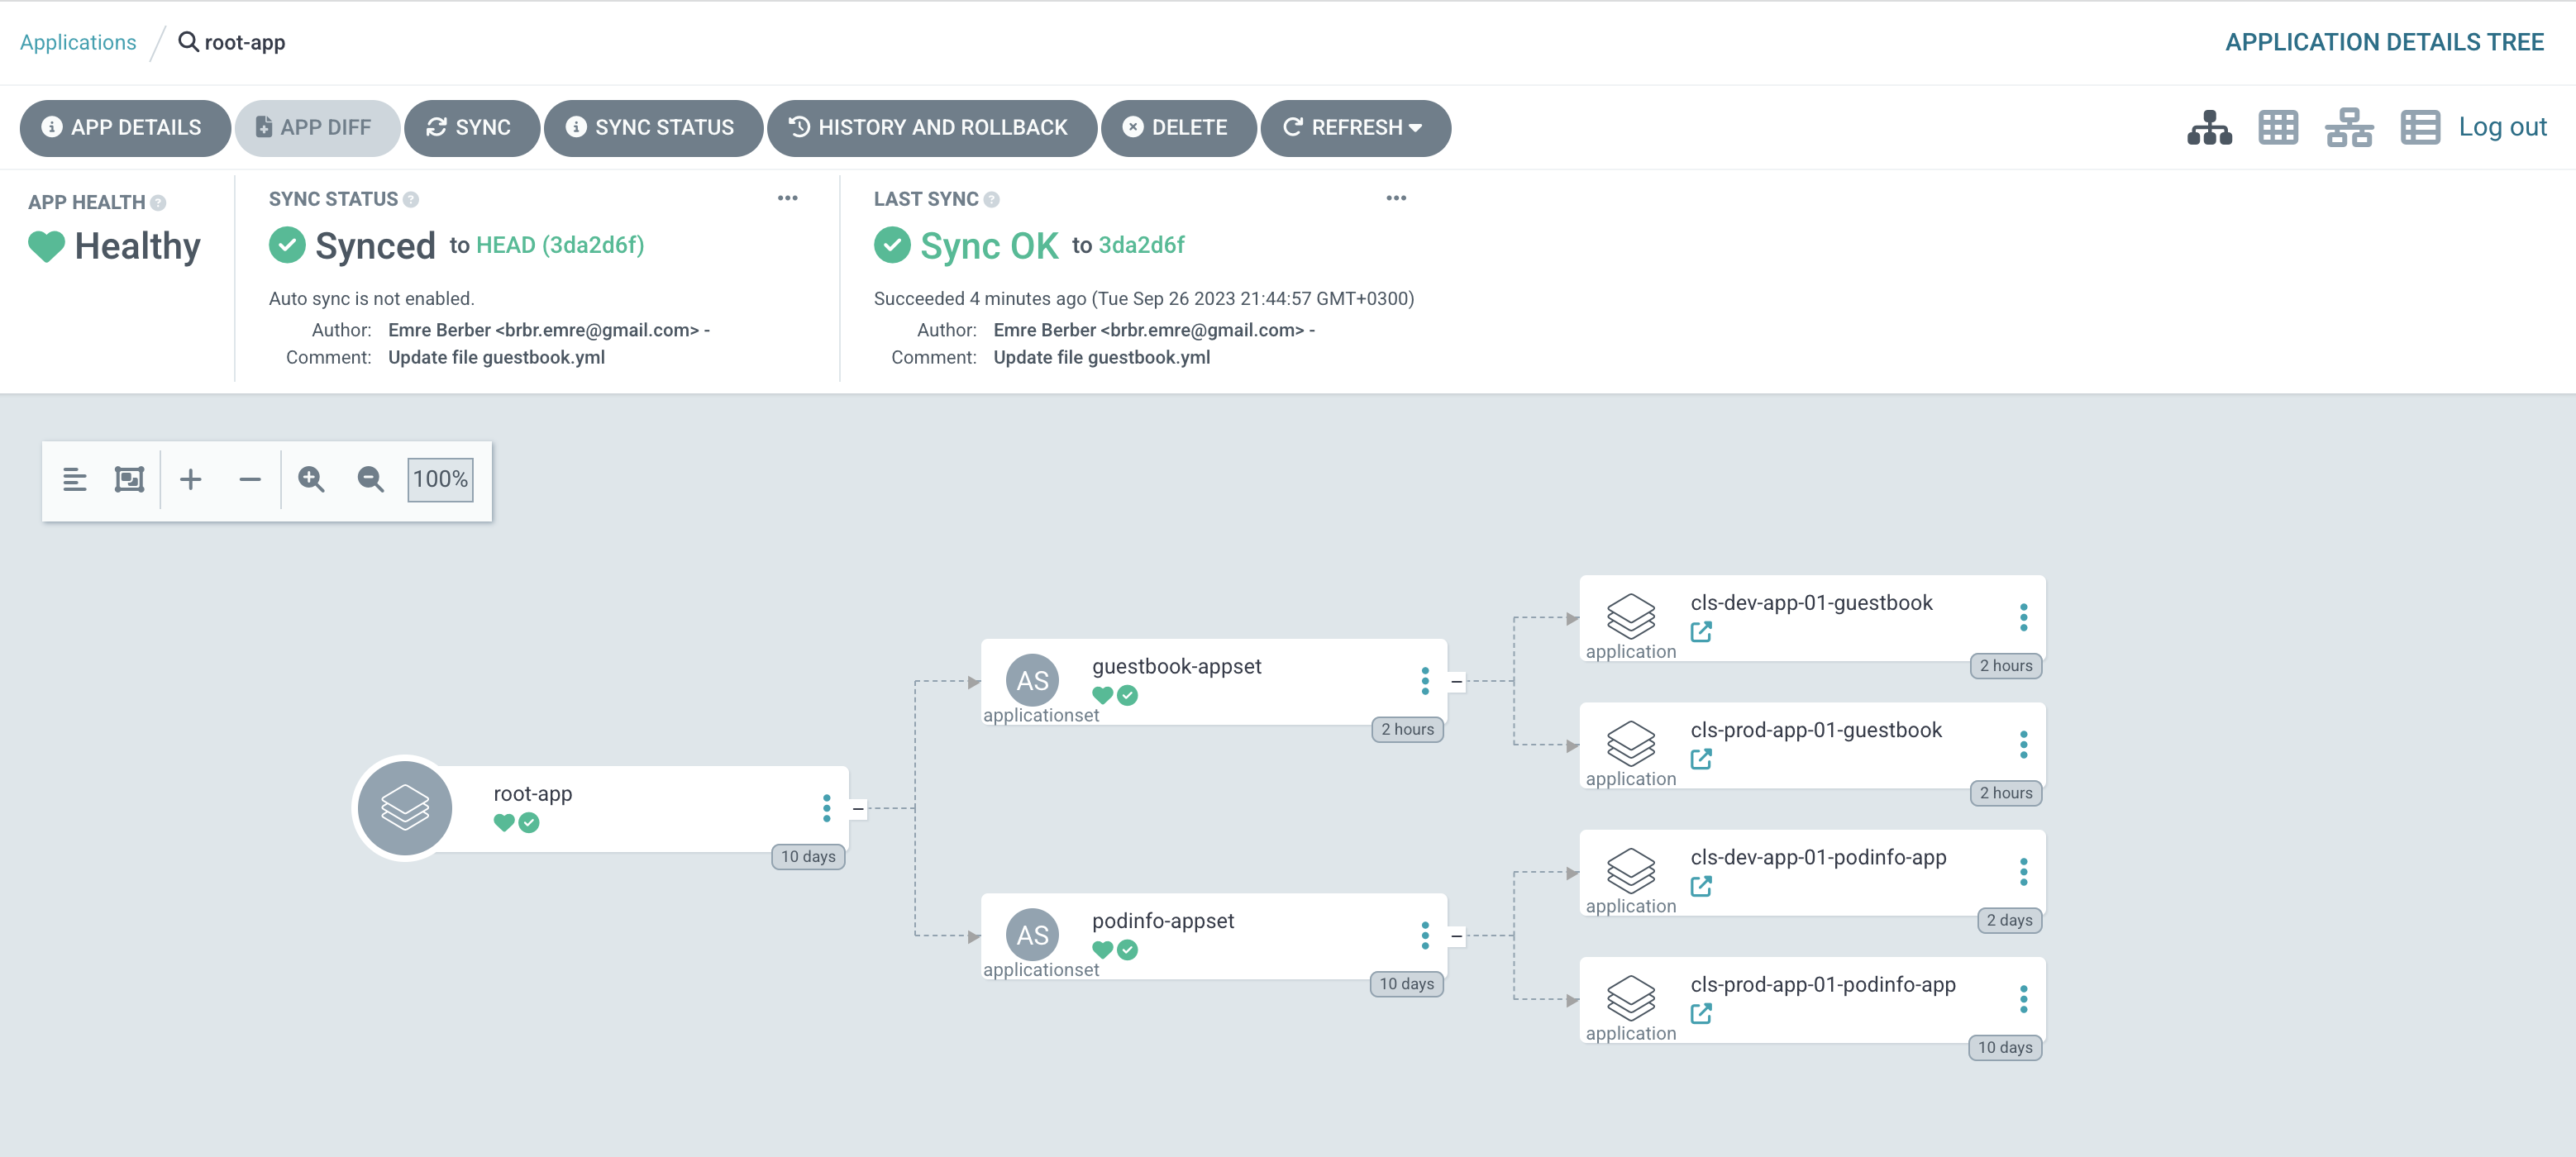
Under the base directory, I added the yaml that allows me to create the root app that will look at my applicationsets.
apiVersion: argoproj.io/v1alpha1
kind: Application
metadata:
  name: root-app
  namespace: argocd
  finalizers:
  - resources-finalizer.argocd.argoproj.io
spec:
  destination:
    namespace: default
    name: in-cluster
  project: default
  source:
    path: application-sets
    repoURL: https://gitlab.com/emreberber/manifests.git
    targetRevision: HEAD
you can apply it directly with kubectl apply -f.
gitlab.com/emreberber/demo-apps In this repo, I specify the manifest files that my applicationset will create. I separate the ApplicationSet and manifest repositories because this is something that should happen in practice. ApplicationSet is added in the argocd namespace in the cluster where Argo CD is running. So this should be added by someone with admin privileges or MR should be taken. But since application manifests will be completely managed by the developer, there will be no restrictions.
In the generators section of the ApplicationSet definition, I used a cluster generator. Argo CD provides us with multiple generators. For a complete list be sure to check here.
- List generator
- Cluster generator
- Git generator:
- Matrix generator
- Merge generator
- SCM Provider generator
- Pull Request generator
- Cluster Decision Resource generator
You will also see kustomization files in the application repository. If you haven’t heard of it before or don’t have much practice, you can get more details here.
The cluster generator will automatically target both local and non-local clusters, for every cluster that matches the cluster selector.
If you wish to target only remote clusters with your Applications (e.g. you want to exclude the local cluster), then use a cluster selector with labels, for example:
spec:
  generators:
  - clusters:
      selector:
        matchLabels:
          argocd.argoproj.io/secret-type: cluster
I can see the prod environment at 192.168.1.61:9091 and the dev environment at 192.168.1.61:8081.
If we will have other applications other than Podinfo, it will be enough to create a new directory and write the name of the directory in kustomization.yml at the top. Of course we do not forget ApplicationSet.
resources:
- podinfo
here there are examples about generators. let’s try the list generator example.
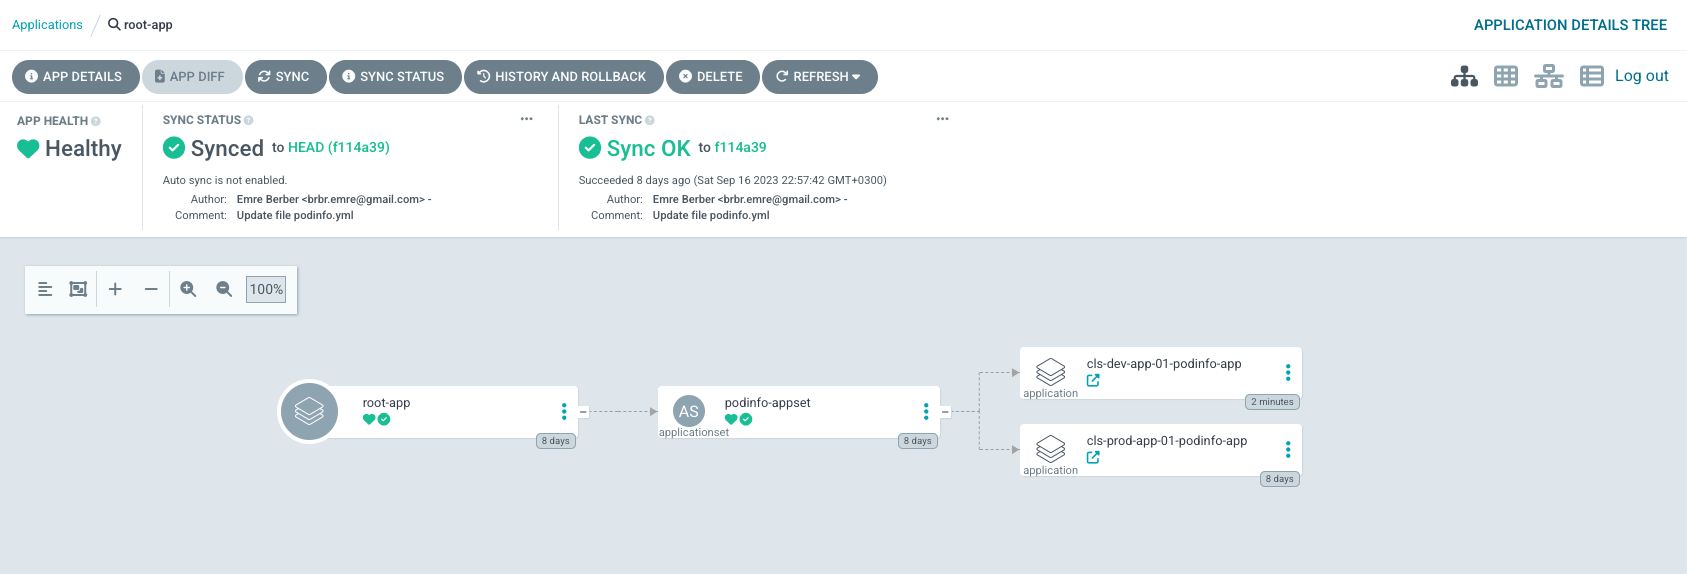
We created an appset file called guestbook.yml. at the end of the day, it should look like this from the top.
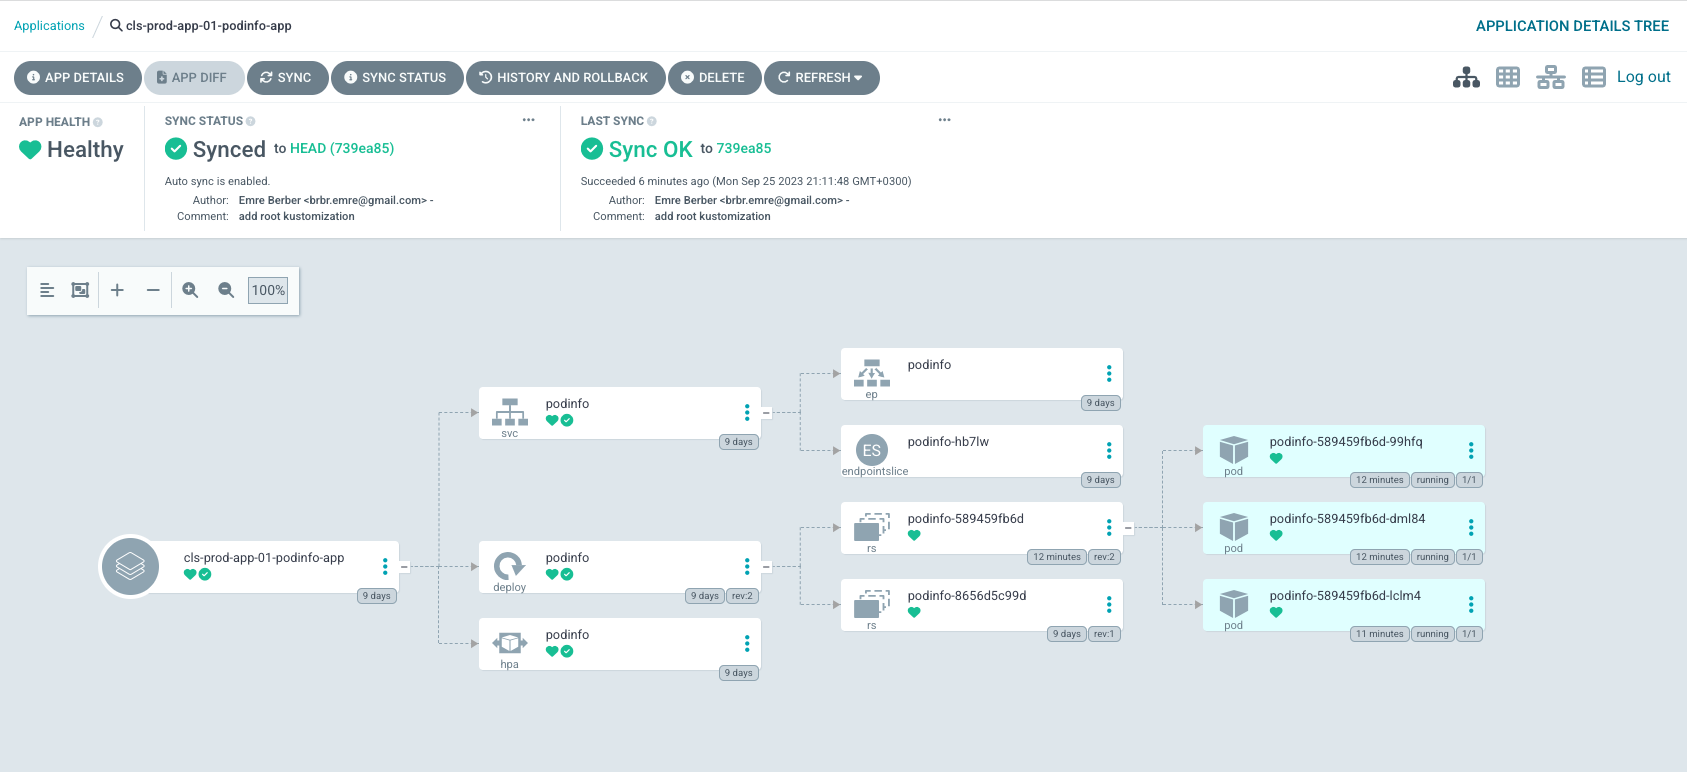
Let’s see what he created in the prod environment.
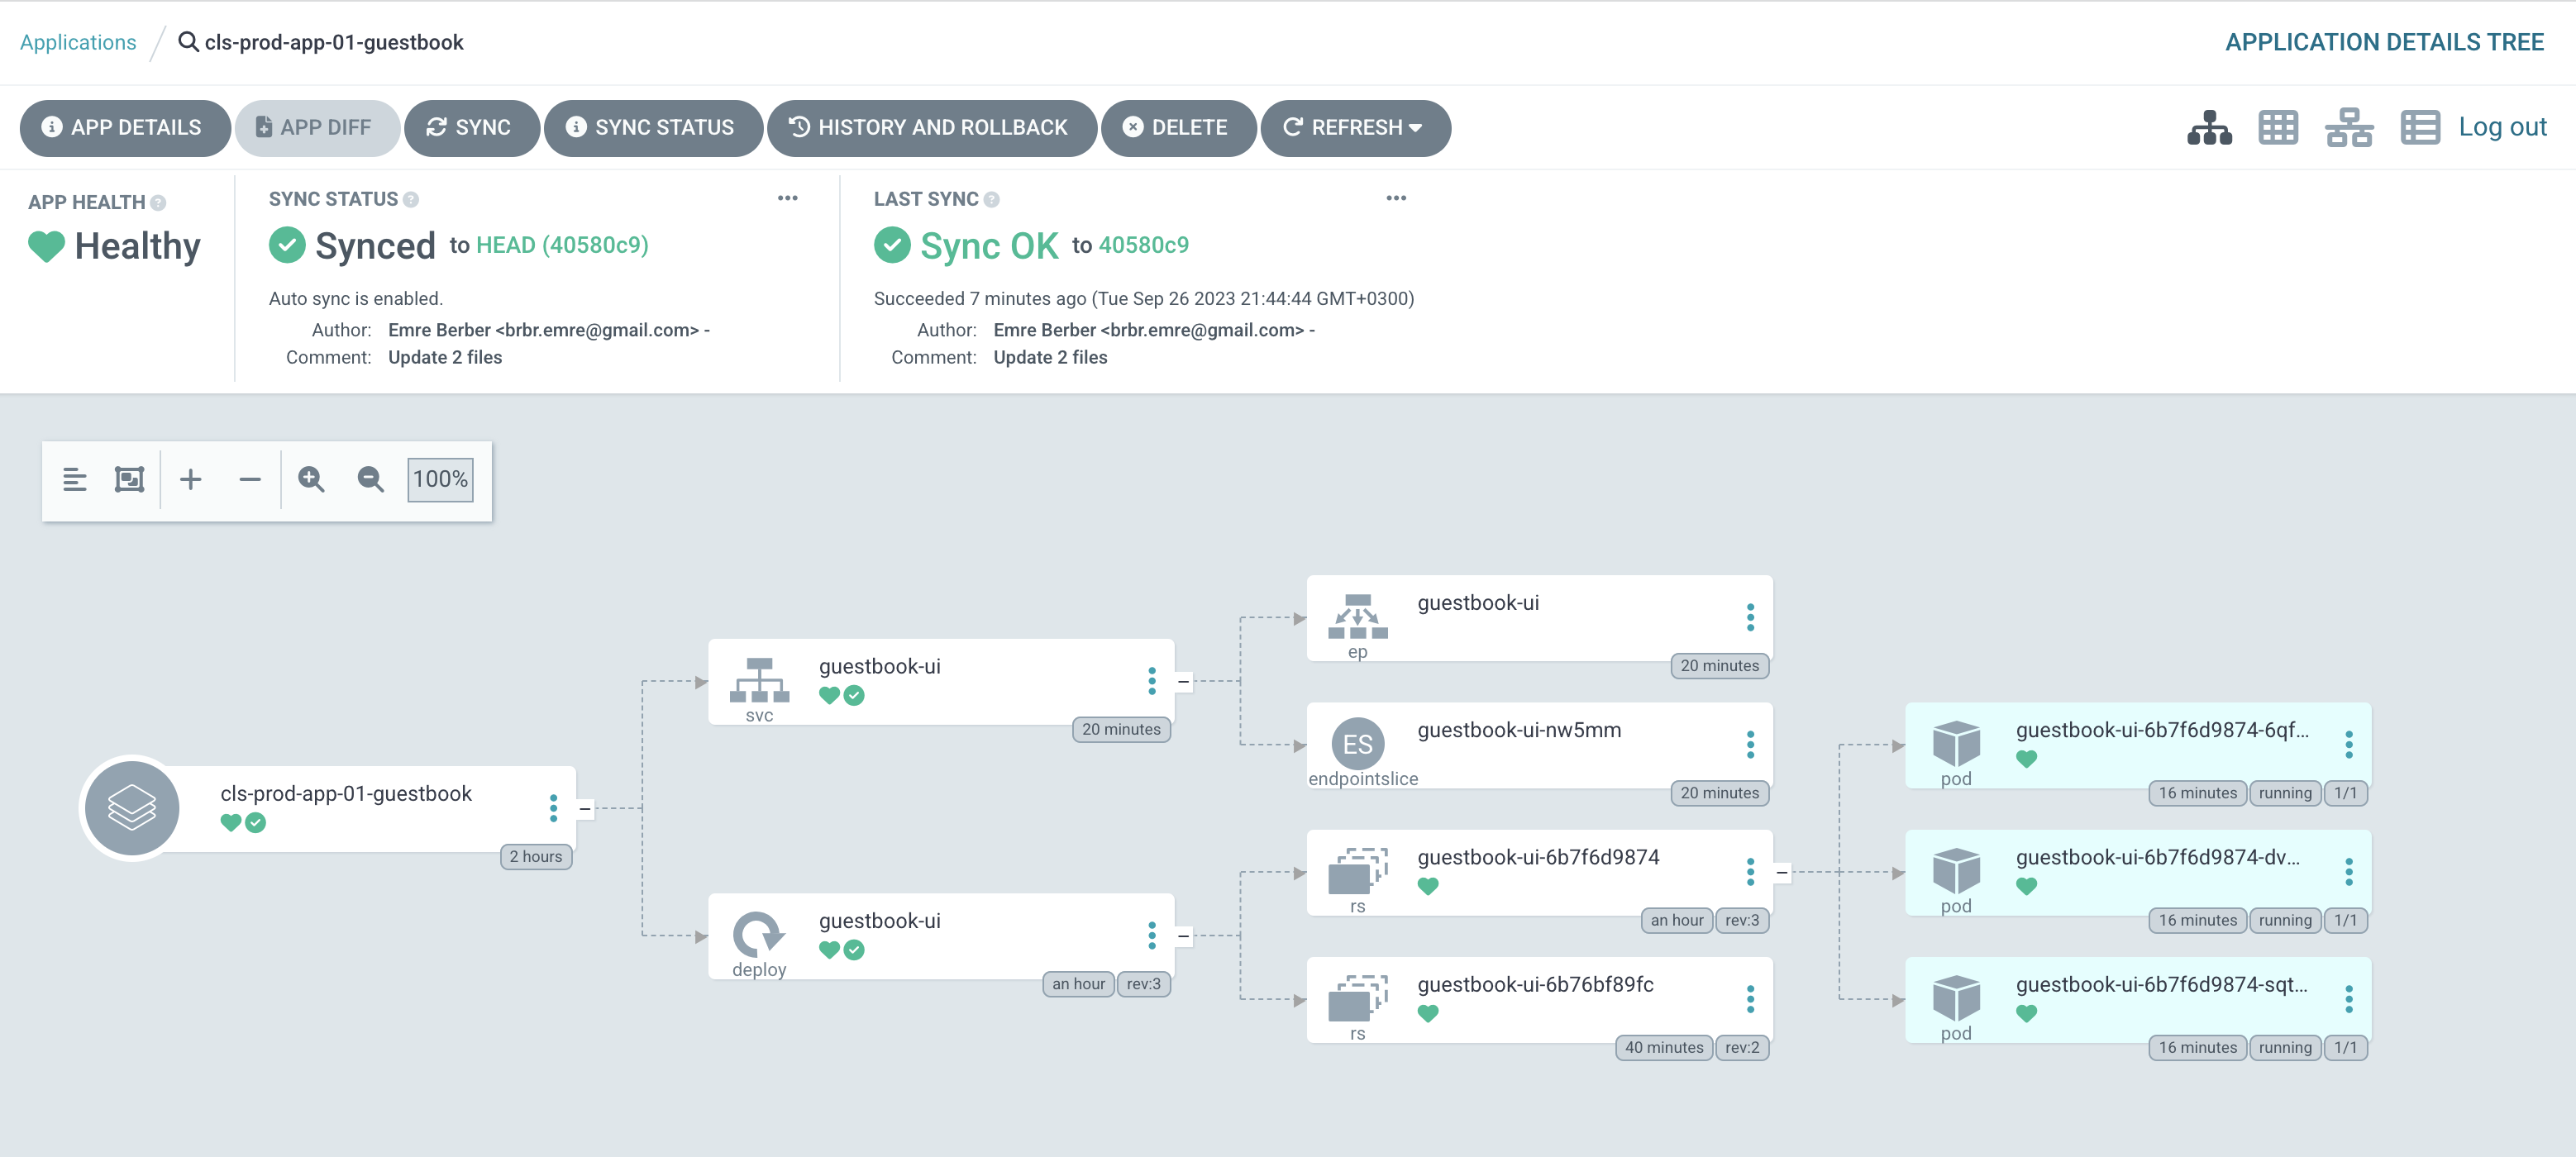
and see if we can access it from the browser.

I have never used pull request generator before but it sounds very nice. The intended use is more for dev environments. I want to try just this in another blog post.
let’s see what the next blog post will be, see you again 🤓