AWS Notes: Route 53
Route 53 is AWS’s managed DNS service. DNS is what translates human-readable domain names (like example.com) into IP addresses (like 192.0.2.1) that computers use to connect to each other.
Think of it this way: when you type google.com in your browser, your computer doesn’t know where Google’s servers are. It asks a DNS server “hey, where is google.com?” and the DNS server responds with an IP address. Route 53 is AWS’s DNS server, but it does way more than just that.
Route 53 is the only AWS service with a 100% uptime SLA. AWS guarantees 100% availability for Route 53.
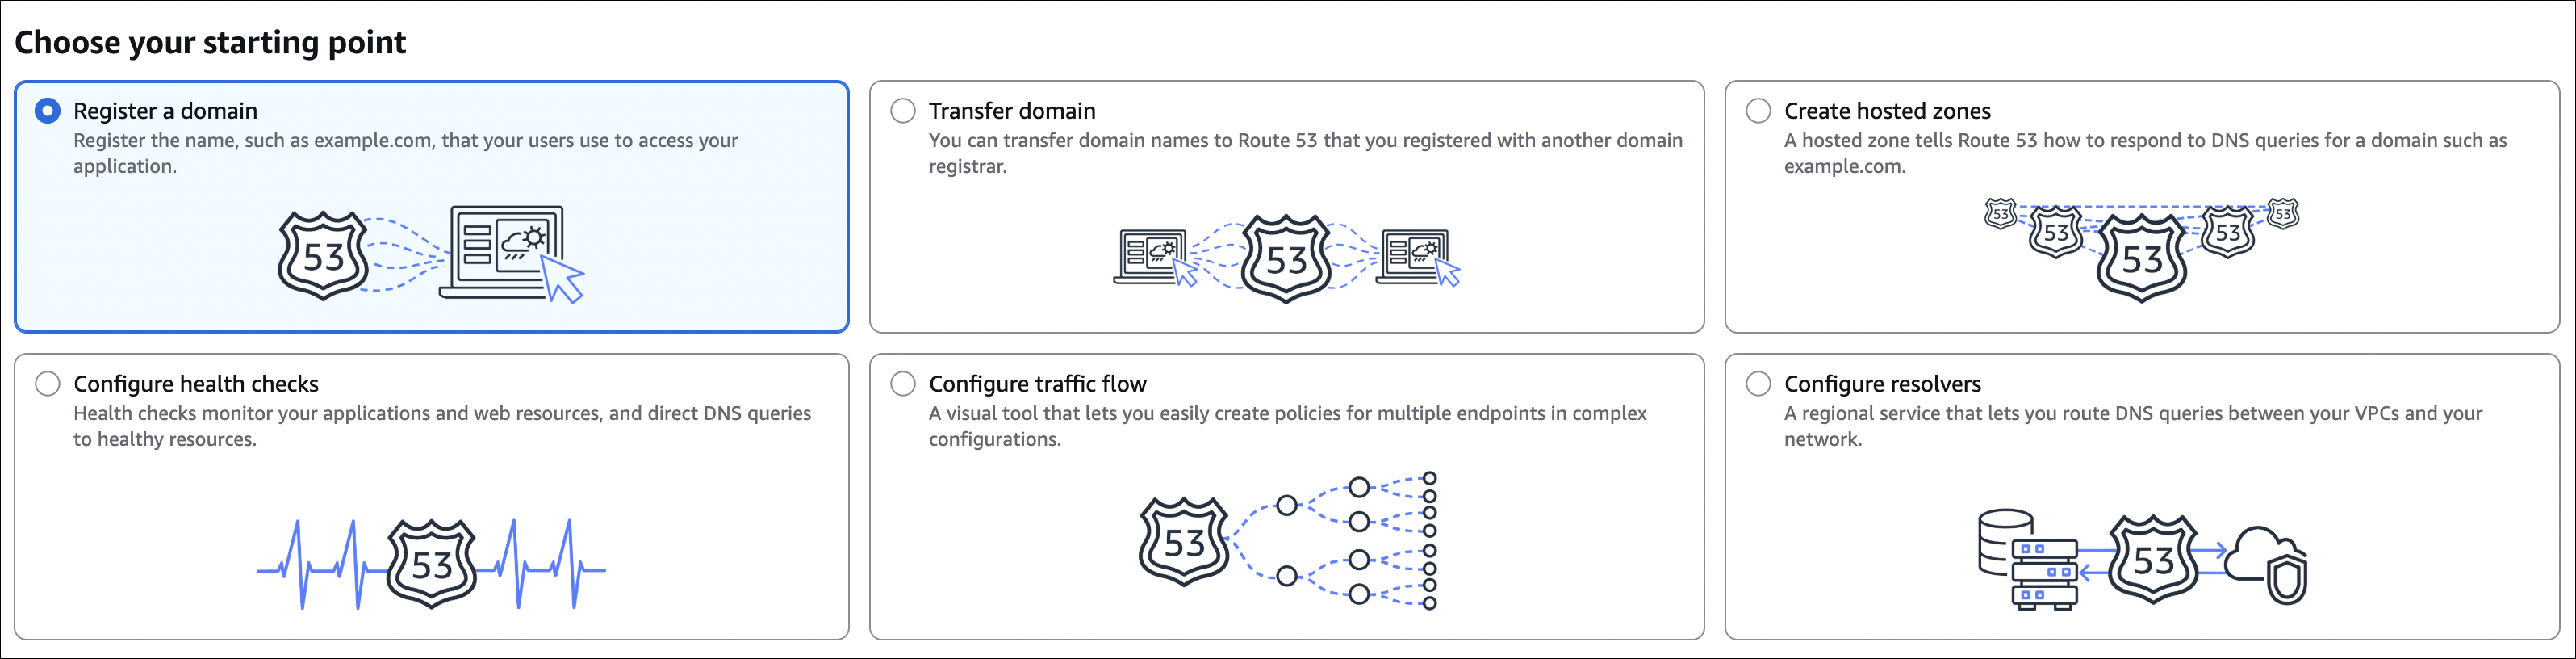
What Route 53 can do:
Route 53 is primarily a DNS service, but it’s also a domain registrar and a health checker. You can register domains, manage DNS records, route traffic based on health checks, and do geolocation-based routing. It’s pretty powerful.
Domain registration: You can buy and manage domains directly through Route 53. No need to go to GoDaddy or Namecheap. AWS handles everything.
DNS management: This is the core feature. You create DNS records (A, AAAA, CNAME, MX, etc.) that point your domain to various resources. Want example.com to point to an EC2 instance? Create an A record. Want www.example.com to point to a CloudFront distribution? Create a CNAME record. Simple.
Health checks: Route 53 can monitor your resources and automatically route traffic away from unhealthy endpoints. If your primary server goes down, Route 53 can automatically send traffic to a backup. This is huge for high availability.
Traffic routing: Route 53 supports several routing policies. You can do simple failover (primary/backup), weighted routing (send X% to one server, Y% to another), latency-based routing (send users to the closest server), geolocation routing (send users in Europe to European servers), and more.
Integration with AWS services: Route 53 integrates seamlessly with other AWS services. You can point domains to ALB, CloudFront, S3 buckets, API Gateway, and more. It’s the glue that connects your domain to your AWS infrastructure.
Why it’s called Route 53: Port 53 is the standard port for DNS.
Domain Registration
You can register domains directly through Route 53. No need to go to external registrars like GoDaddy or Namecheap. AWS handles everything, and it integrates seamlessly with your DNS management.
How to register a domain:
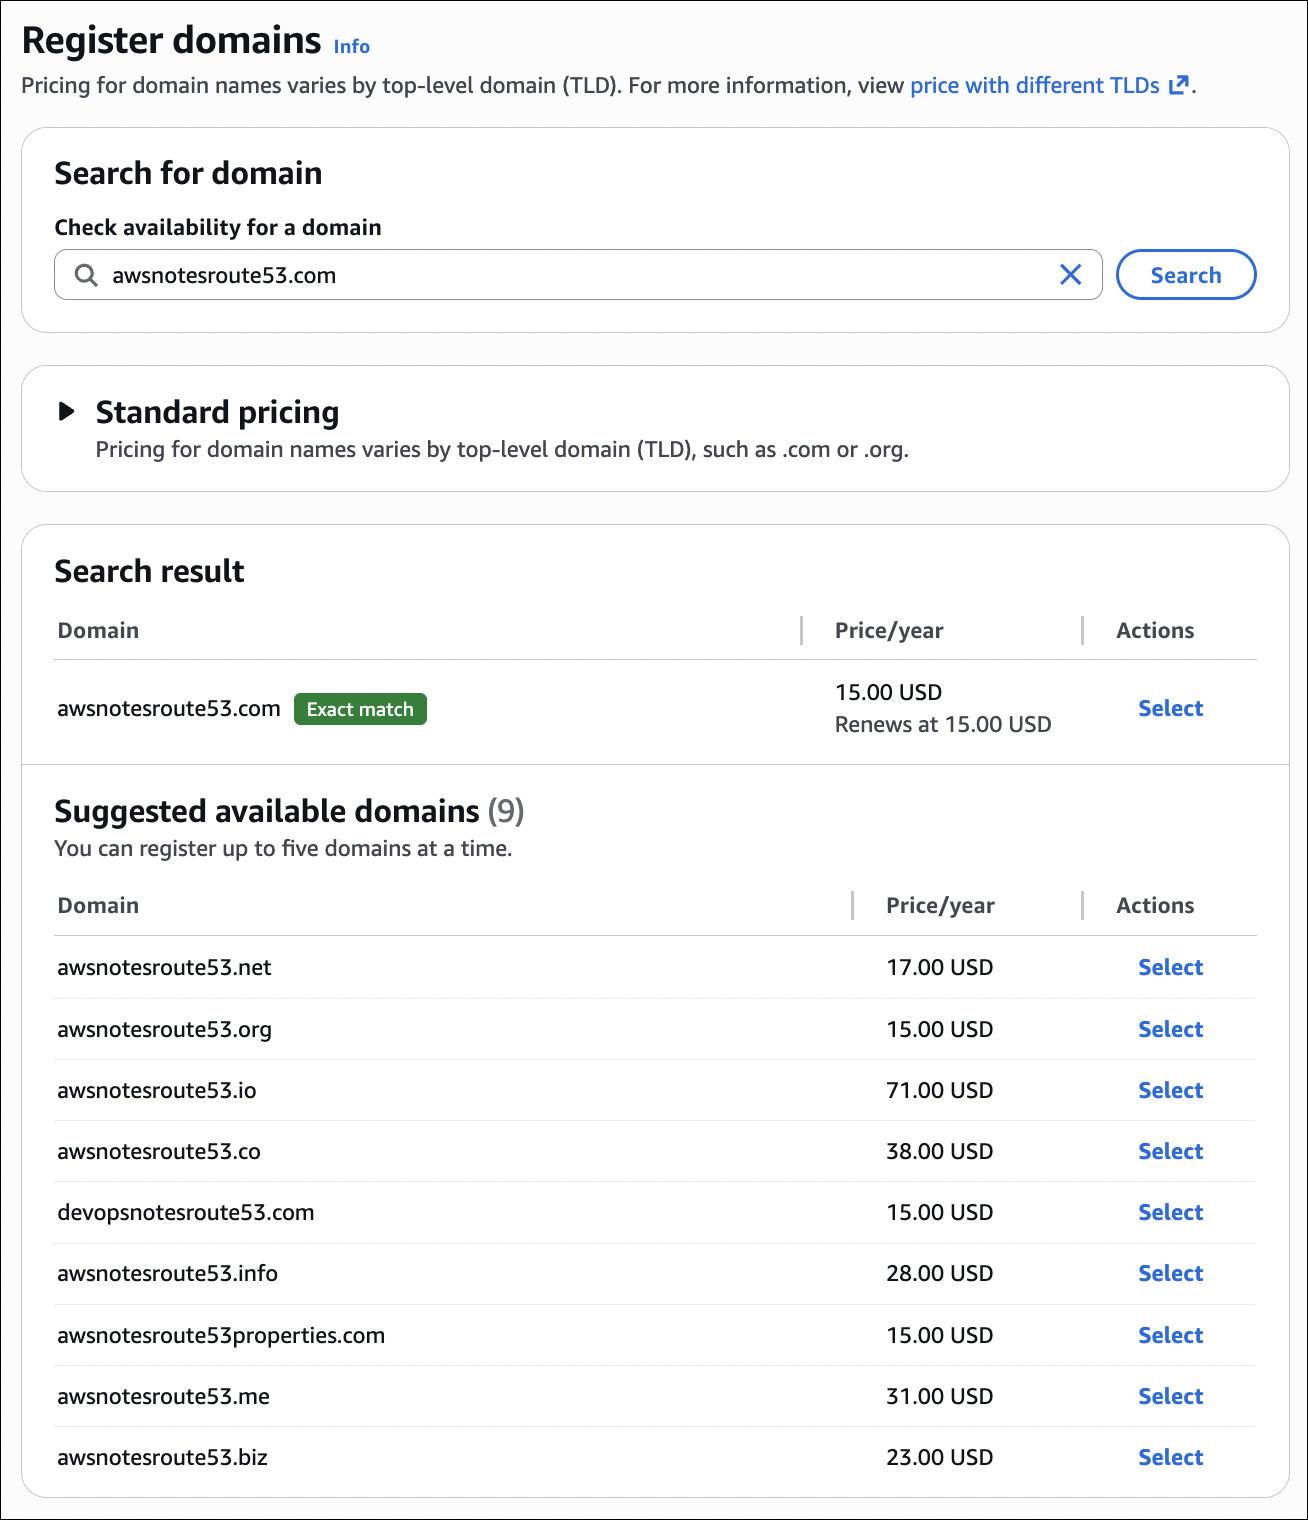
Go to Route 53 console, click Registered domains, then Register domain. You’ll search for available domain names. Type what you want (like myawesomeapp) and Route 53 will show you available TLDs (.com, .net, .org, etc.) and their prices.
Once you find a domain you like, add it to cart and proceed to checkout. You’ll need to provide contact information (registrant, admin, technical contacts). This is required by ICANN. You can use the same info for all three, or different people for different roles.
Important details:
Auto-renew: Route 53 can automatically renew your domain before it expires. Enable this unless you want to manually renew every year. Domains expire after one year, and if you don’t renew, someone else can grab it.
Privacy protection: Route 53 offers privacy protection (WHOIS privacy). Without it, your contact information is publicly visible in WHOIS databases. With privacy protection, AWS’s contact info is shown instead. This is usually worth it.
After registration:
Once registered, the domain is automatically added to Route 53 as a hosted zone. You can immediately start creating DNS records. The domain usually becomes active within a few minutes, though it can take up to 48 hours for DNS to fully propagate worldwide.
Transferring existing domains:
If you already have a domain registered elsewhere, you can transfer it to Route 53. Go to Registered domains → Transfer domain. You’ll need the authorization code (EPP code) from your current registrar. The transfer process takes a few days and requires approval from your current registrar. During transfer, your domain continues to work normally.
Domain management:
All your registered domains appear in the Registered domains section. You can renew, transfer, or update contact information from there. Route 53 sends email notifications before domains expire, so you don’t accidentally lose them.
Creating DNS Records
Once you have a domain (registered or transferred), you need to create DNS records to point it to your resources. This is where the magic happens.
Hosted zones:
First, you need a hosted zone. If you registered the domain through Route 53, a hosted zone is automatically created. If you transferred a domain or want to manage DNS for an external domain, you’ll need to create a hosted zone manually. Go to Hosted zones, click Create hosted zone, enter your domain name.
How to create a record:
Go to your hosted zone, click Create record:
- Record name: Leave blank for root domain, or enter subdomain (e.g.,
www,api) - Record type: A (IPv4), AAAA (IPv6), CNAME (domain name), MX (email), TXT (text)
- Value: IP address (A), domain name (CNAME), or text (TXT)
- TTL: Cache duration (default 300 seconds)
- Routing policy: Simple (default), Weighted, Failover, Geolocation, Latency-based, etc.
CNAME vs Alias records:
CNAME:
- Points to another domain name (e.g.,
www.example.com→example.com) - Cannot be used for root domain (can’t use CNAME for
example.com) - Can point to any domain (AWS or non-AWS)
- Costs money (you pay for DNS queries)
Alias:
- Points to AWS resources (see list below)
- Can be used for root domain (can use Alias for
example.com) - Route 53 automatically resolves to correct IP addresses
- Free (no cost for DNS queries)
- Better performance (no extra DNS lookup needed)
Alias targets:
- CloudFront distributions
- Application Load Balancer (ALB)
- Network Load Balancer (NLB)
- S3 buckets (static website hosting)
- API Gateway (REST APIs)
- Elastic Beanstalk environments
- VPC interface endpoints
- Global Accelerator accelerators
- Another Route 53 record in the same hosted zone
EC2 instances cannot be Alias targets. Use A record with EC2’s public IP address instead.
When to use: Use Alias for AWS resources (recommended). Use CNAME for non-AWS resources or when you need to point to another domain name. Use A record for EC2 instances.
Example scenarios:
Want example.com to point to an EC2 instance? Create an A record with the EC2’s public IP. Want www.example.com to point to a CloudFront distribution? Create a CNAME record (or Alias) pointing to the CloudFront domain. Want api.example.com to point to an ALB? Create an Alias record pointing to the ALB.
Public vs Private Hosted Zones
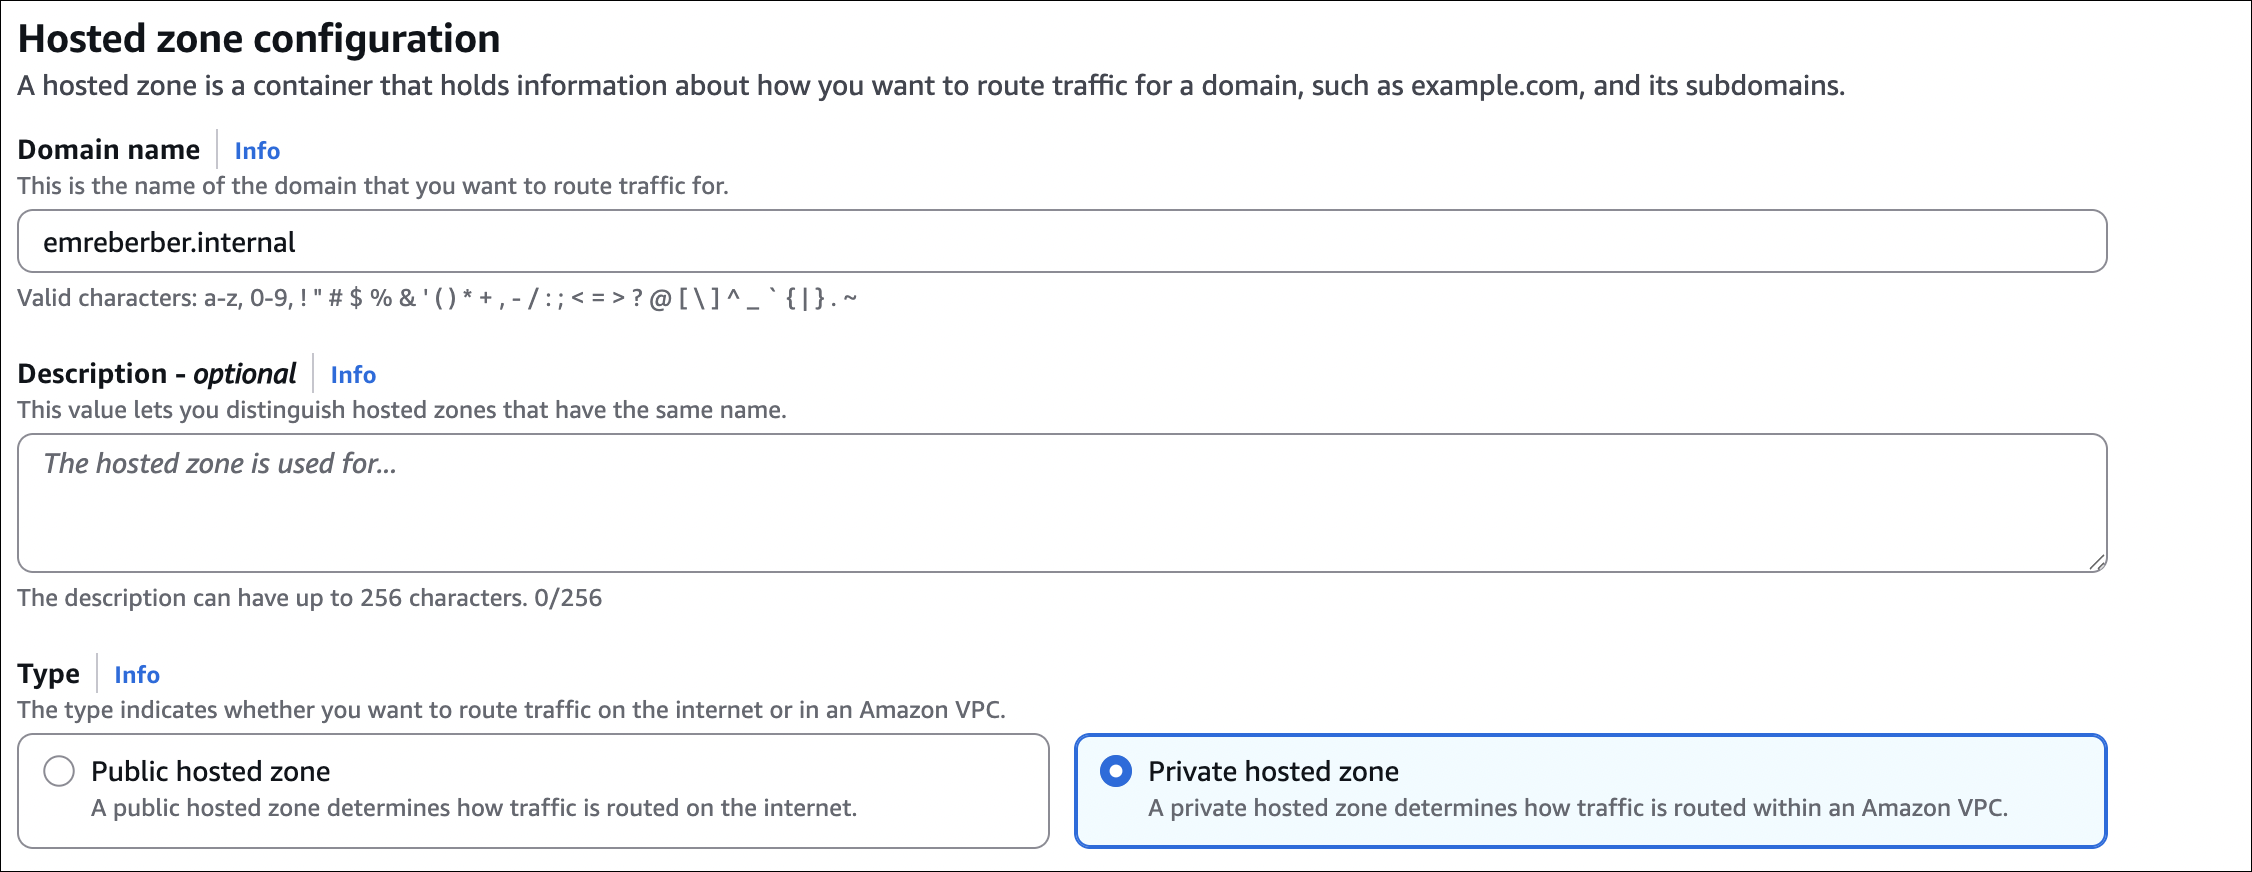
Public hosted zones:
- Resolve DNS queries from anywhere on the internet
- Used for public-facing websites, APIs, email servers
- Automatically created when you register a domain through Route 53
- Cost: $0.50 per month per zone
Private hosted zones:
- Resolve DNS queries only within associated VPCs
- Used for internal services, databases (RDS, Aurora), internal APIs
- Must associate with one or more VPCs
- Cost: $0.50 per month per zone + $0.50 per million queries

Key difference: Public zones are accessible from the internet. Private zones are only accessible from resources in associated VPCs.
Routing Policies
Route 53 supports different routing policies to control how traffic is distributed. Here’s what you need to know:
| Routing Policy | Use Case | How It Works |
|---|---|---|
| Simple | Single or multiple resources, no special routing | Returns one value randomly (if multiple values) |
| Weighted | Distribute traffic across multiple resources | Assign weights (e.g., 80% to server A, 20% to server B) |
| Failover | Primary/backup setup | Routes to primary, fails over to backup if primary is unhealthy |
| Geolocation | Route based on user’s location | Different resources for different countries/regions |
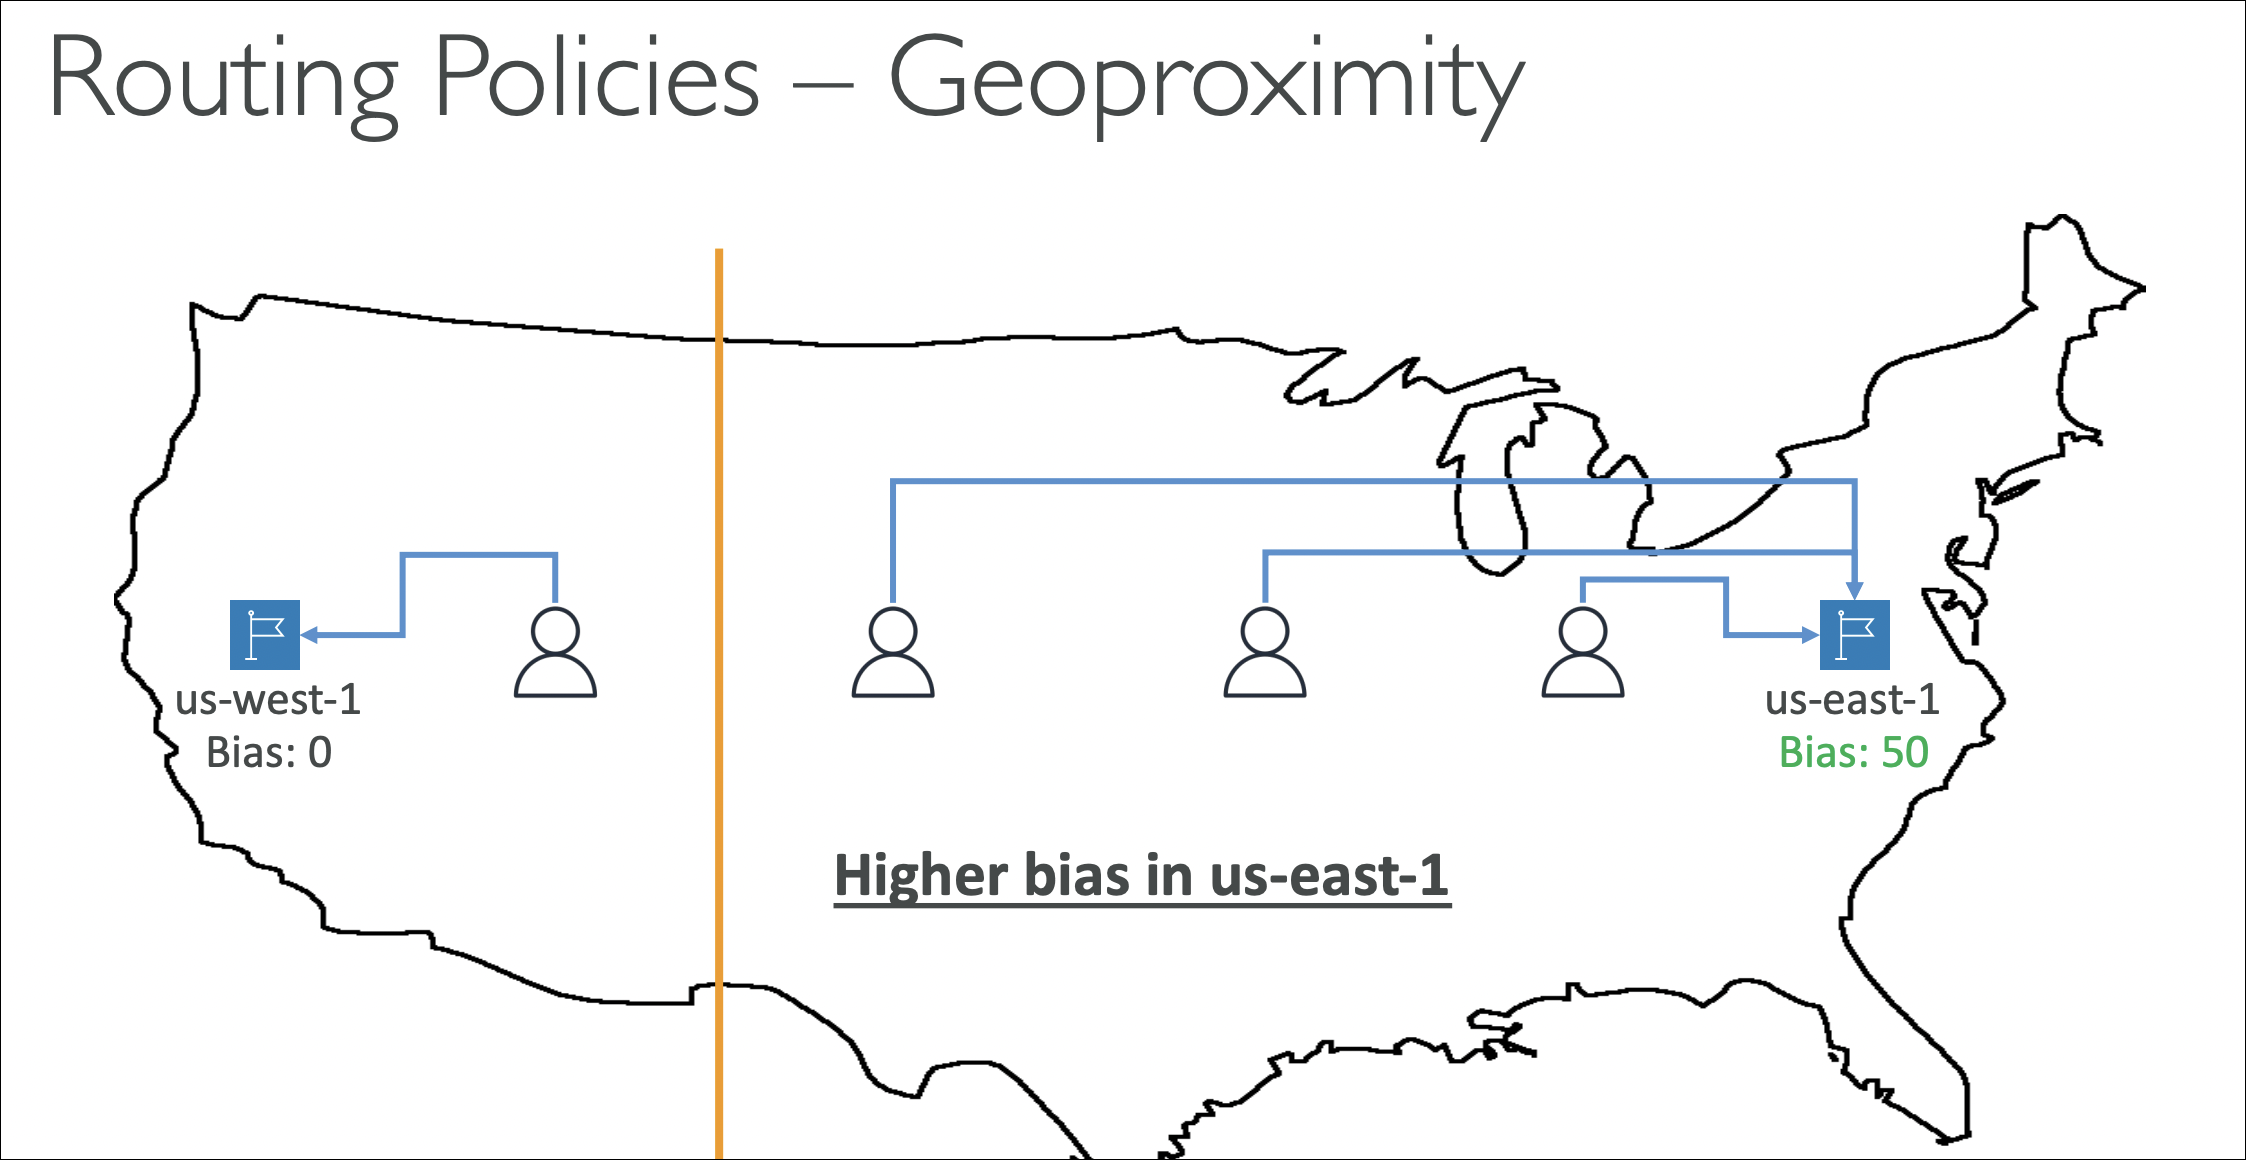
| Geoproximity | Shift traffic between regions based on distance | Uses geographic distance + bias to move more/less traffic to a region (Traffic Flow) |
| Latency-based | Route to lowest latency | Routes users to resource with lowest latency |
| Multivalue | Return multiple healthy IPs | Returns up to 8 healthy IP addresses (load balancing) |
Important notes:
- Simple: Most common, can have multiple values (Route 53 returns one randomly)
- Weighted: Good for A/B testing, gradual rollouts
- Failover: Requires health checks
- Geolocation: Can set default for locations not specified
- Geoproximity: Use Traffic Flow to gradually shift traffic between regions using bias values
- Latency-based: Routes to resource with lowest latency from user’s location
- Multivalue: Returns multiple healthy IPs (with health checks) instead of a single random one like Simple
Geolocation vs Latency-based Routing
Imagine you have two copies of the same app:
- One in Frankfurt (eu-central-1)
- One in Tokyo (ap-northeast-1)
Geolocation routing:
- You say: “Users from Turkey → Frankfurt, users from Japan → Tokyo”
- Route 53 looks at the user’s IP, figures out the country, and follows your mapping
Latency-based routing:
- You say: “Send everyone to whichever region is fastest right now”
- Example for a user in Turkey:
- Frankfurt latency: 40ms
- Tokyo latency: 250ms
- Route 53 automatically picks Frankfurt
Summary:
Geolocation = manual rule based on country/region (you decide mapping).
Latency-based = automatic choice based on real network latency (Route 53 picks the fastest region).
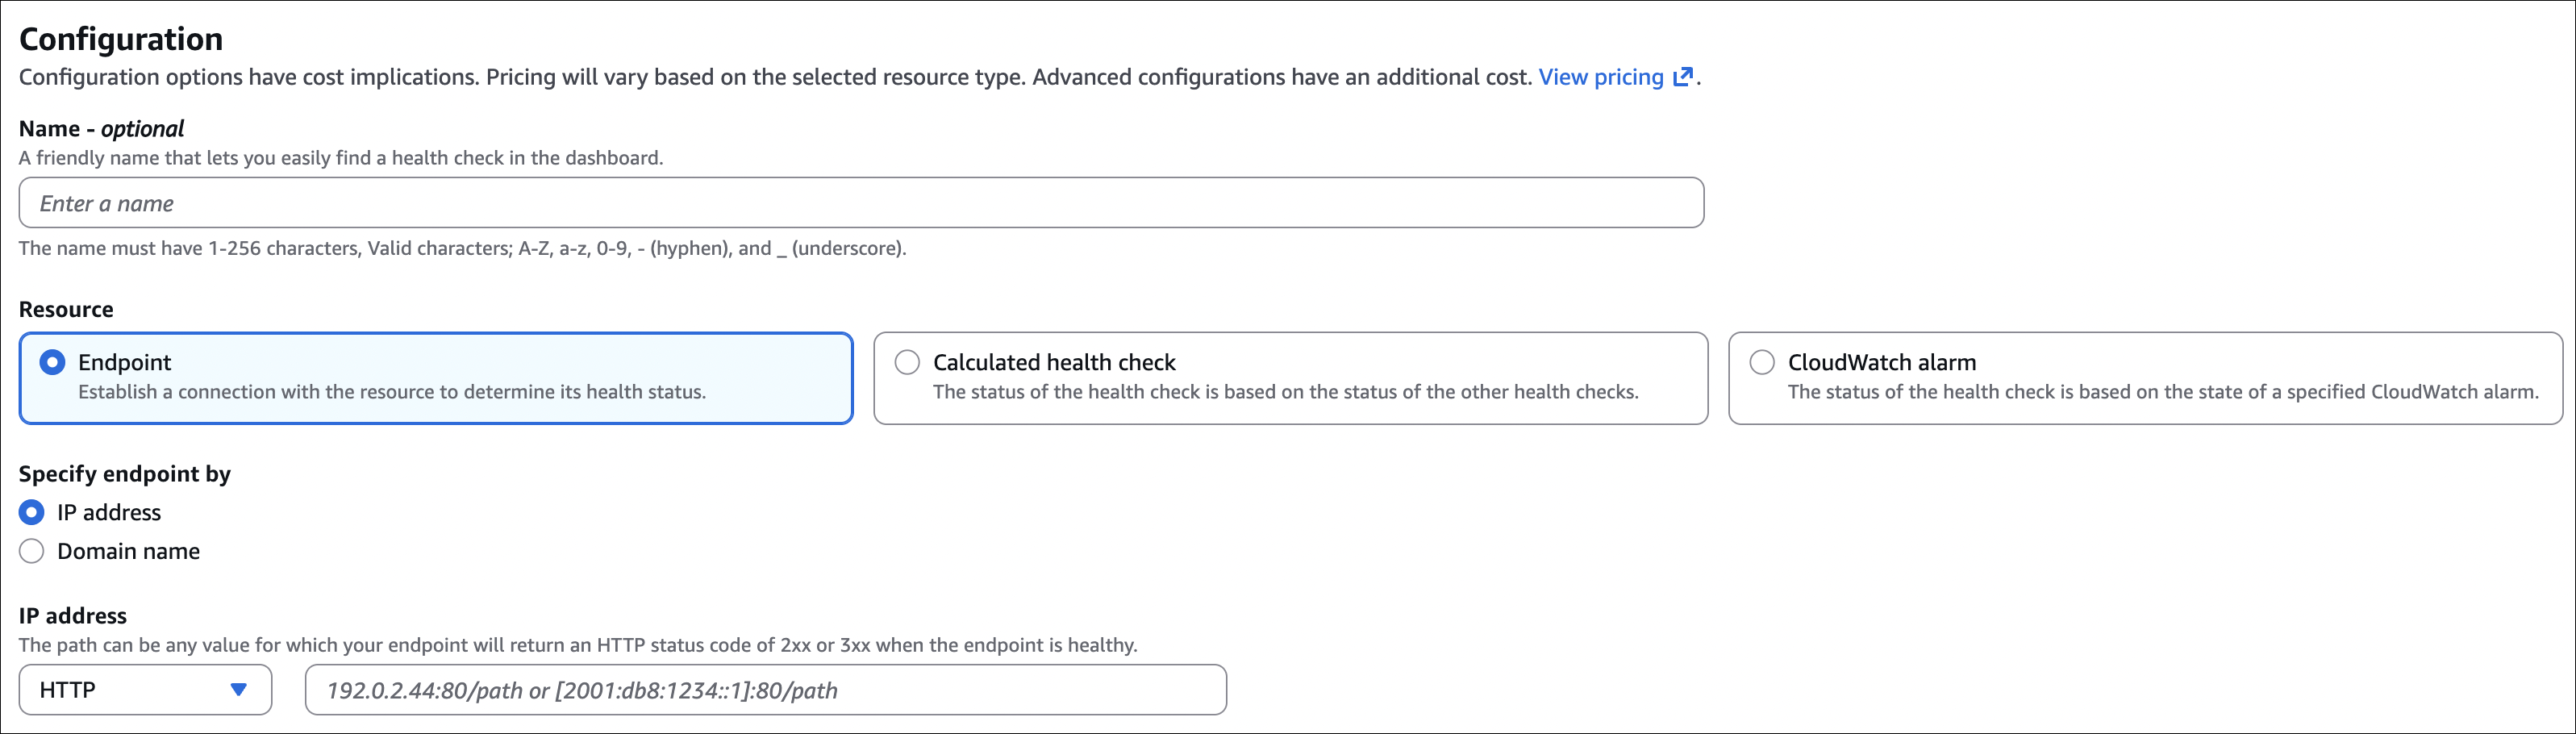
Health Checks
Route 53 health checks monitor the health of your resources and can automatically route traffic away from unhealthy endpoints.
What health checks do:
Health checks periodically check if your resources are healthy. If a resource fails health checks, Route 53 can:
- Stop routing traffic to that resource (failover routing)
- Remove it from DNS responses (multivalue routing)
- Trigger CloudWatch alarms
Health check types:
- Endpoint health check: Monitor HTTP, HTTPS, or TCP endpoints (only for public resources)
- CloudWatch alarm: Monitor CloudWatch metrics
- Calculated health check: Combine multiple health checks (AND/OR logic)
- Private hosted zone health check: Monitor resources in VPC (different mechanism)
Health check settings:
- Protocol: HTTP, HTTPS, or TCP
- Path: For HTTP/HTTPS, the path to check (e.g.,
/health) - Port: Port number (default 80 for HTTP, 443 for HTTPS)
- Interval: How often to check (10, 30 seconds, or 1 minute)
- Failure threshold: Number of consecutive failures before marking unhealthy (1-10)
- Request string matching: Check if response contains specific text
Use cases:
- Failover routing: Automatically failover to backup if primary fails
- Multivalue routing: Only return healthy IPs
- Monitoring: Get notified when resources go down
Using Route 53 with an external domain
You don’t have to buy the domain from AWS to use Route 53 for DNS. You can keep the domain at another registrar and just move the DNS to Route 53.
How it works:
- Register the domain at any registrar (Namecheap, Cloudflare, GoDaddy, etc.)
- In Route 53, create a public hosted zone with the exact same domain name (e.g.,
example.com) - Route 53 gives you 4 name servers (NS records) for that hosted zone
- Go back to your registrar and update the domain’s nameservers to these Route 53 NS values
- From that point on, Route 53 becomes the DNS provider for that domain
Then you can manage all DNS records (A, CNAME, MX, etc.) from Route 53, even though the domain itself is still registered elsewhere.
Domain registration and DNS hosting are separate things. You can keep registration anywhere, and still use Route 53 just for DNS.
Hybrid DNS (On-prem + AWS)
Hybrid DNS = combining your on-premises DNS with Route 53 so both environments can resolve each other’s names.
Typical setup:
- On-premises:
corp.local(managed by your own DNS servers) - AWS:
example.internal(Route 53 private hosted zone in your VPC)
You use Route 53 Resolver endpoints to connect them:
- Inbound endpoint: On-prem → AWS (on-prem DNS forwards
*.example.internalto Route 53) - Outbound endpoint + forwarding rules: AWS → on-prem (VPC DNS forwards
*.corp.localto on-prem DNS)
Result:
EC2 instances can resolve on-prem names, on-prem servers can resolve Route 53 private zone names. One joined DNS space across on-prem and AWS.