AWS Notes: RDS + Aurora + ElastiCache
My notes on AWS managed database services: RDS, Aurora, and ElastiCache.
Managed services = AWS handles backups, patching, scaling. You focus on your app.
Amazon RDS Overview
Managed database service. AWS handles setup, backups, patching. You just use the database.
Supported engines: MySQL, PostgreSQL, MariaDB, Oracle, SQL Server
Limitations:
- Can’t SSH into server
- Can’t install custom software
- Limited to supported engines
RDS Custom
RDS Custom is a special version of RDS that gives you more control. It removes some of the limitations of regular RDS.
What you get:
- SSH access to the database server
- OS-level access (can install custom software)
- Full control over the operating system
- Still managed by AWS (backups, patching, monitoring)
Supported engines:
- Oracle
- SQL Server
Use cases:
- Need to install custom software or agents
- Legacy applications requiring OS-level access
- Compliance requirements needing SSH access
- Custom database configurations not possible with regular RDS
Important:
- More expensive than regular RDS
- More responsibility (you manage OS, AWS manages database)
- Only for Oracle and SQL Server
- Requires more expertise
When to use: Only if you specifically need SSH/OS access. For most use cases, regular RDS is sufficient and easier to manage.
Storage Auto Scaling
Automatically increases storage when running low. Prevents “storage full” errors.
How it works:
- Monitors storage usage
- When reaches threshold (default 90%) → automatically increases
- No downtime
- Set max storage limit → RDS grows up to that limit
Configuration:
- Enable Storage autoscaling when creating/modifying
- Set Maximum storage threshold (e.g., start 100 GB, max 1000 GB)
- Scaling trigger: Default 90%
Important:
- Storage can only increase, never decrease
- Increases: 10% of current storage (minimum 5 GB)
- Pay only for storage you use
When to use: Production databases, unpredictable growth
Read Replicas
Read-only copies of primary database. Used for read scaling.
How it works:
- Create replica from primary
- Asynchronous replication (slight delay, eventual consistency)
- Application reads from replica, writes go to primary
- Distributes read load
Use cases:
- Read scaling (offload read queries)
- Reporting/analytics (heavy queries on replica)
- Disaster recovery (promote replica to primary)
- Cross-region (low latency reads in different regions)
Important:
- Read-only (can’t write to replicas)
- Up to 5 read replicas per primary
- Each replica can have different instance type
- Can be in different regions
- Can promote to standalone primary (breaks replication)
Read Replicas vs Multi-AZ:
Multi-AZ:
- Primary + standby replica in different AZ
- Synchronous replication (no data loss)
- Automatic failover (if primary fails, standby takes over)
- Purpose: High availability (HA)
- Can’t read from standby (standby is passive, only for failover)
Read Replicas:
- Read-only copies of primary
- Asynchronous replication (slight delay, eventual consistency)
- Manual promotion (you decide when to promote)
- Purpose: Read scaling
- Can read from replicas (that’s the point)
| Feature | Multi-AZ | Read Replicas |
|---|---|---|
| Replication | Synchronous | Asynchronous |
| Failover | Automatic | Manual promotion |
| Purpose | High availability | Read scaling |
| Can read from | No (standby only) | Yes |
You can have both: Multi-AZ for HA, Read Replicas for read scaling.
Cost:
- Same region (any AZ): Replication FREE ✅
- Cross-region: Data transfer CHARGED per GB
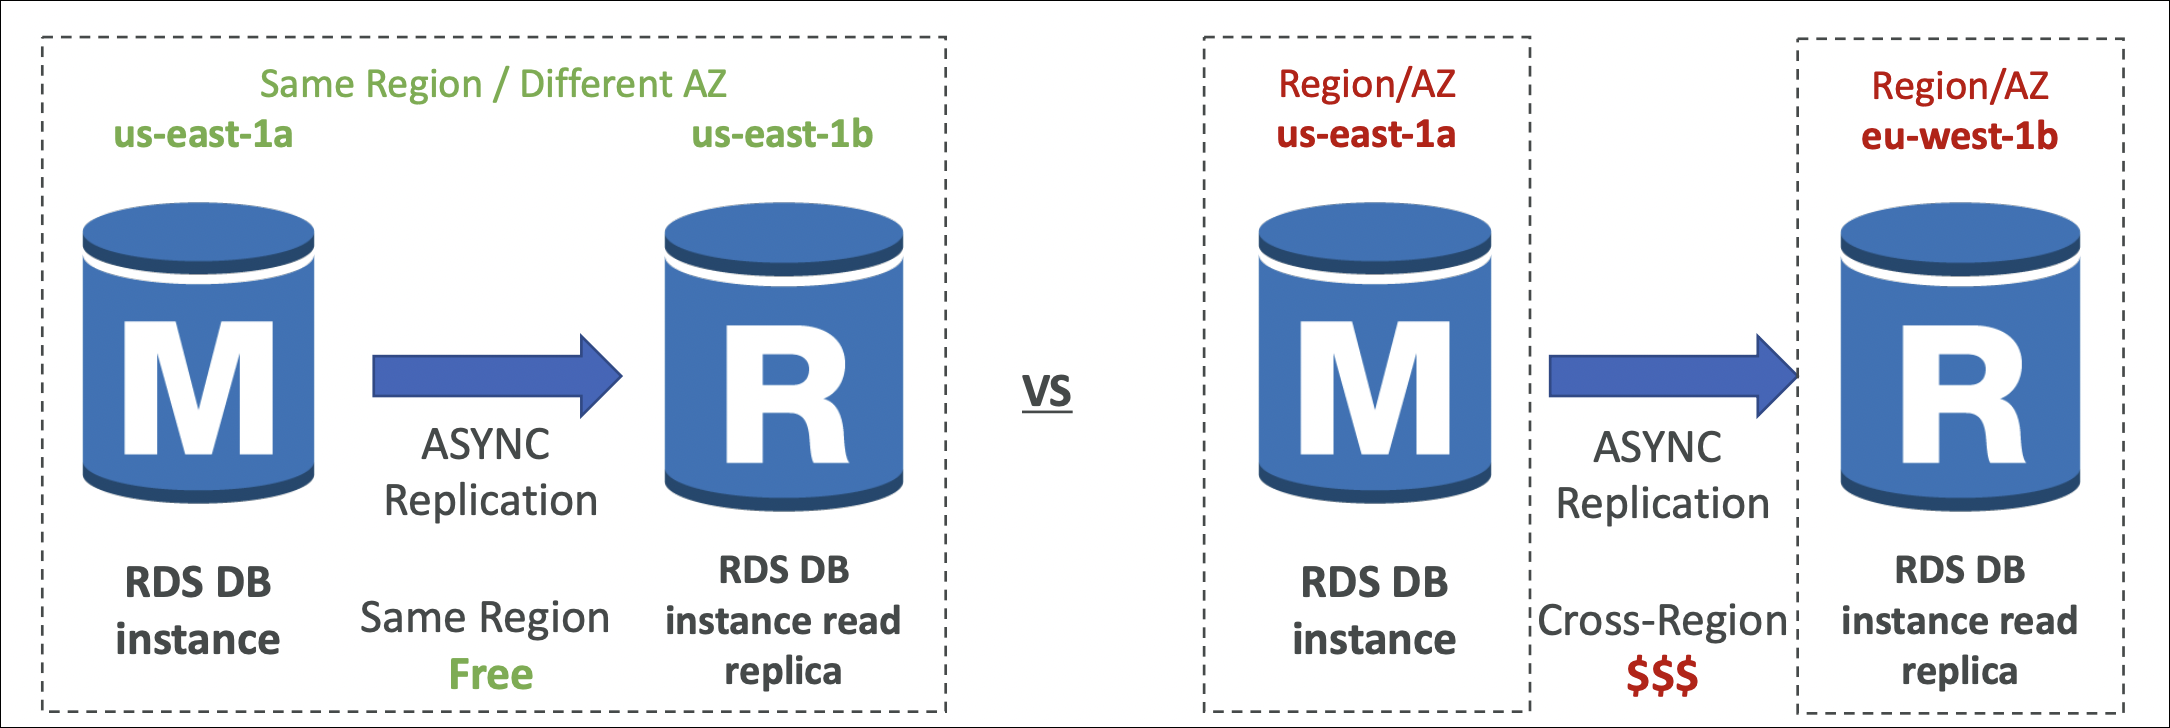
Example:
- Primary: us-east-1a, Replica: us-east-1b (same region) → FREE
- Primary: us-east-1, Replica: eu-west-1 (different regions) → CHARGED
When to use: Heavy read workloads, reporting queries, need to scale reads
Hands-On: Creating RDS MySQL Instance
Let’s create a MySQL RDS instance with public access for testing.
Step 1: Create RDS Instance
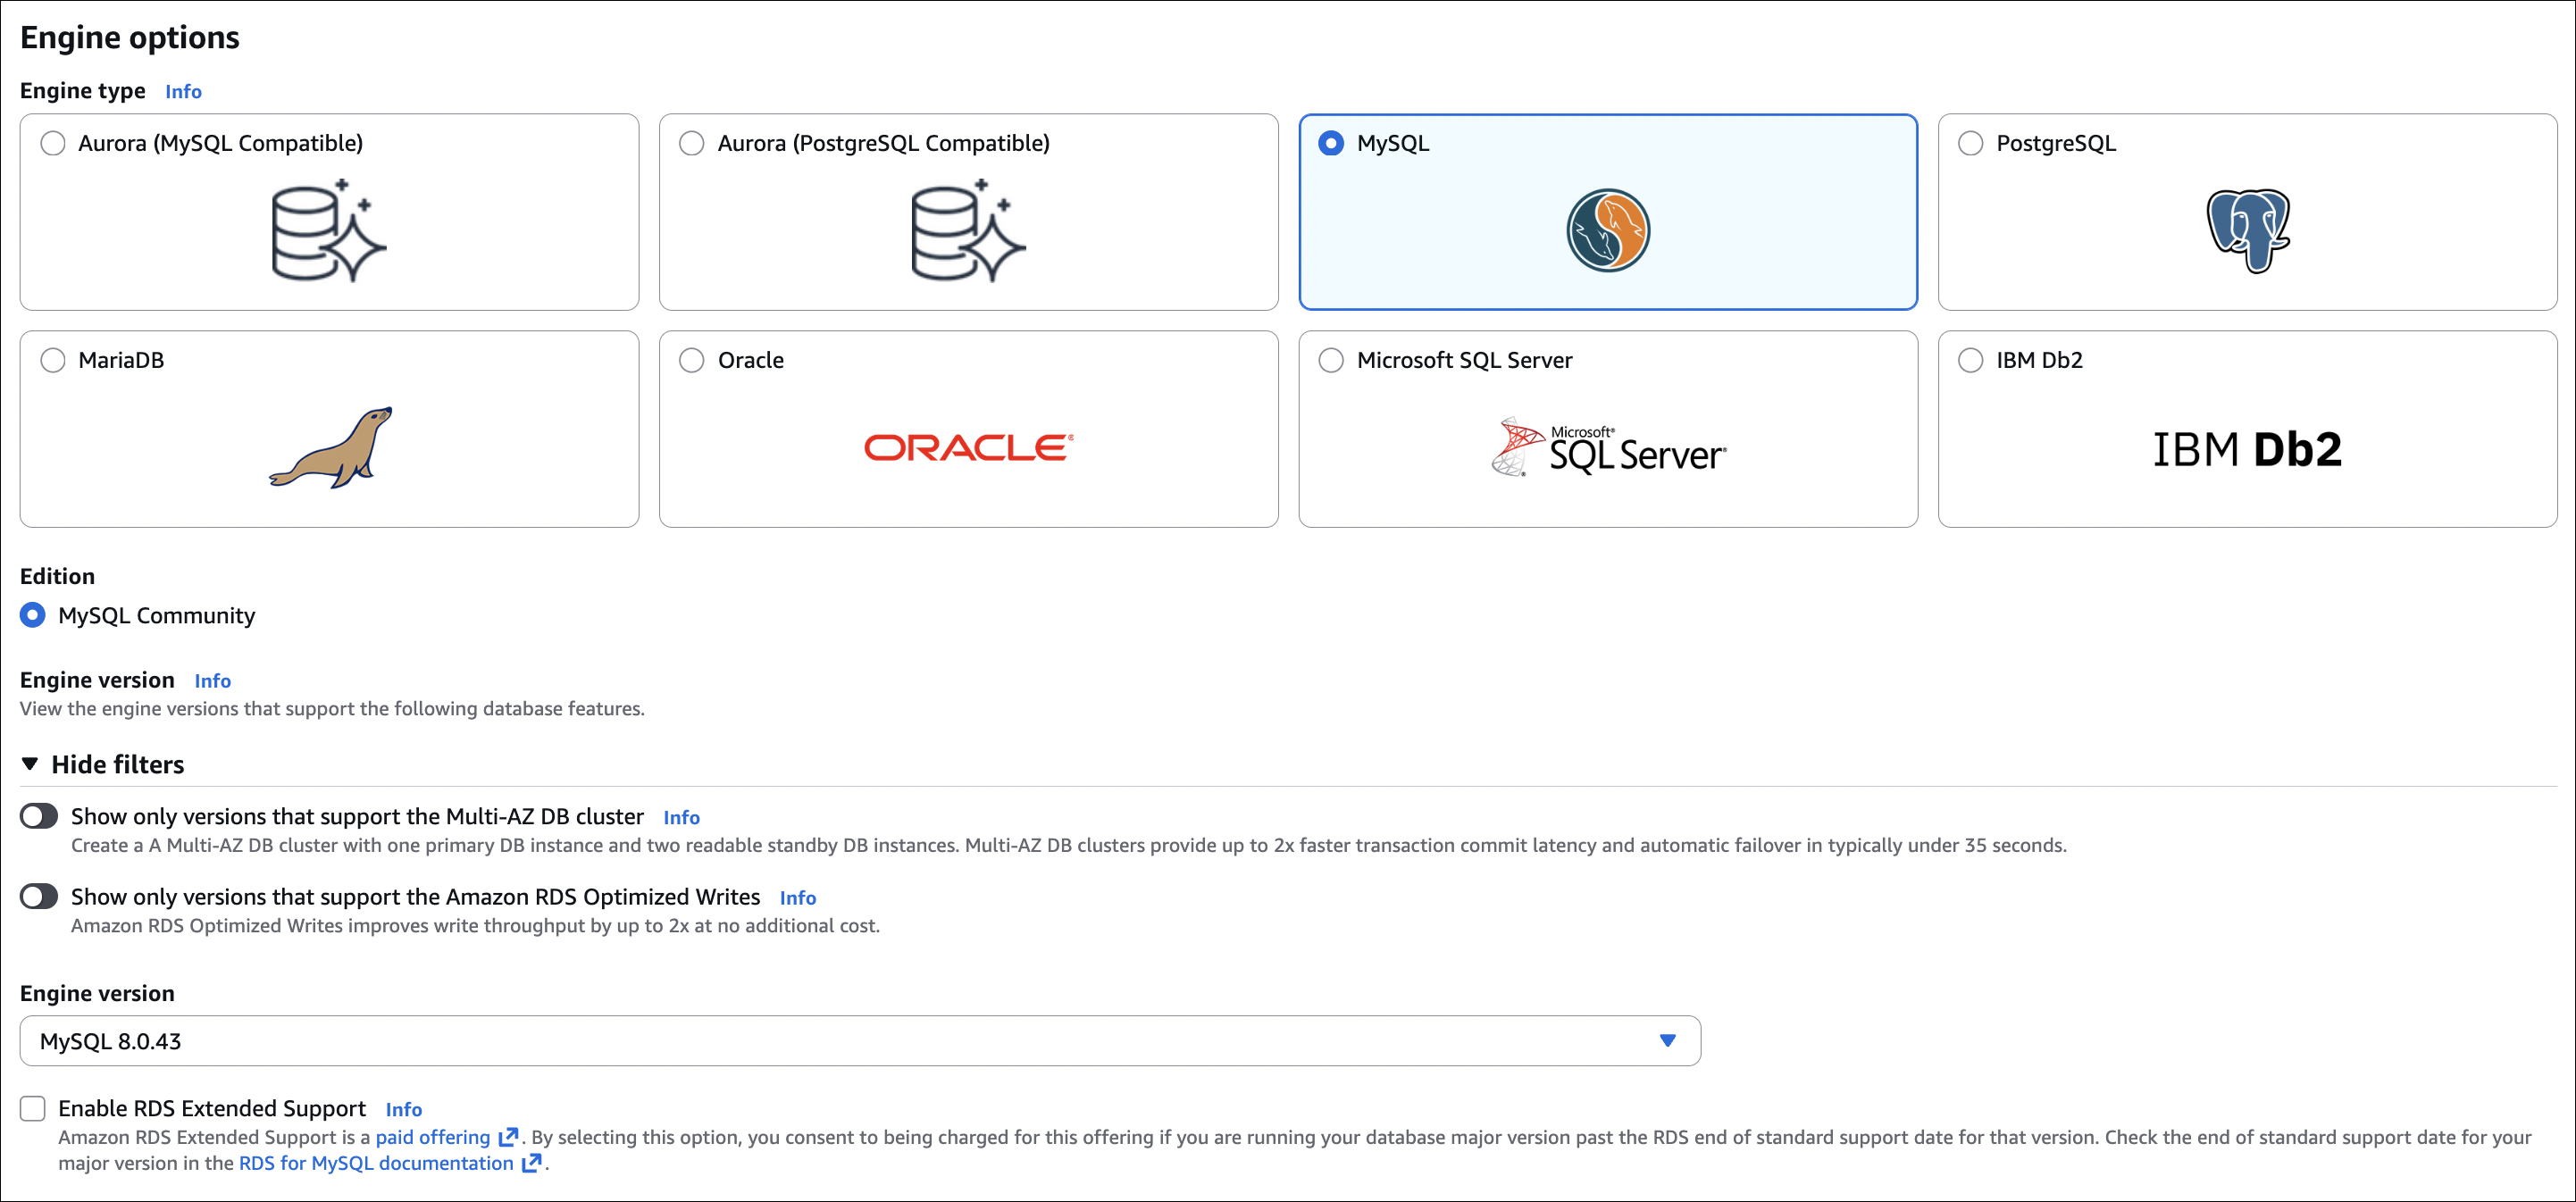
- Go to RDS → Databases → Create database
- Engine: MySQL
- Version: Latest (or specific version)
- Template: Free tier (or Production)
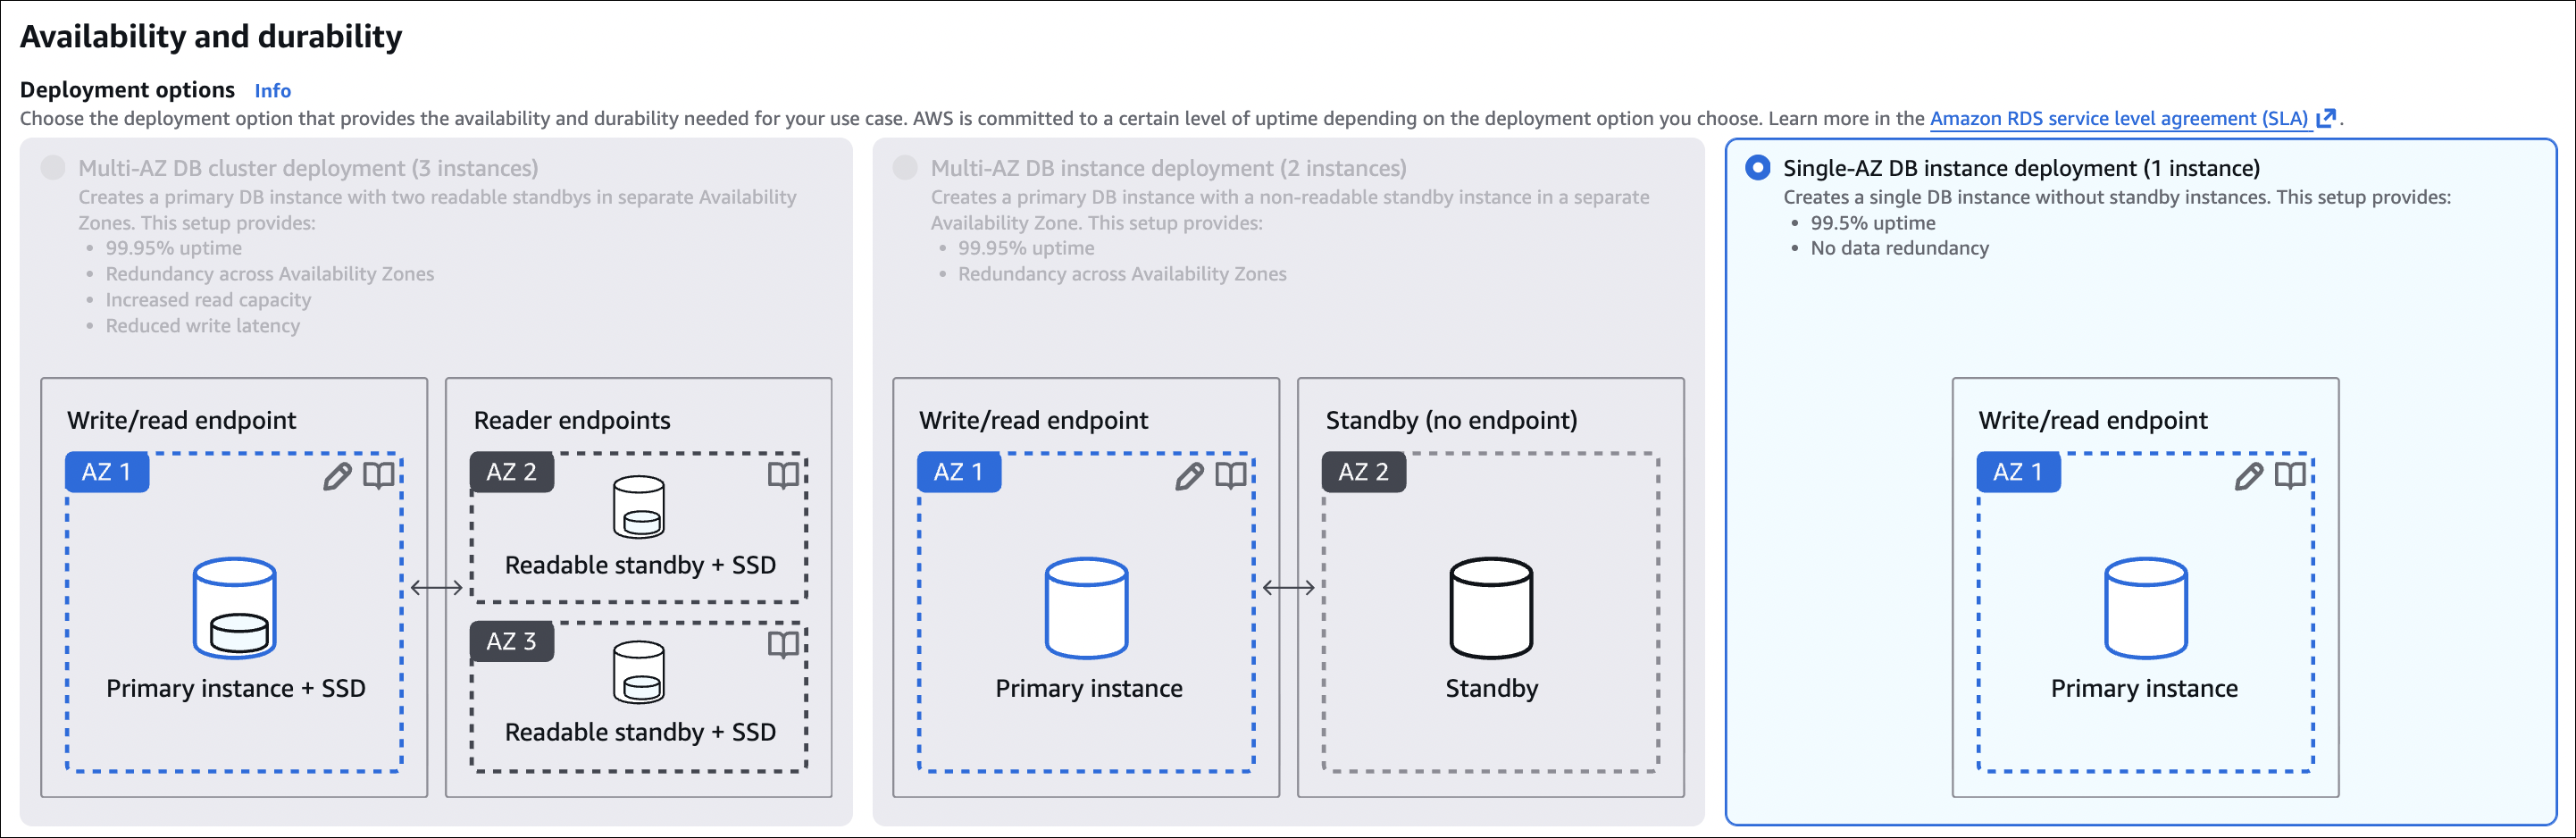
- Availability and durability:
- Multi-AZ deployment: No (for testing) or Yes (for production)
- For testing, select No (cheaper)
- For production, select Yes (high availability)
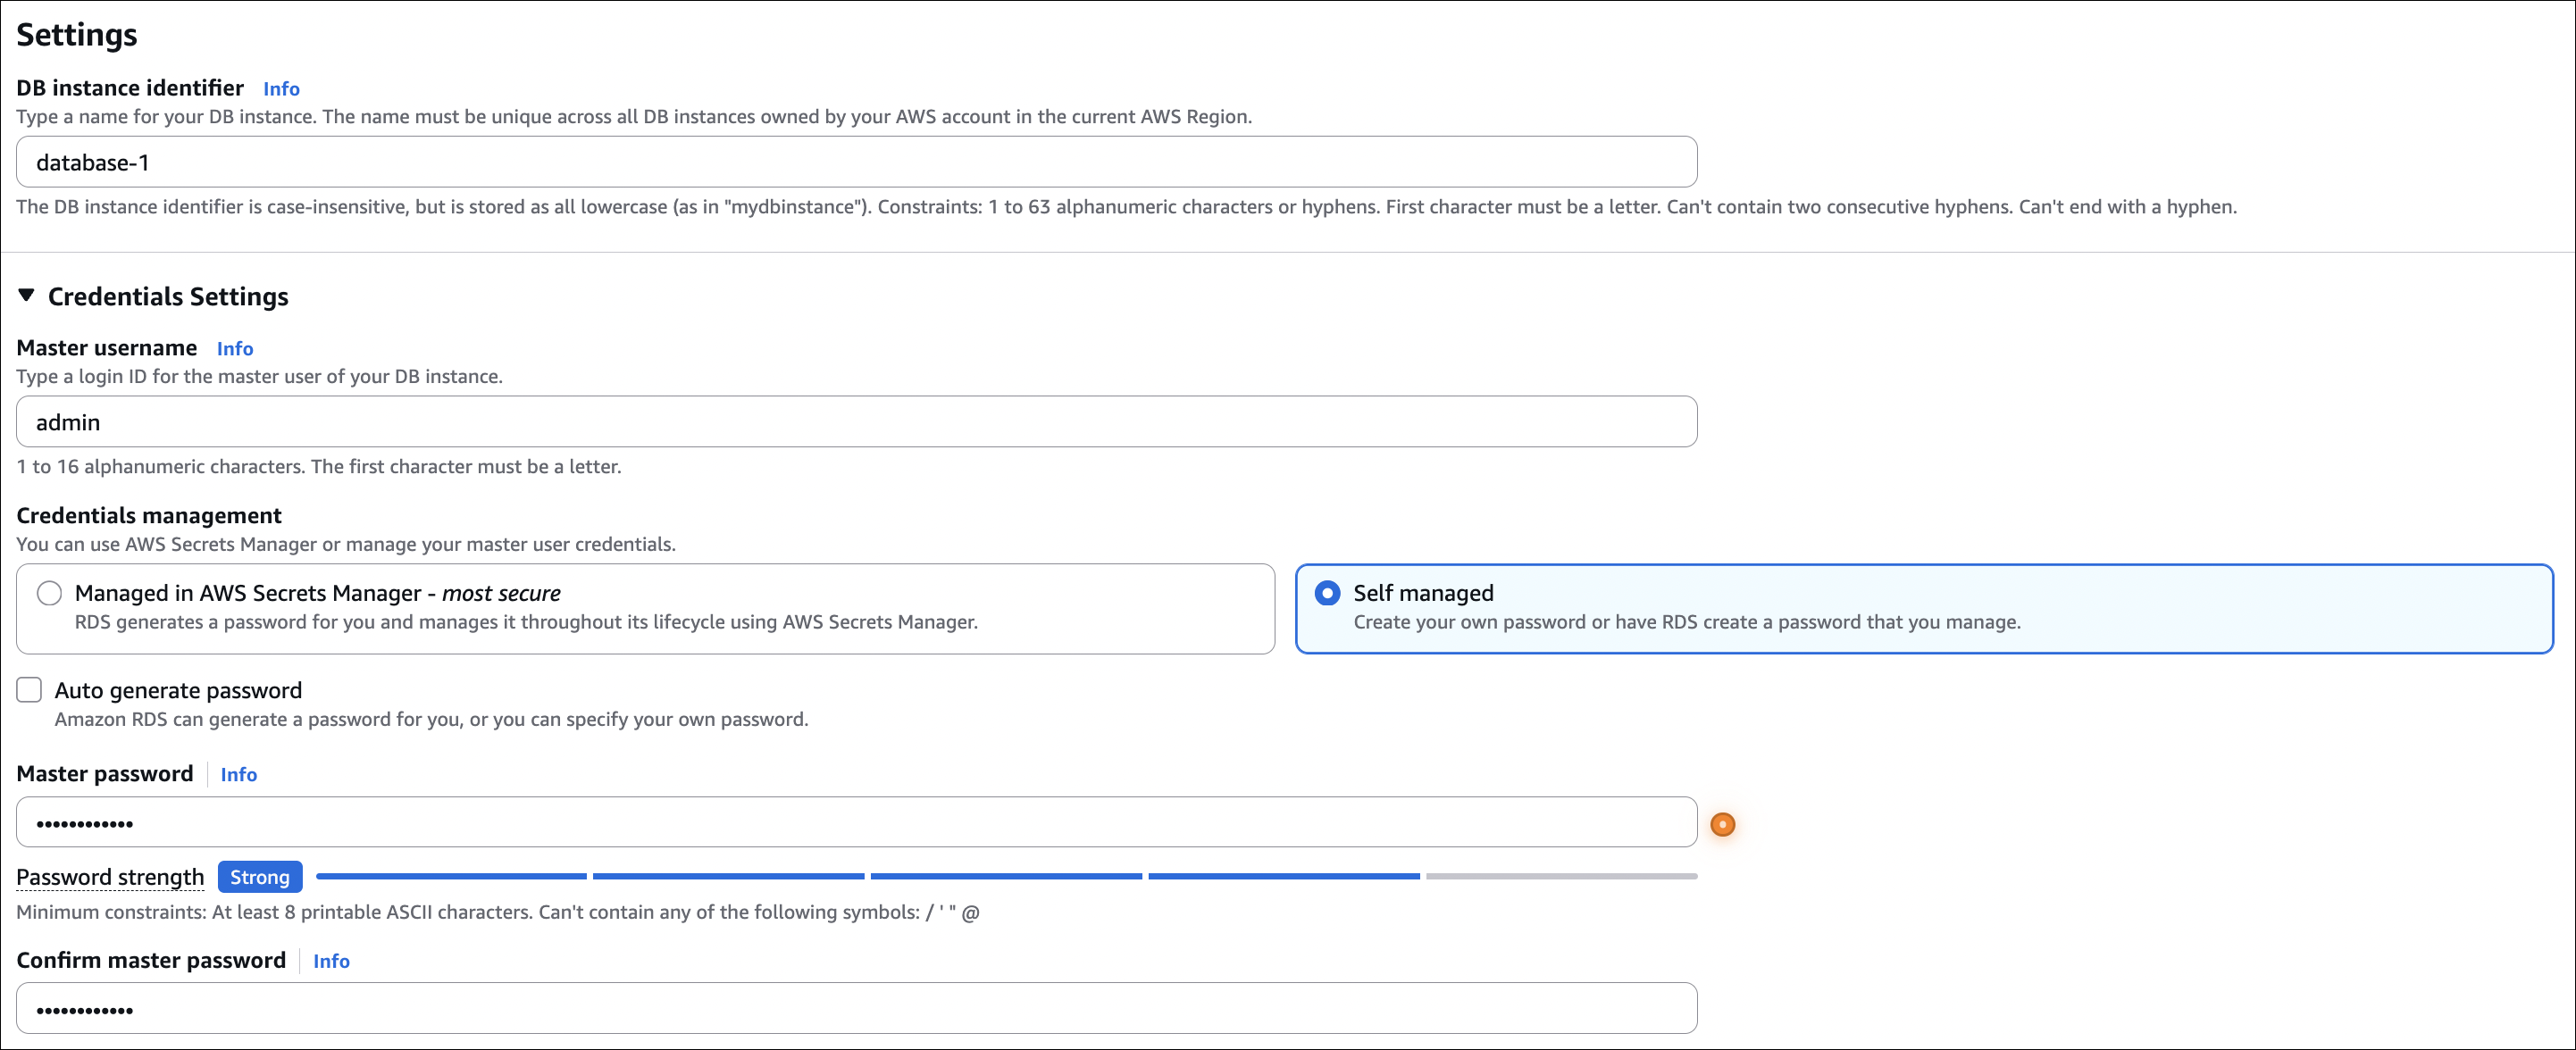
- DB instance identifier:
my-mysql-db - Master username:
admin(or your choice) - Master password: Set a strong password (save it!)
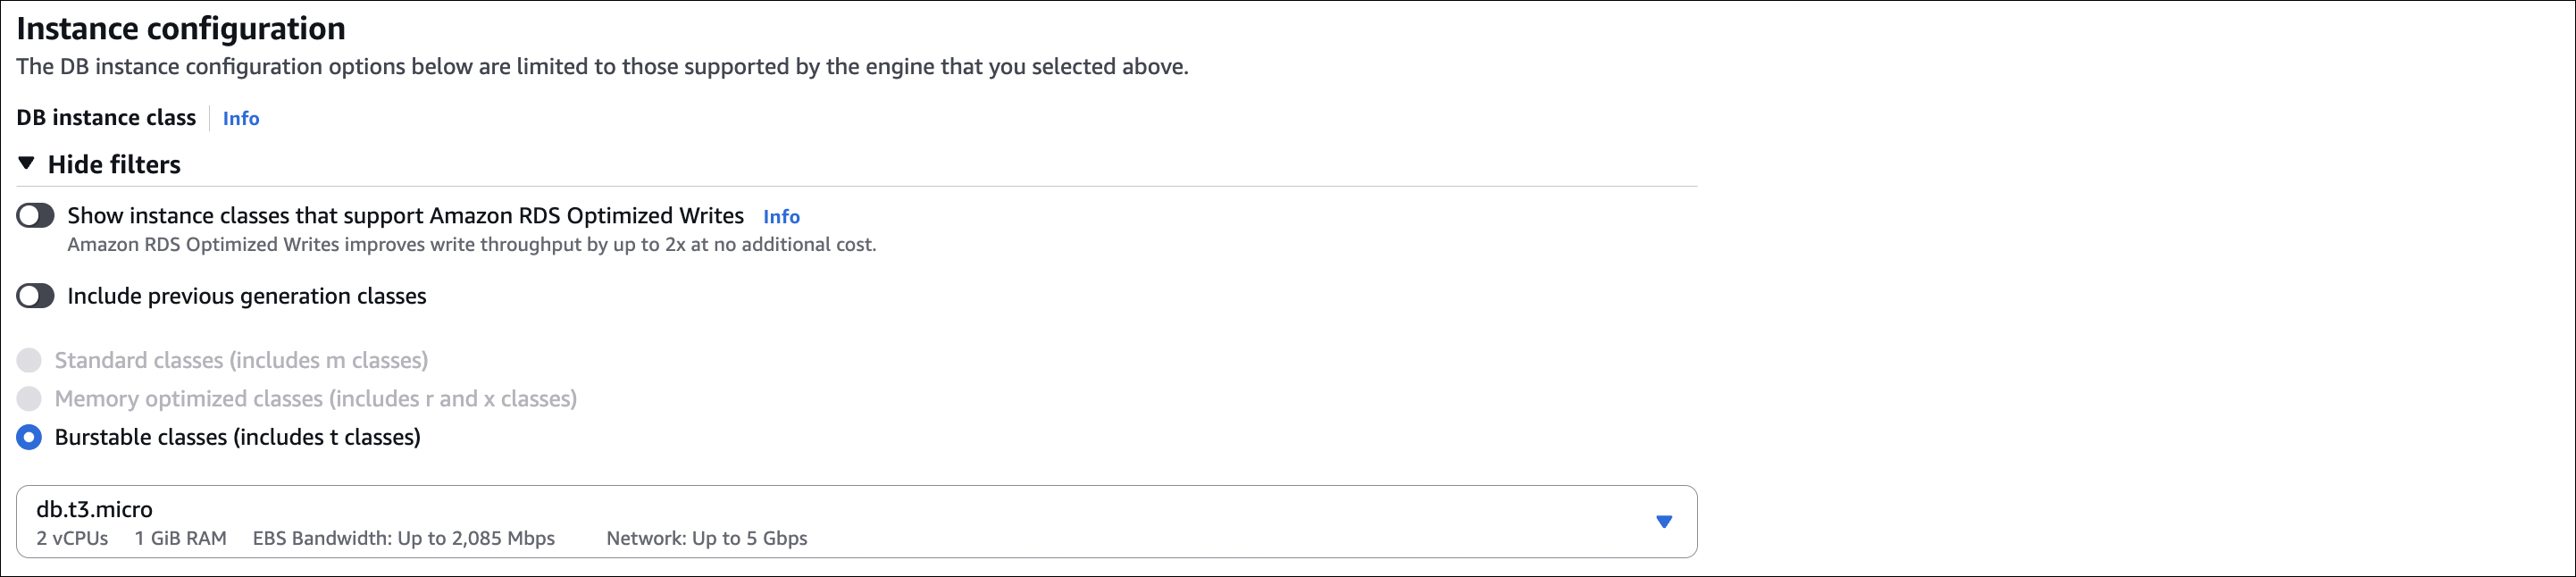
- DB instance class: db.t3.micro (free tier) or db.t3.small
- Storage:
- Storage type: General Purpose SSD (gp3)
- Allocated storage: 20 GB (minimum)
- Storage autoscaling: Enable (optional, set max to 100 GB)
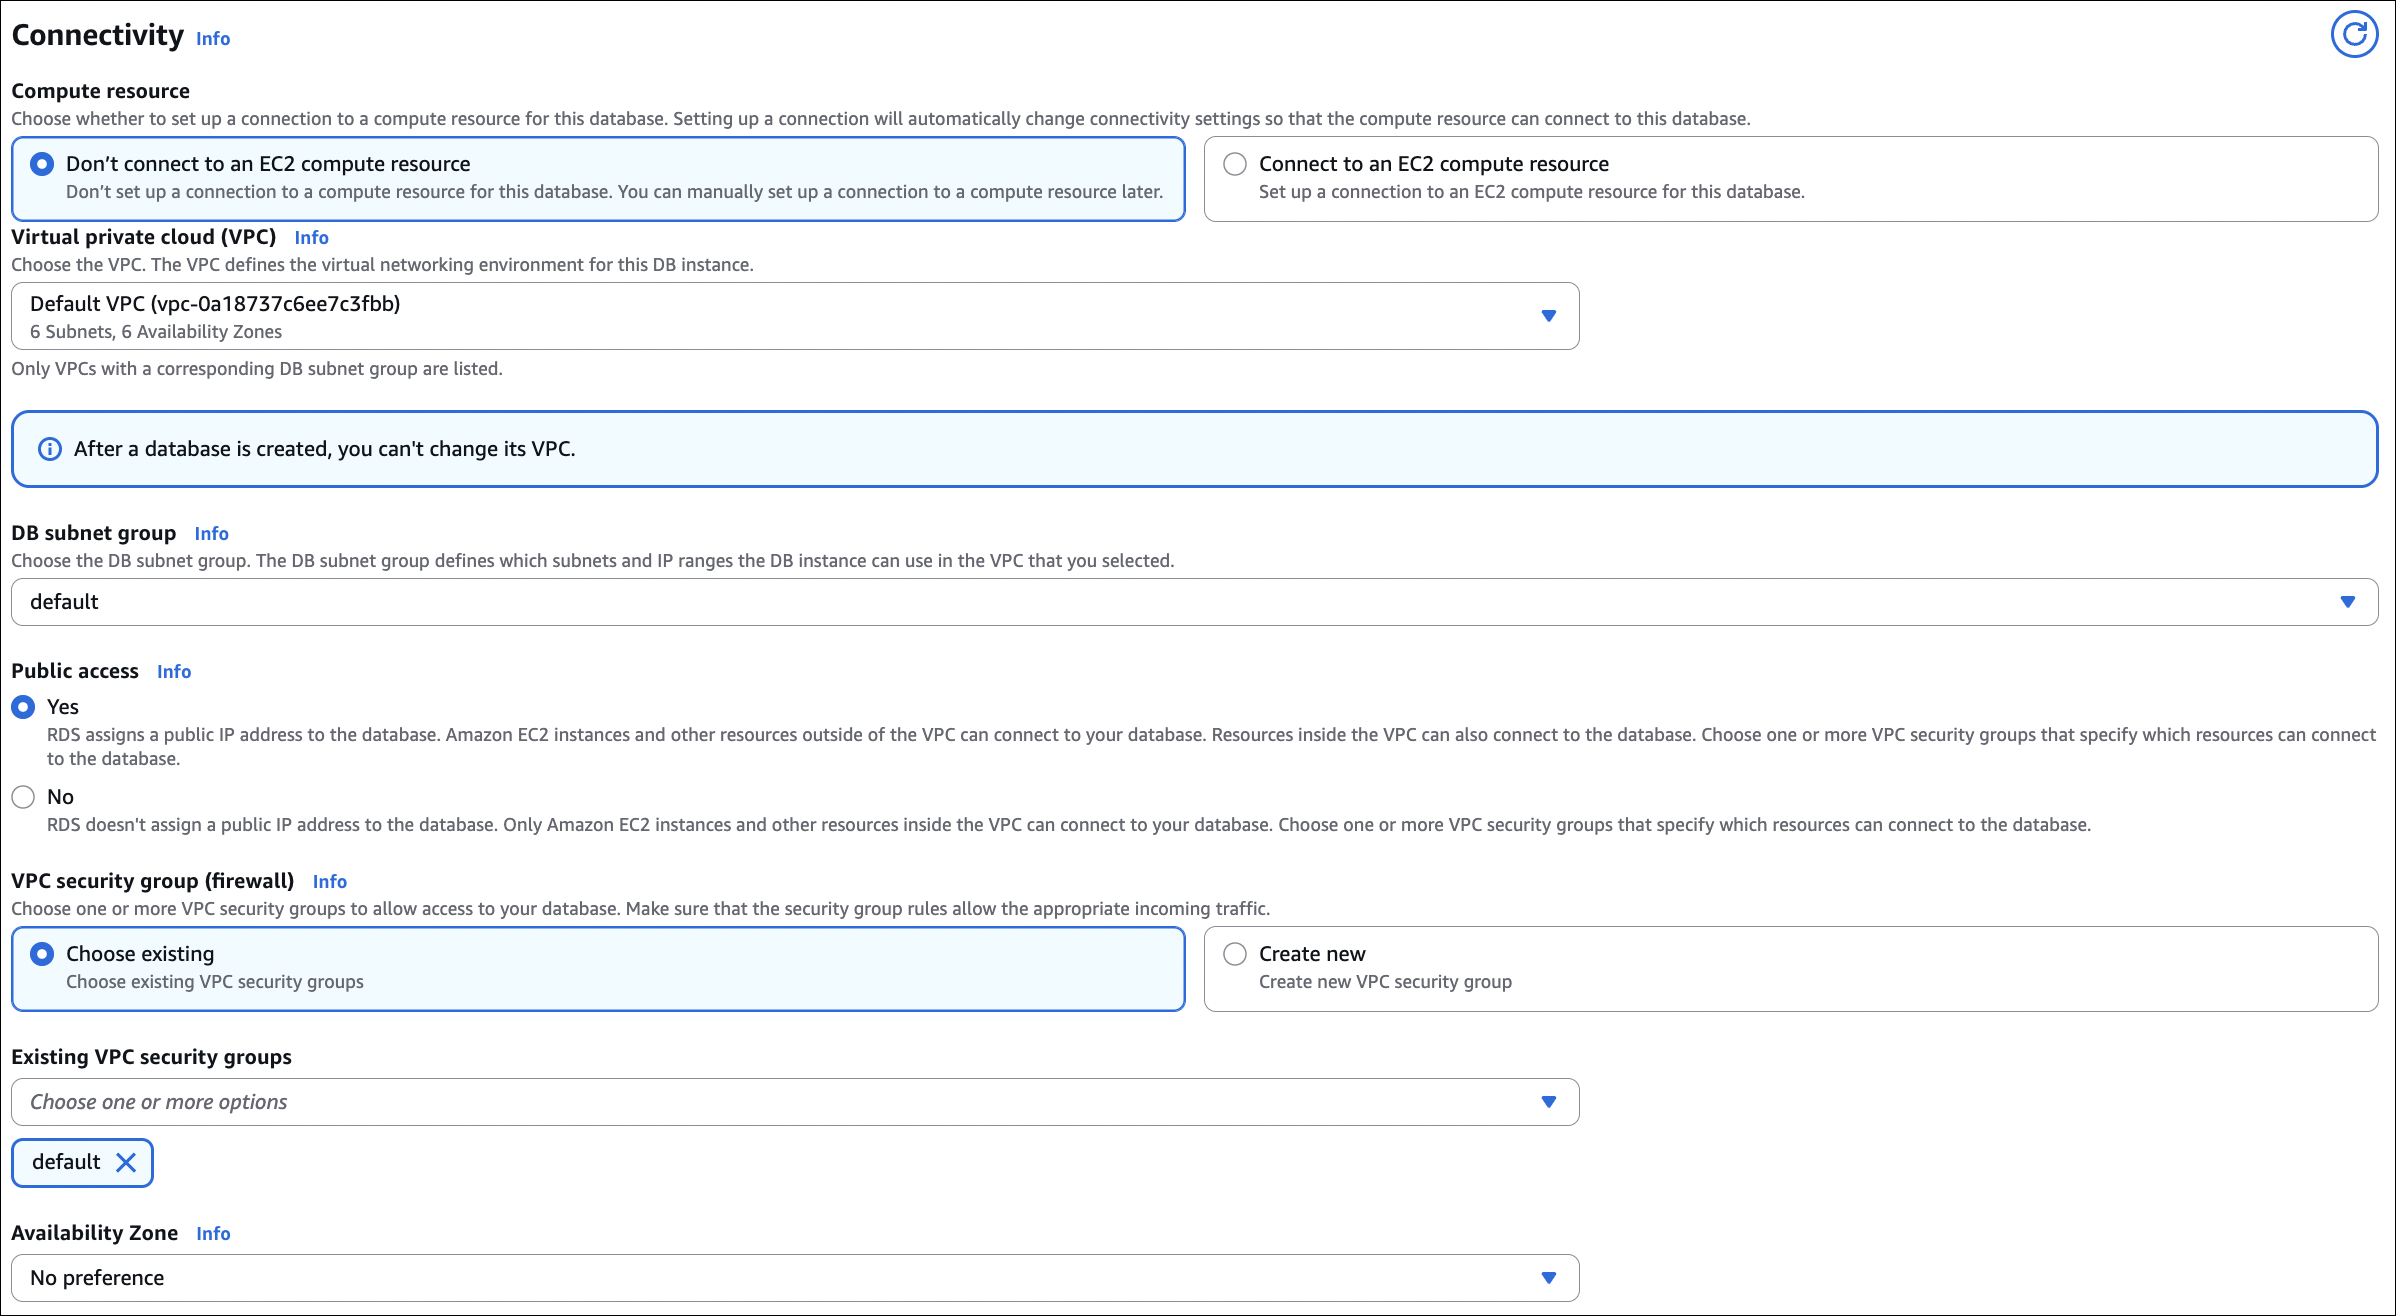
- Connectivity:
- VPC: Select your VPC
- Subnet group: Default (or create new)
- Public access: Yes (for testing)
- VPC security group: Create new or select existing
- Availability Zone: No preference (or select specific)
- Database authentication: Password authentication
- Initial database name:
mydb(optional)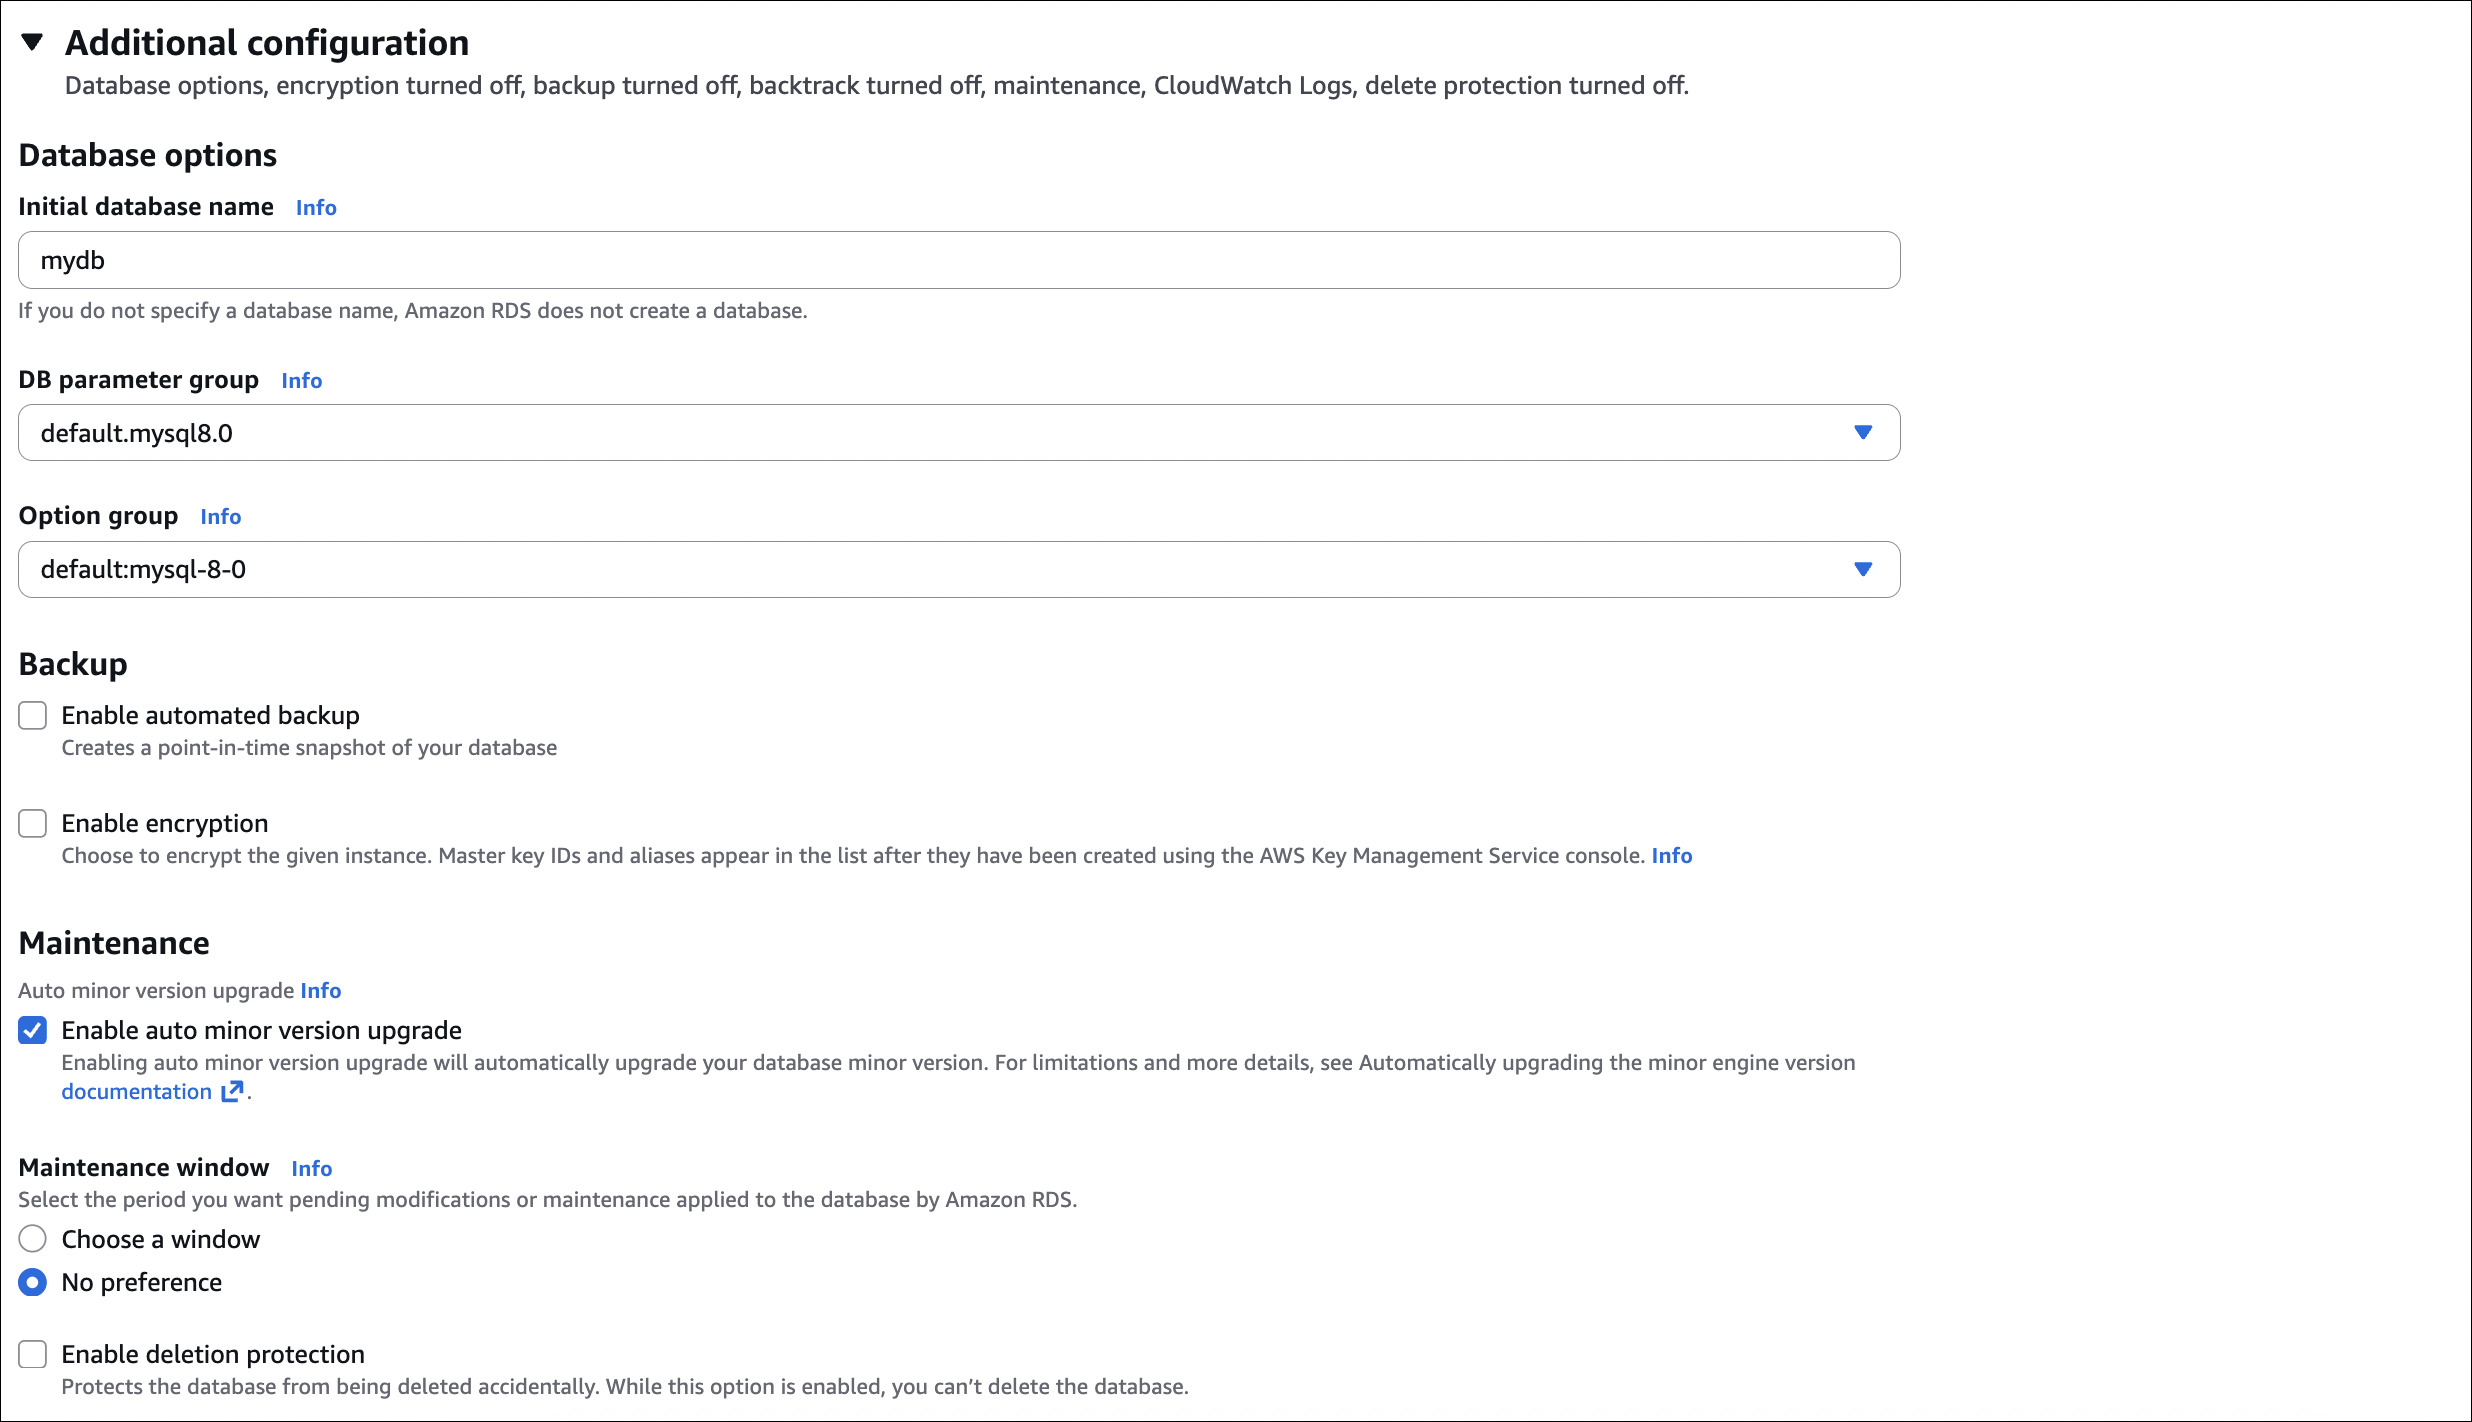
- Click Create database
Wait for creation: Takes 5-10 minutes. Status will change from “Creating” to “Available”.
Step 2: Configure Security Group
After RDS is created, we need to allow MySQL access:
- Go to EC2 → Security Groups
- Find the security group attached to your RDS instance
- Inbound rules: Add rule
- Type: MySQL/Aurora
- Port: 3306
- Source: Your IP address (or 0.0.0.0/0 for testing, not recommended for production)
- Click Save rules
Step 3: Get Connection Endpoint
- Go to RDS → Databases → Select your database
- Note the Endpoint (e.g.,
my-mysql-db.xxxxx.us-east-1.rds.amazonaws.com) - Note the Port (default 3306)
Step 4: Test Connection
Using MySQL client:
1
mysql -h my-mysql-db.xxxxx.us-east-1.rds.amazonaws.com -u admin -p
Enter password when prompted. You should connect successfully.
Test queries:
1
2
3
4
5
SHOW DATABASES;
USE mydb;
CREATE TABLE test (id INT, name VARCHAR(50));
INSERT INTO test VALUES (1, 'Hello RDS');
SELECT * FROM test;
Using MySQL Workbench or other GUI tools:
- Host: Your RDS endpoint
- Port: 3306
- Username: admin (or your master username)
- Password: Your master password
Important notes:
- Public access: Enabled for testing. For production, disable public access and use VPN or bastion host.
- Security group: Must allow MySQL (port 3306) from your IP
- Endpoint: Use the endpoint, not IP address (endpoint can change)
- Password: Save your master password securely
Amazon Aurora
Aurora is AWS’s cloud-native database. Compatible with MySQL/PostgreSQL, but built for AWS. Faster, more scalable, more reliable than RDS.
📖 Deep dive: For a detailed explanation of Aurora architecture and internals, check out this AWS Aurora Deep Dive.
Key differences from RDS:
- Shared storage: Auto-scales to 128 TB, shared across all instances
- 6-way replication: Data copied 6 times across 3 AZs (2 per AZ)
- Performance: 3-5x faster than RDS
- Read replicas: Up to 15 (vs 5 for RDS)
- Failover: < 30 seconds (vs 60-120 seconds for RDS)
- Backup: Continuous to S3 (no performance impact)
Aurora features:
- Aurora Serverless: Auto-scales compute, pay per second, can pause
- Aurora Global Database: Cross-region replication (up to 16 regions)
- Backtrack: Rewind database to any point in time (up to 72 hours)
- Fast clone: Create new cluster from snapshot in minutes
Aurora vs RDS:
| Feature | RDS | Aurora |
|---|---|---|
| Performance | Standard | 3-5x faster |
| Storage | Fixed size | Auto-scales to 128 TB |
| Read replicas | Up to 5 | Up to 15 |
| Failover | 60-120 seconds | < 30 seconds |
| Cost | Lower | Higher |
When to use:
- Aurora: Need high performance, high availability, many replicas, auto-scaling storage
- RDS: Standard performance is enough, cost is a concern, simple use cases
Creating an Aurora Cluster - Hands-On Example
Let’s create an Aurora MySQL cluster step by step:
Step 1: Create Aurora Cluster
- Go to RDS → Databases → Create database
- Engine type: Amazon Aurora
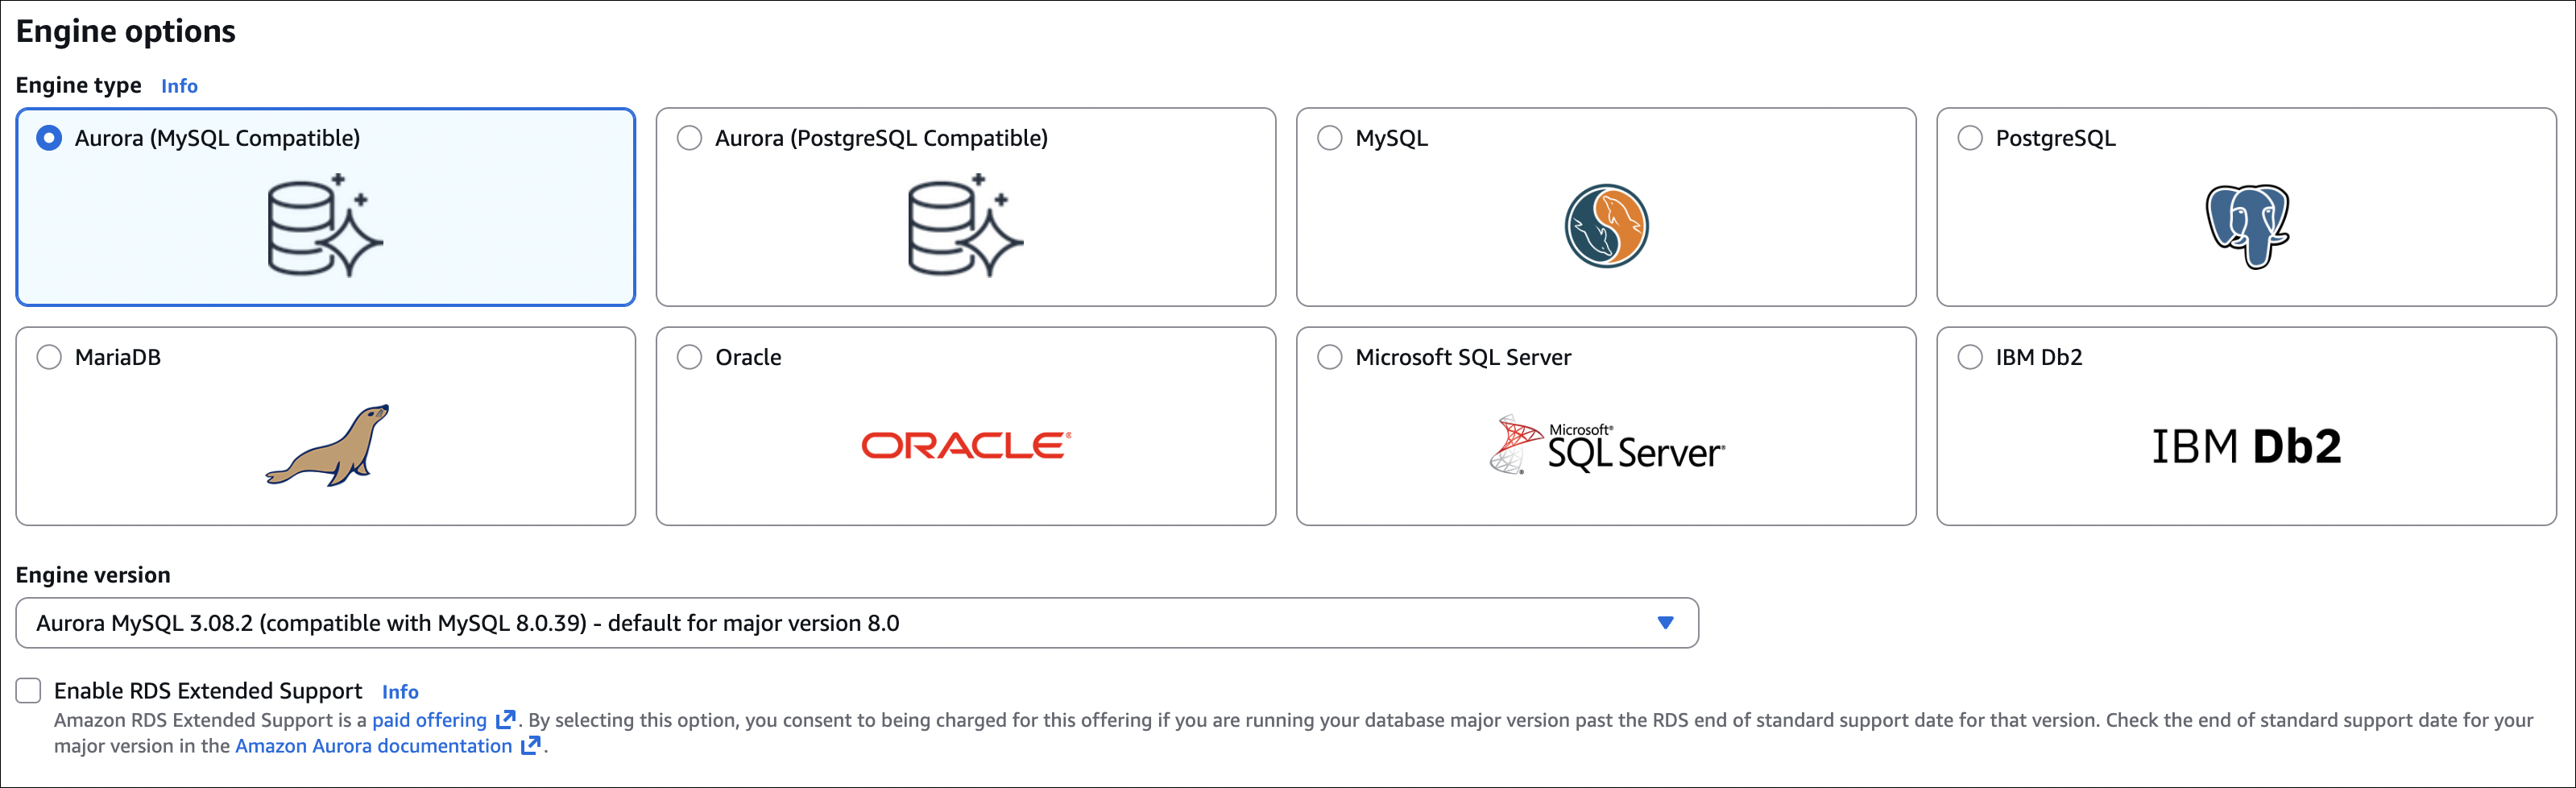
- Edition: Aurora (MySQL-Compatible) or Aurora (PostgreSQL-Compatible)
- Version: Latest (or specific version)
- Template: Production (or Dev/Test)
- DB cluster identifier:
my-aurora-cluster - Master username:
admin(or your choice) - Master password: Set a strong password (save it!)
- Storage configuration:
- Storage type:
- Standard: Lower cost, good for most workloads
- IO Optimized: Higher cost, better I/O performance (lower latency, higher throughput)
- Choose based on your I/O requirements

- Storage type:
- DB instance class: db.r6g.large (or smaller for testing)
- Availability and durability:
- Multi-AZ deployment: Yes (recommended for production)
- Creates primary instance + 1 replica in different AZ

- Connectivity:
- VPC: Select your VPC
- Subnet group: Default (or create new)
- Public access: Yes (for testing) or No (for production)
- VPC security group: Create new or select existing
- Availability Zone: No preference (or select specific)
- Database authentication: Password authentication
- Initial database name:
mydb(optional) - Backup retention period: 7 days (default, can change)
- Backtrack: Enable if needed (up to 72 hours)
- Click Create database
Wait for creation: Takes 10-15 minutes. Status will change from “Creating” to “Available”.

Step 2: Configure Security Group
After Aurora cluster is created, allow MySQL access:
- Go to EC2 → Security Groups
- Find the security group attached to your Aurora cluster
- Inbound rules: Add rule
- Type: MySQL/Aurora
- Port: 3306
- Source: Your IP address (or 0.0.0.0/0 for testing, not recommended for production)
- Click Save rules
Step 3: Get Connection Endpoints
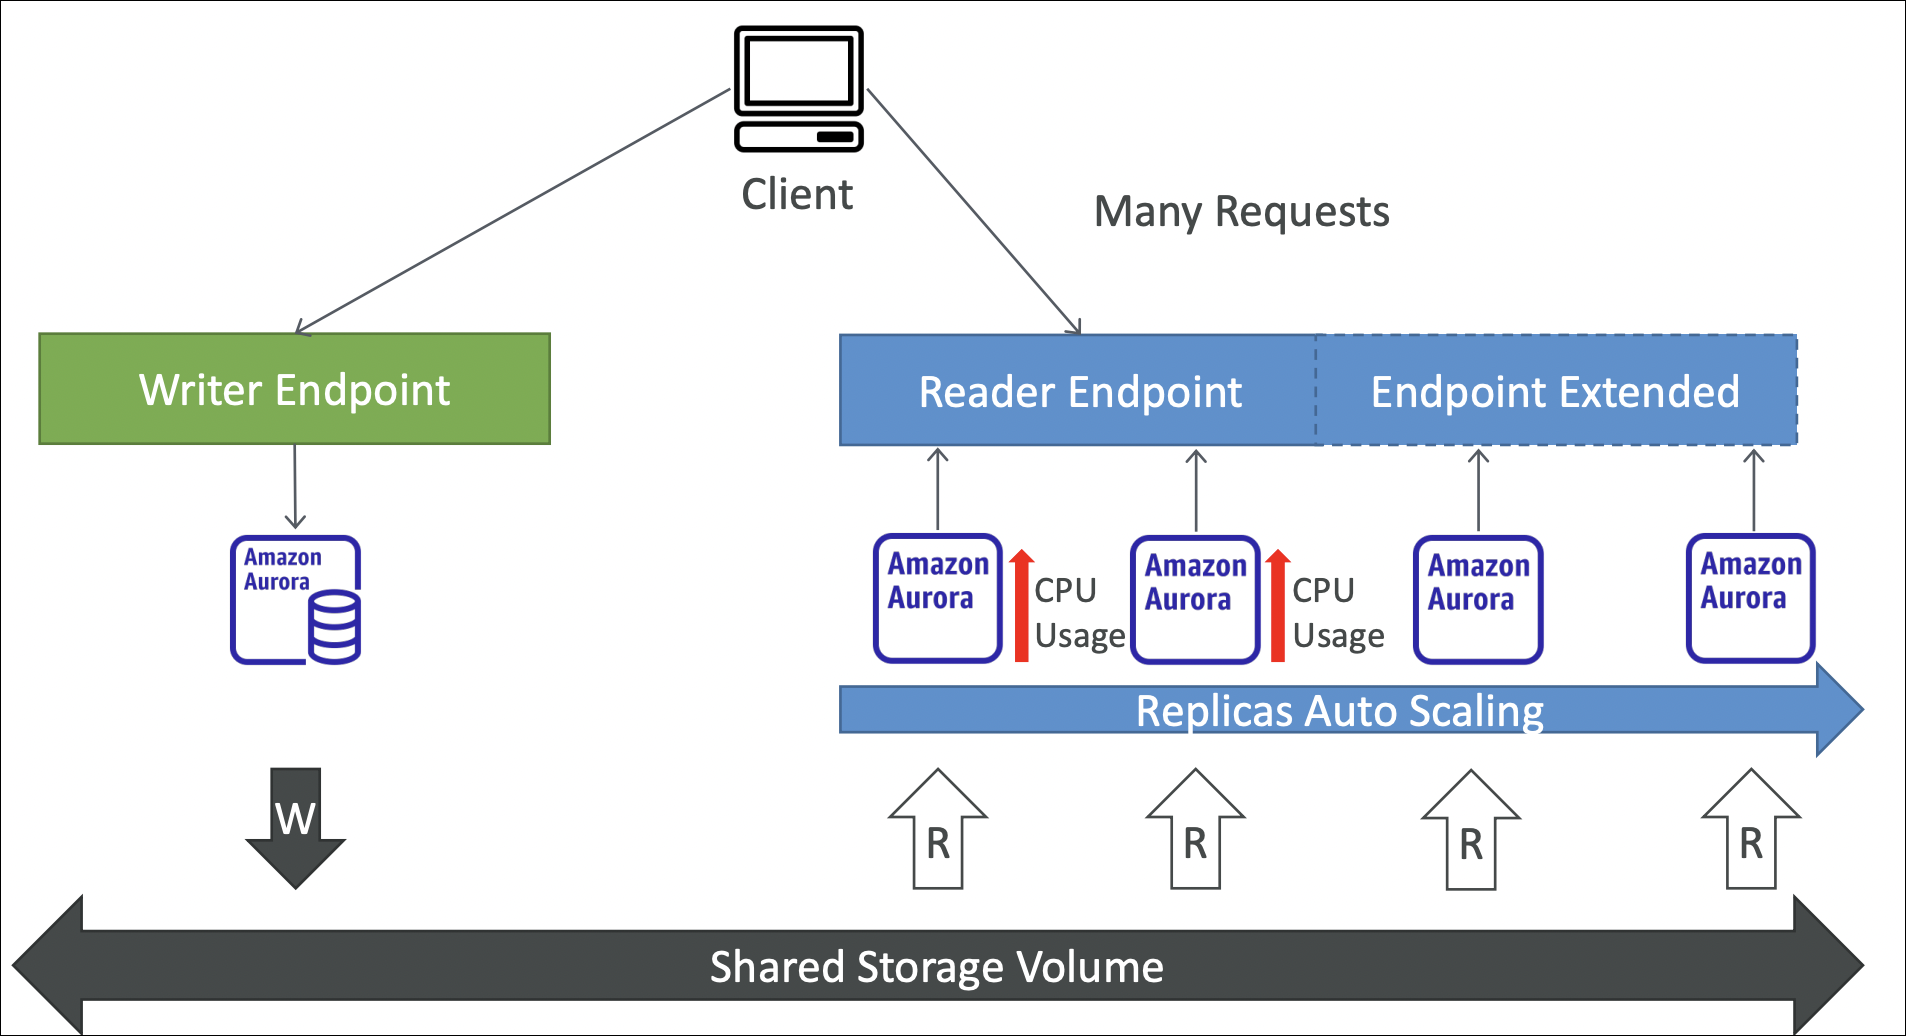
Aurora has two endpoints:
- Cluster endpoint: Always points to primary instance (for writes)
- Format:
my-aurora-cluster.cluster-xxxxx.region.rds.amazonaws.com - Use this for: Write operations, applications that need primary
- Format:
- Reader endpoint: Load balances across all read replicas (for reads)
- Format:
my-aurora-cluster.cluster-ro-xxxxx.region.rds.amazonaws.com - Use this for: Read operations, scaling reads
- Format:
Where to find:
- Go to RDS → Databases → Your cluster
- Click on cluster name
- Connectivity & security tab
- Copy Writer endpoint (cluster endpoint) or Reader endpoint

Step 5: Add Read Replica (Optional)
To add a read replica to your cluster:
- Go to RDS → Databases → Your cluster
- Click Actions → Add reader
- DB instance identifier:
my-aurora-cluster-instance-2 - DB instance class: Same as primary (or different)
- Availability Zone: Different from primary (recommended)
- Click Add reader
Note: Read replicas share the same storage as primary. They’re not separate databases, just additional compute instances for reads.
Step 6: Add Auto Scaling Policy for Read Replicas
Aurora can automatically add/remove read replicas based on load. You need at least 1 read replica before enabling auto-scaling.
Steps:
- Go to RDS → Databases → Your cluster
- Click on your cluster name
- Go to Configuration tab
- Scroll down to Auto Scaling section
- Click Add Auto Scaling policy
- Policy name:
aurora-read-replica-scaling(or your choice) - Target metric:
- CPUUtilization: Target 70% (scales up if CPU > 70%, scales down if < 70%)
- ACUUtilization: Target 70% (Aurora Capacity Units)
- DatabaseConnections: Target value (e.g., 100 connections per replica)
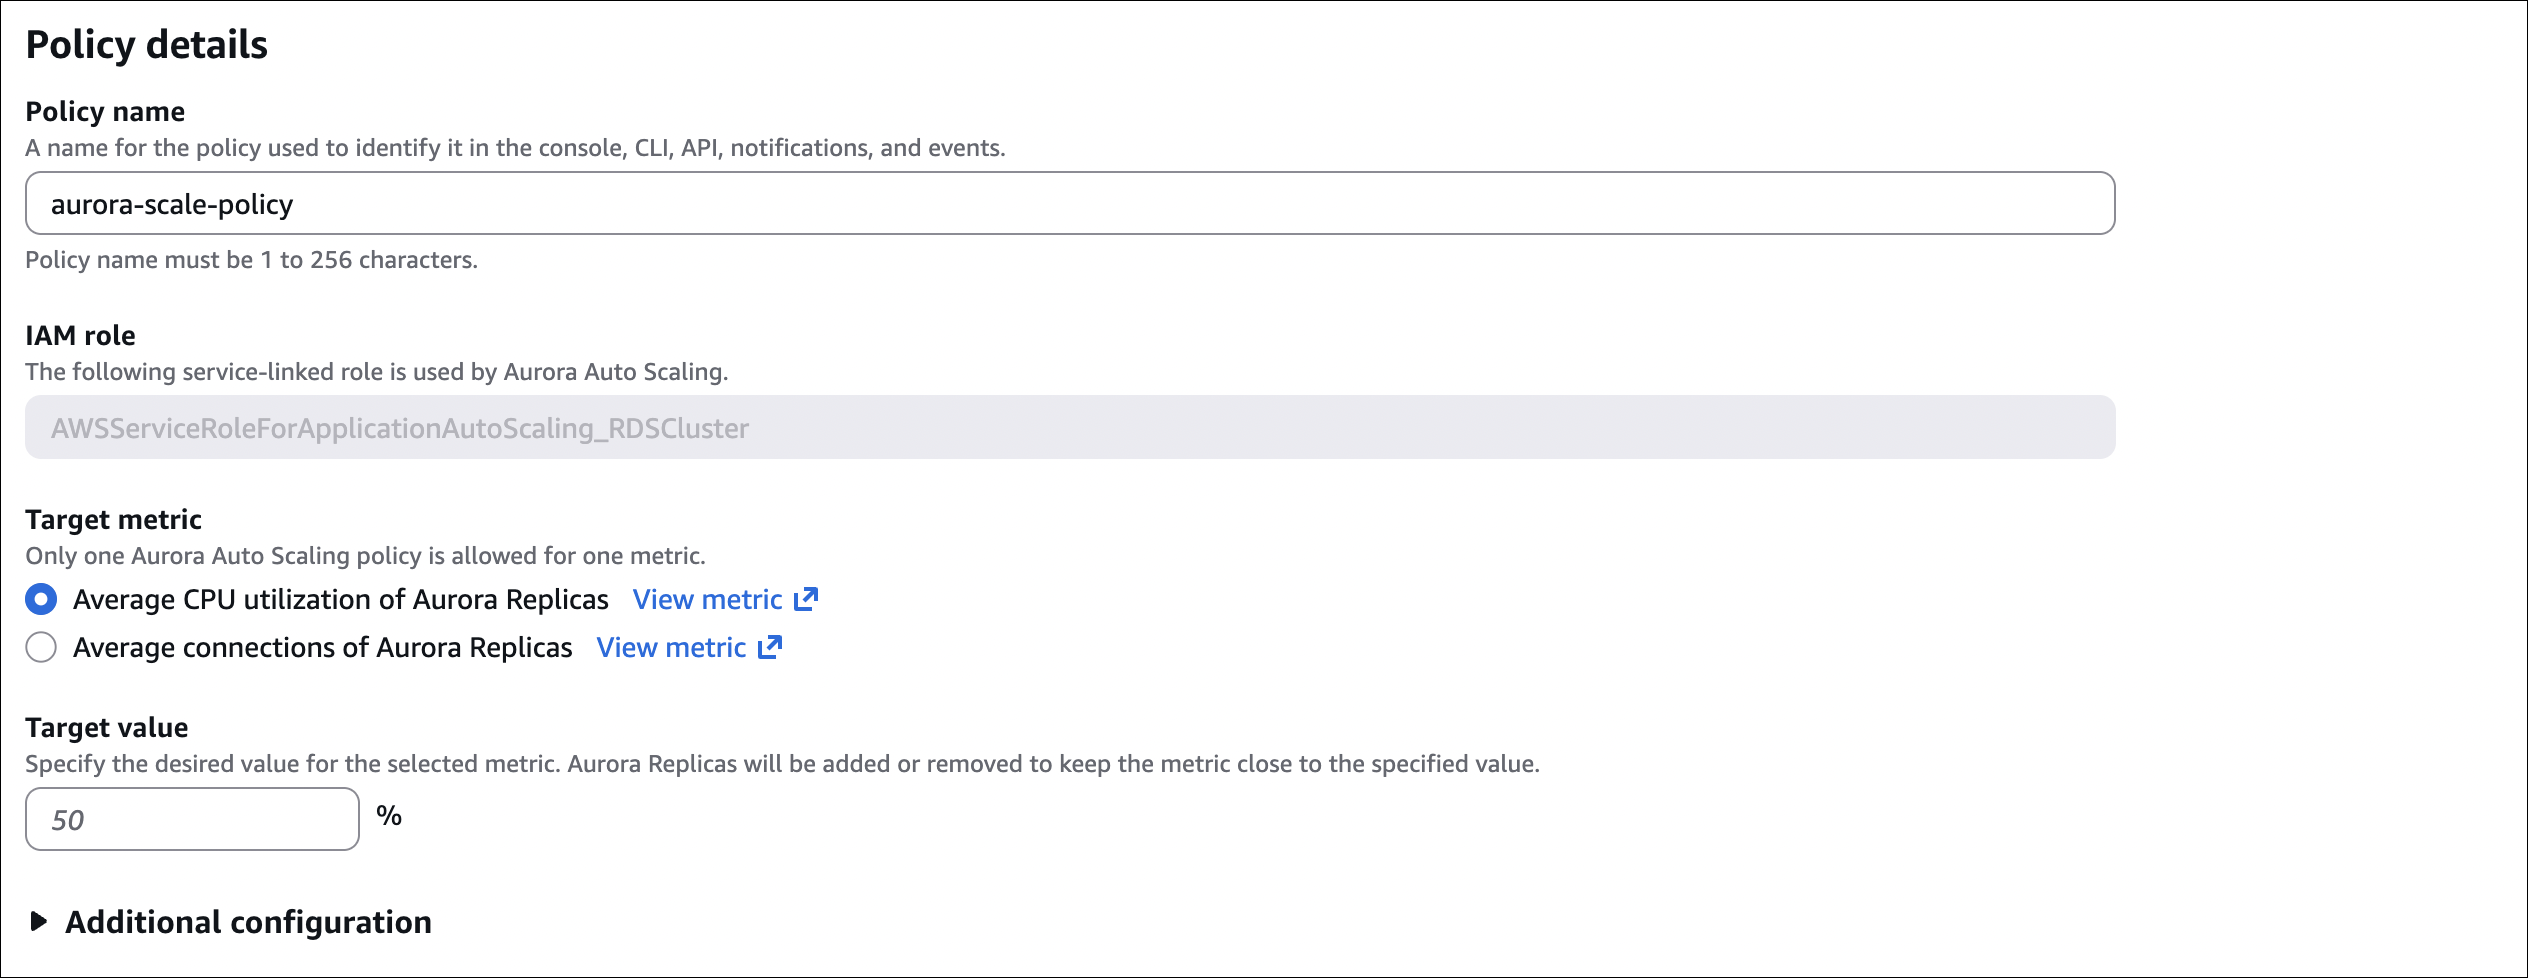
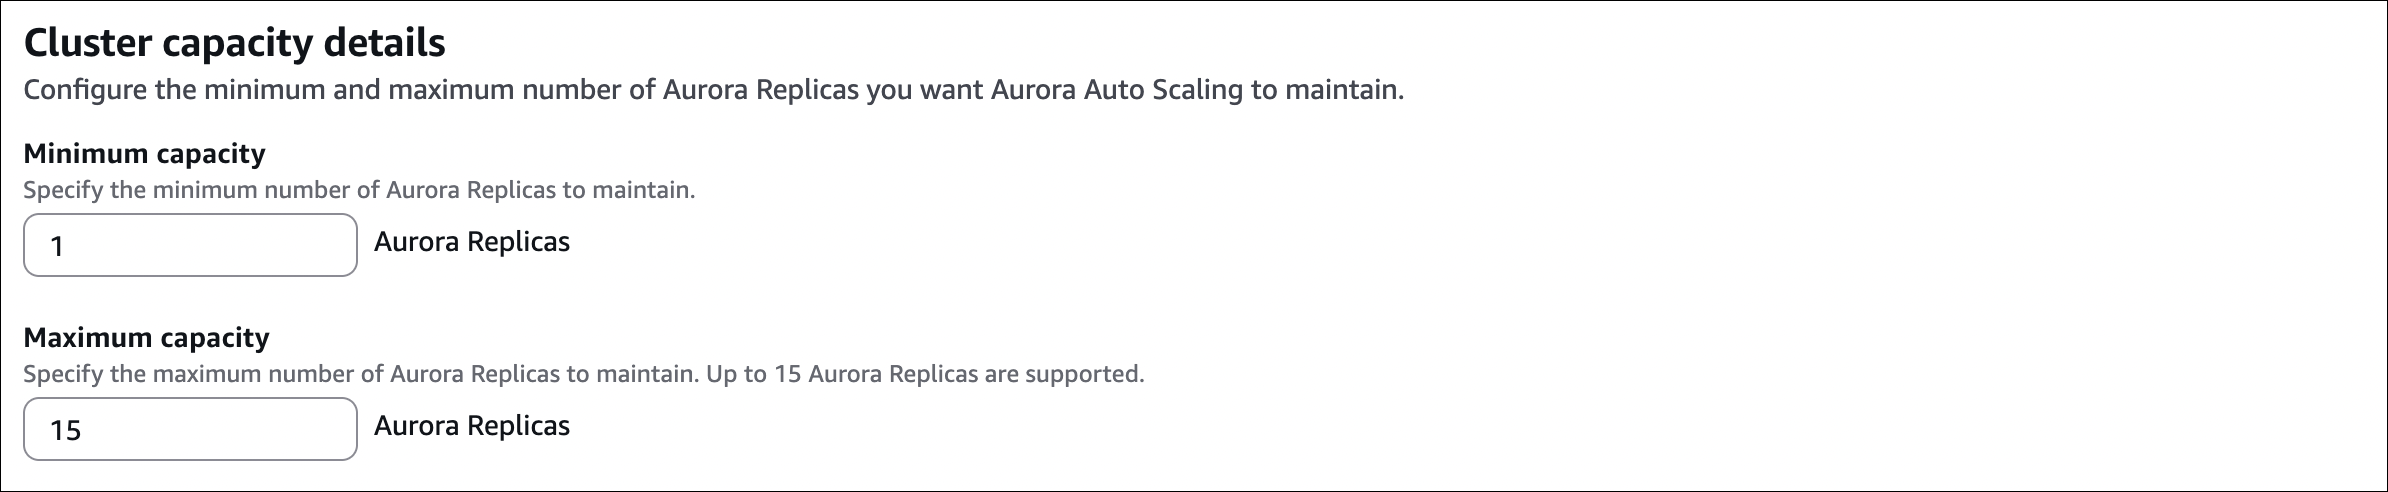
- Min capacity: 1 (minimum number of replicas)
- Max capacity: 15 (maximum number of replicas)
- Scale in cooldown: 300 seconds (wait 5 minutes before removing replicas)
- Scale out cooldown: 0 seconds (add replicas immediately when needed)
- Click Add Auto Scaling policy
How it works:
- Scale out: When metric exceeds target → adds read replicas (up to max)
- Scale in: When metric below target → removes read replicas (down to min)
- Cooldown: Prevents rapid scaling up/down
Important notes:
- Auto-scaling only works for read replicas, not primary instance
- Primary instance class must be changed manually
- Storage auto-scales automatically (no configuration needed)
- Monitor costs: More replicas = higher cost
Important Notes:
- Cluster endpoint always points to primary (for writes)
- Reader endpoint distributes reads across all replicas
- If primary fails, Aurora automatically promotes a replica (failover)
- After failover, cluster endpoint automatically points to new primary
- No need to change connection strings in your application
- Storage auto-scales automatically (up to 128 TB, no configuration needed)
- Read replica auto-scaling requires Application Auto Scaling setup
- Aurora snapshots: Cannot be deleted manually, automatically retained for 35 days (unlike RDS where you can delete snapshots)
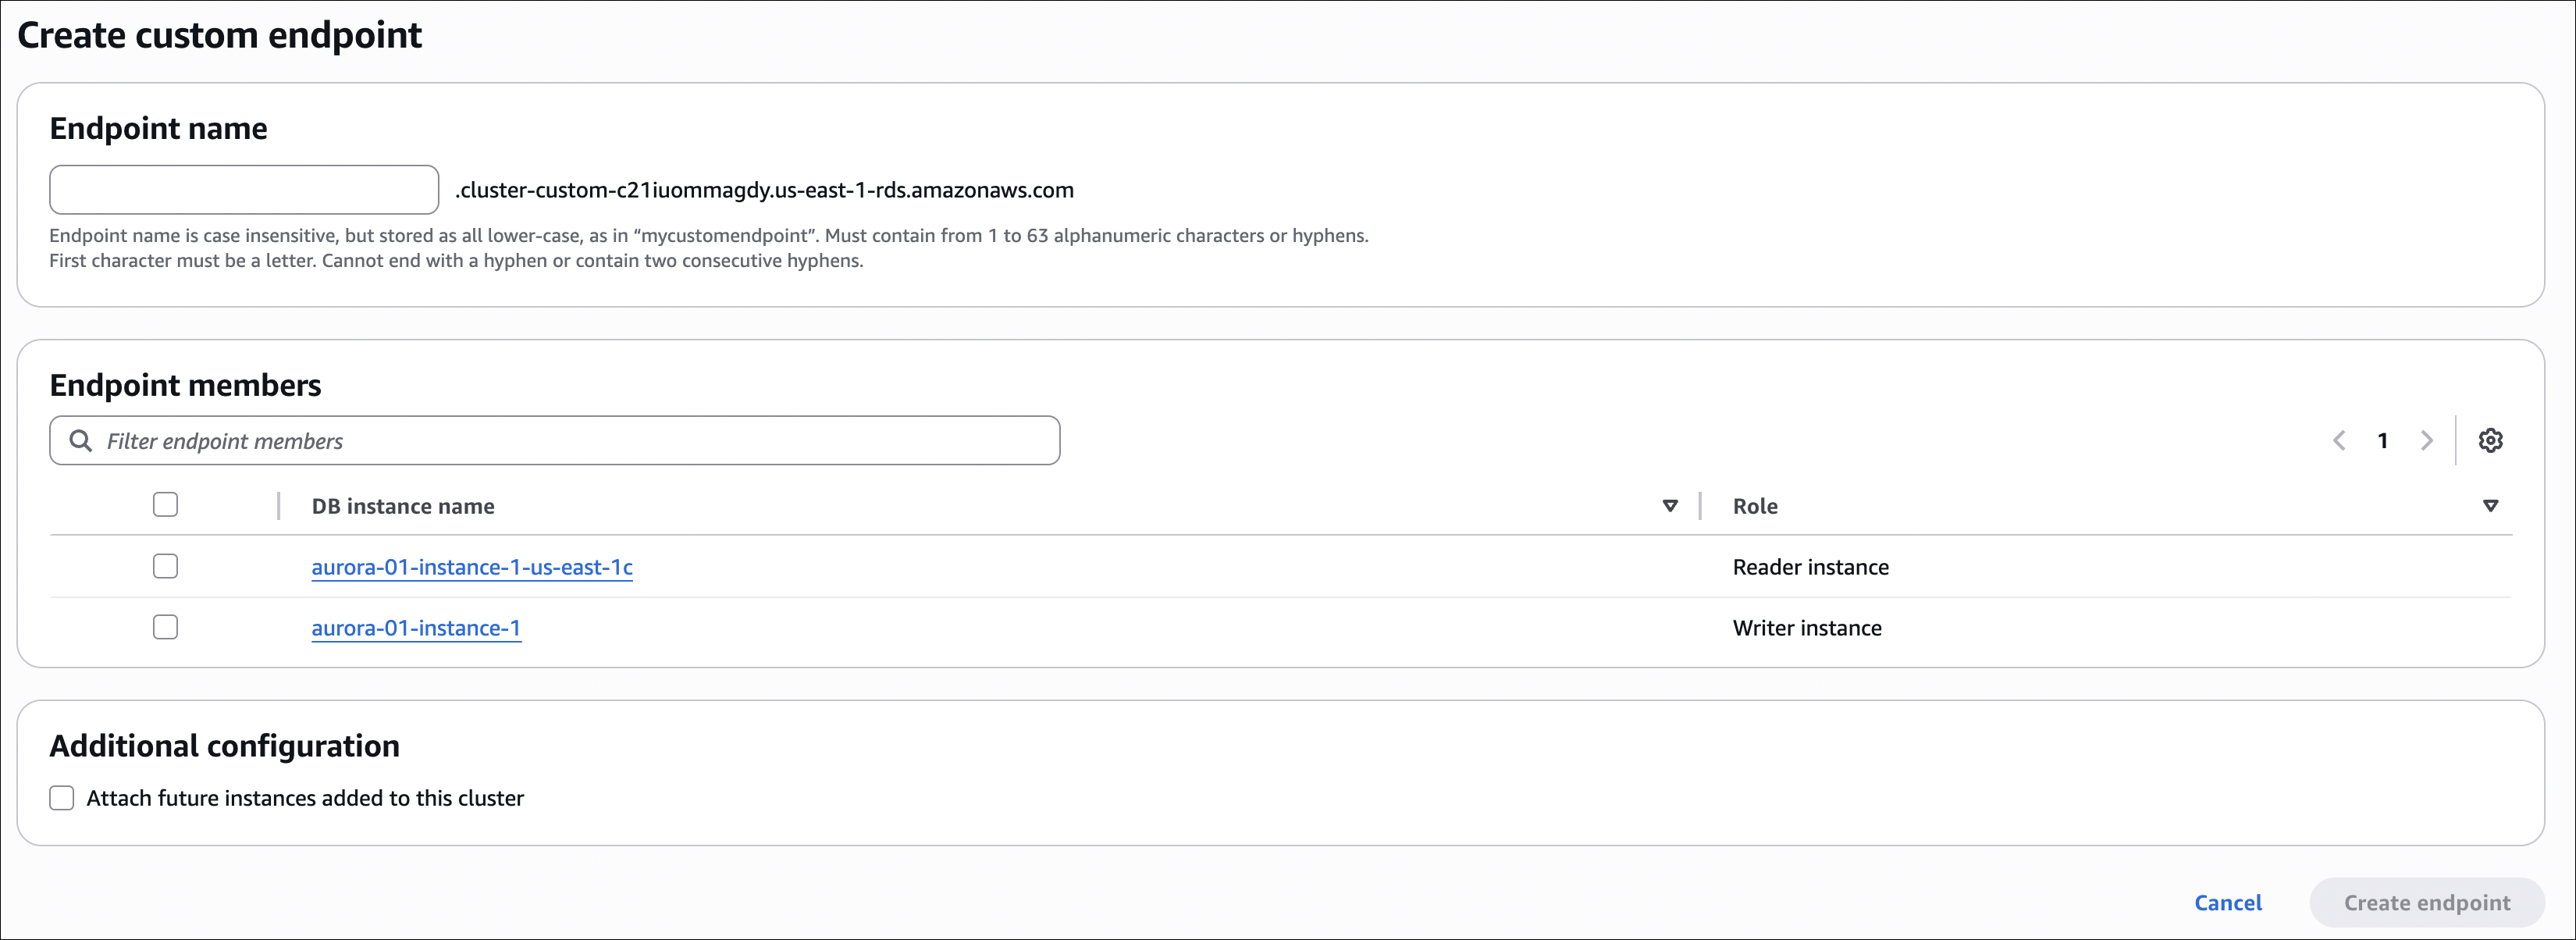
Aurora Custom Endpoint
Aurora provides Custom Endpoint to route traffic to specific read replicas.
What it does:
- Create a custom endpoint that points to specific replicas (not all)
- Useful for: Different workloads, A/B testing, separating read traffic
Example use cases:
- Analytics workload: Route analytics queries to specific replicas (don’t affect main app)
- Reporting: Dedicated replicas for reports
- Different regions: Route traffic to replicas in specific AZs
How to create:
- Go to RDS → Databases → Your cluster
- Click Endpoints tab
- Click Create custom endpoint
- Endpoint identifier:
analytics-endpoint(or your choice) - Target instances: Select specific read replicas (not primary)
- Click Create
Aurora Serverless
Aurora Serverless automatically scales compute capacity up and down based on workload.
What it does:
- Auto-scaling: Automatically adjusts capacity (ACUs - Aurora Capacity Units)
- Pay per second: Only pay when database is active
- Pause/Resume: Can pause when not in use (saves money)
- No capacity planning: Don’t need to choose instance size
How it works:
- Min ACU: Minimum capacity (e.g., 0.5 ACU)
- Max ACU: Maximum capacity (e.g., 16 ACU)
- Scales between min and max based on load
- If paused, resumes automatically when connection arrives
Use cases:
- Variable workloads: Traffic spikes during certain hours
- Development/Testing: Not used 24/7, can pause
- Infrequent access: Applications with sporadic usage
- Cost optimization: Pay only when database is active
Aurora Serverless vs Provisioned:
| Feature | Provisioned | Serverless |
|---|---|---|
| Capacity | Fixed (you choose) | Auto-scales (min-max) |
| Cost | Pay 24/7 | Pay per second |
| Pause | No | Yes (when idle) |
| Use case | Steady workload | Variable workload |
Important notes:
- Warm-up time: Takes a few seconds to resume from pause
- Not for high-traffic: Provisioned is better for consistent high load
- ACU scaling: Scales in 0.5 ACU increments
- Compatible: Works with Aurora MySQL and PostgreSQL
Aurora Global Database
Aurora Global Database replicates your database across multiple AWS regions (up to 16 regions).
What it does:
- Cross-region replication: Primary region + up to 16 secondary regions
- Low latency reads: Read from nearest region (secondary regions)
- Fast disaster recovery: < 1 second RPO (Recovery Point Objective)
- Automatic failover: Promote secondary region to primary if primary fails
Architecture:
1
2
3
4
5
6
7
Primary Region (us-east-1)
├── Primary instance
└── Read replicas

Secondary Region (eu-west-1)
├── Read replicas (synced from primary)
└── Can be promoted to primary if needed
How to set up:
- Go to RDS → Databases → Your Aurora cluster
- Click Actions → Add region
- Region: Select target region (e.g., eu-west-1)
- DB cluster identifier: Name for secondary cluster
- Instance class: Choose instance size
- Click Add region
Important notes:
- Writes: Only in primary region
- Reads: Can read from any region (primary or secondary)
- Replication lag: < 1 second (very fast)
- Cost: Pay for instances in all regions
- Limits: Up to 16 secondary regions
- Compatible: Aurora MySQL and PostgreSQL
Aurora Babelfish
Aurora Babelfish allows SQL Server applications to run on Aurora PostgreSQL without code changes.
What it does:
- SQL Server compatibility: Run SQL Server T-SQL queries on Aurora PostgreSQL
- No code changes: Existing SQL Server applications work as-is
- Migration path: Easier migration from SQL Server to PostgreSQL
How it works:
- Translation layer: Babelfish translates T-SQL to PostgreSQL
- Dual protocol: Supports both T-SQL (SQL Server) and PostgreSQL protocols
- Same database: Both protocols access the same data
Use cases:
- SQL Server migration: Migrate SQL Server apps to Aurora PostgreSQL
- Cost reduction: PostgreSQL is cheaper than SQL Server licensing
- Hybrid approach: Run both SQL Server and PostgreSQL queries on same database
Important notes:
- Aurora PostgreSQL only: Not available for Aurora MySQL
- Not 100% compatible: Some SQL Server features may not work
- Performance: Some queries may need optimization
- Testing required: Test your application before migrating
How to enable:
- When creating Aurora cluster, select Aurora PostgreSQL
- Babelfish compatibility: Enable Babelfish for SQL Server
- Your cluster will support both T-SQL and PostgreSQL queries
RDS Proxy
RDS Proxy is a fully managed database proxy that makes applications more resilient, secure, and scalable.
What it does:
- Connection pooling: Reuses database connections (reduces connection overhead)
- Failover handling: Automatically routes traffic to healthy database instances
- IAM authentication: Use IAM credentials instead of database passwords
- Query routing: Routes queries to appropriate database instances
How it works:
- Proxy endpoint: Your application connects to RDS Proxy (not directly to database)
- Connection management: Proxy manages connections to database
- Automatic failover: If primary fails, proxy routes to standby/replica automatically
- No code changes: Application doesn’t need to handle failover logic
Use cases:
- Serverless applications: Lambda functions that need database access (connection pooling)
- High connection count: Applications that open many connections
- Failover resilience: Automatic failover without application changes
- Security: IAM authentication instead of storing passwords
Benefits:
- Reduced connection overhead: Reuses connections (important for Lambda)
- Faster failover: Application doesn’t need to reconnect
- Better security: IAM authentication, secrets management
- Cost savings: Fewer database connections = lower costs
How to set up:
- Go to RDS → Proxies → Create proxy
- Proxy identifier:
my-rds-proxy(or your choice) - Target group: Create new or use existing
- Target type: RDS instance or Aurora cluster
- Database: Select your RDS/Aurora database
- Authentication:
- IAM authentication: Enable (optional, uses IAM roles)
- Secrets Manager: Store database credentials (recommended)
- Network: Select VPC, subnets, security groups
- Click Create proxy
Important notes:
- Works with: RDS (MySQL, PostgreSQL, MariaDB) and Aurora (MySQL, PostgreSQL)
- Connection limits: Proxy has connection limits (check AWS docs)
- Secrets Manager: Store database credentials in AWS Secrets Manager
- IAM roles: Use IAM roles for authentication (more secure than passwords)
- Monitoring: CloudWatch metrics available for proxy performance
ElastiCache
ElastiCache is AWS’s managed in-memory caching service. It provides Valkey (recommended), Redis OSS, and Memcached as fully managed services. AWS handles setup, patching, backups, monitoring. You just use it.
What ElastiCache does:
- Managed engines: Valkey (recommended), Redis OSS, or Memcached - fully managed, no need to install or maintain
- High performance: In-memory storage, very fast (microseconds latency)
- Scalable: Can scale up (larger instance) or out (more nodes)
- Multi-AZ: Automatic failover for Redis (high availability)
- Backup/restore: Snapshots for Redis (not available for Memcached)
- Monitoring: CloudWatch metrics (CPU, memory, cache hits/misses)
ElastiCache Engines:
| Feature | Valkey | Redis OSS | Memcached |
|---|---|---|---|
| Recommended by AWS | Yes | No | No |
| Price/Performance | Best (33% savings Serverless, 20% node-based) | Standard | Standard |
| Data structures | Yes (lists, sets, etc.) | Yes (lists, sets, etc.) | No (key-value only) |
| Persistence | Yes (snapshots) | Yes (snapshots) | No |
| Replication | Yes (up to 5 replicas) | Yes (up to 5 replicas) | No |
| Multi-AZ | Yes (automatic failover) | Yes (automatic failover) | No |
| Backup | Yes | Yes | No |
| Encryption at rest | Yes | Yes | No |
| Auth token | Yes | Yes | No |
| Pub/Sub | Yes | Yes | No |
| Cluster mode | Yes | Yes | No |
Important concepts:
Replication Group (Redis/Valkey): Primary node + read replicas. Replicas are read-only copies. If primary fails, one replica is promoted to primary (automatic failover).
Cluster (Memcached): Multiple nodes, no replication. Data is distributed across nodes. If a node fails, data on that node is lost (no automatic failover).
Cluster Mode (Redis/Valkey): Distributes data across multiple shards. Each shard has a primary and replicas. Good for large datasets (can’t fit in single node).
Non-Cluster Mode (Redis/Valkey): Single shard with primary and replicas. Simpler, but limited by single node capacity.
Multi-AZ (Redis/Valkey only): Replicas in different availability zones. Automatic failover if primary fails. Not available for Memcached.
Snapshot (Redis/Valkey only): Backup of your cache data. Can restore from snapshot. Not available for Memcached.
Parameter Groups: Configuration settings for your cache cluster (like RDS parameter groups). Can customize Redis/Valkey/Memcached settings.
When to choose Valkey (recommended):
- Need Redis-compatible cache (drop-in replacement for Redis OSS v7.0)
- Want better price/performance (cost savings)
- Need persistence (data survives restarts)
- Need high availability (Multi-AZ)
- Need data structures (lists, sets, sorted sets)
- Need pub/sub messaging
- Need backup/restore
- Need encryption at rest
- Prefer open source (Linux Foundation)
When to choose Redis OSS:
- Need persistence (data survives restarts)
- Need high availability (Multi-AZ)
- Need data structures (lists, sets, sorted sets)
- Need pub/sub messaging
- Need backup/restore
- Need encryption at rest
- Prefer original Redis OSS
When to choose Memcached:
- Simple key-value caching
- Don’t need persistence
- Don’t need high availability (can tolerate data loss)
- Need to scale horizontally (many nodes)
- Maximum performance for simple use cases
Best practices for SAA exam:
- Valkey recommended: Use Valkey for new deployments (better price/performance, AWS recommended)
- Redis/Valkey for production: Use Redis or Valkey if you need persistence, replication, Multi-AZ
- Memcached for simple caching: Use Memcached for simple, high-performance caching
- Multi-AZ for Redis/Valkey: Always enable Multi-AZ for production Redis/Valkey (automatic failover)
- Private subnets: Deploy in private subnets (not public)
- Security groups: Restrict access to application servers only
- Encryption: Enable encryption for sensitive data (Redis supports at-rest, both support in-transit)
- Monitoring: Monitor cache hit ratio (should be high)
- TTL: Set time-to-live on cached items (prevent stale data)
Hands-on: Create ElastiCache Redis Cluster
Let’s create a Redis cluster step by step.
Step 1: Go to ElastiCache
- Go to ElastiCache → Redis clusters
- Click Create Redis cluster
Step 2: Choose engine
- Engine: Choose one of:
- Valkey (recommended) - Open source, compatible with Redis OSS v7.0, better price/performance
- Memcached - Simple key-value cache
- Redis OSS - Original Redis open source
Step 3: Choose deployment option
- Serverless: Automatically scales, no servers to manage (good for variable workloads)
- Node-based cluster: Select node type, size, and count (more control, better for predictable workloads)
- For this example, choose Node-based cluster
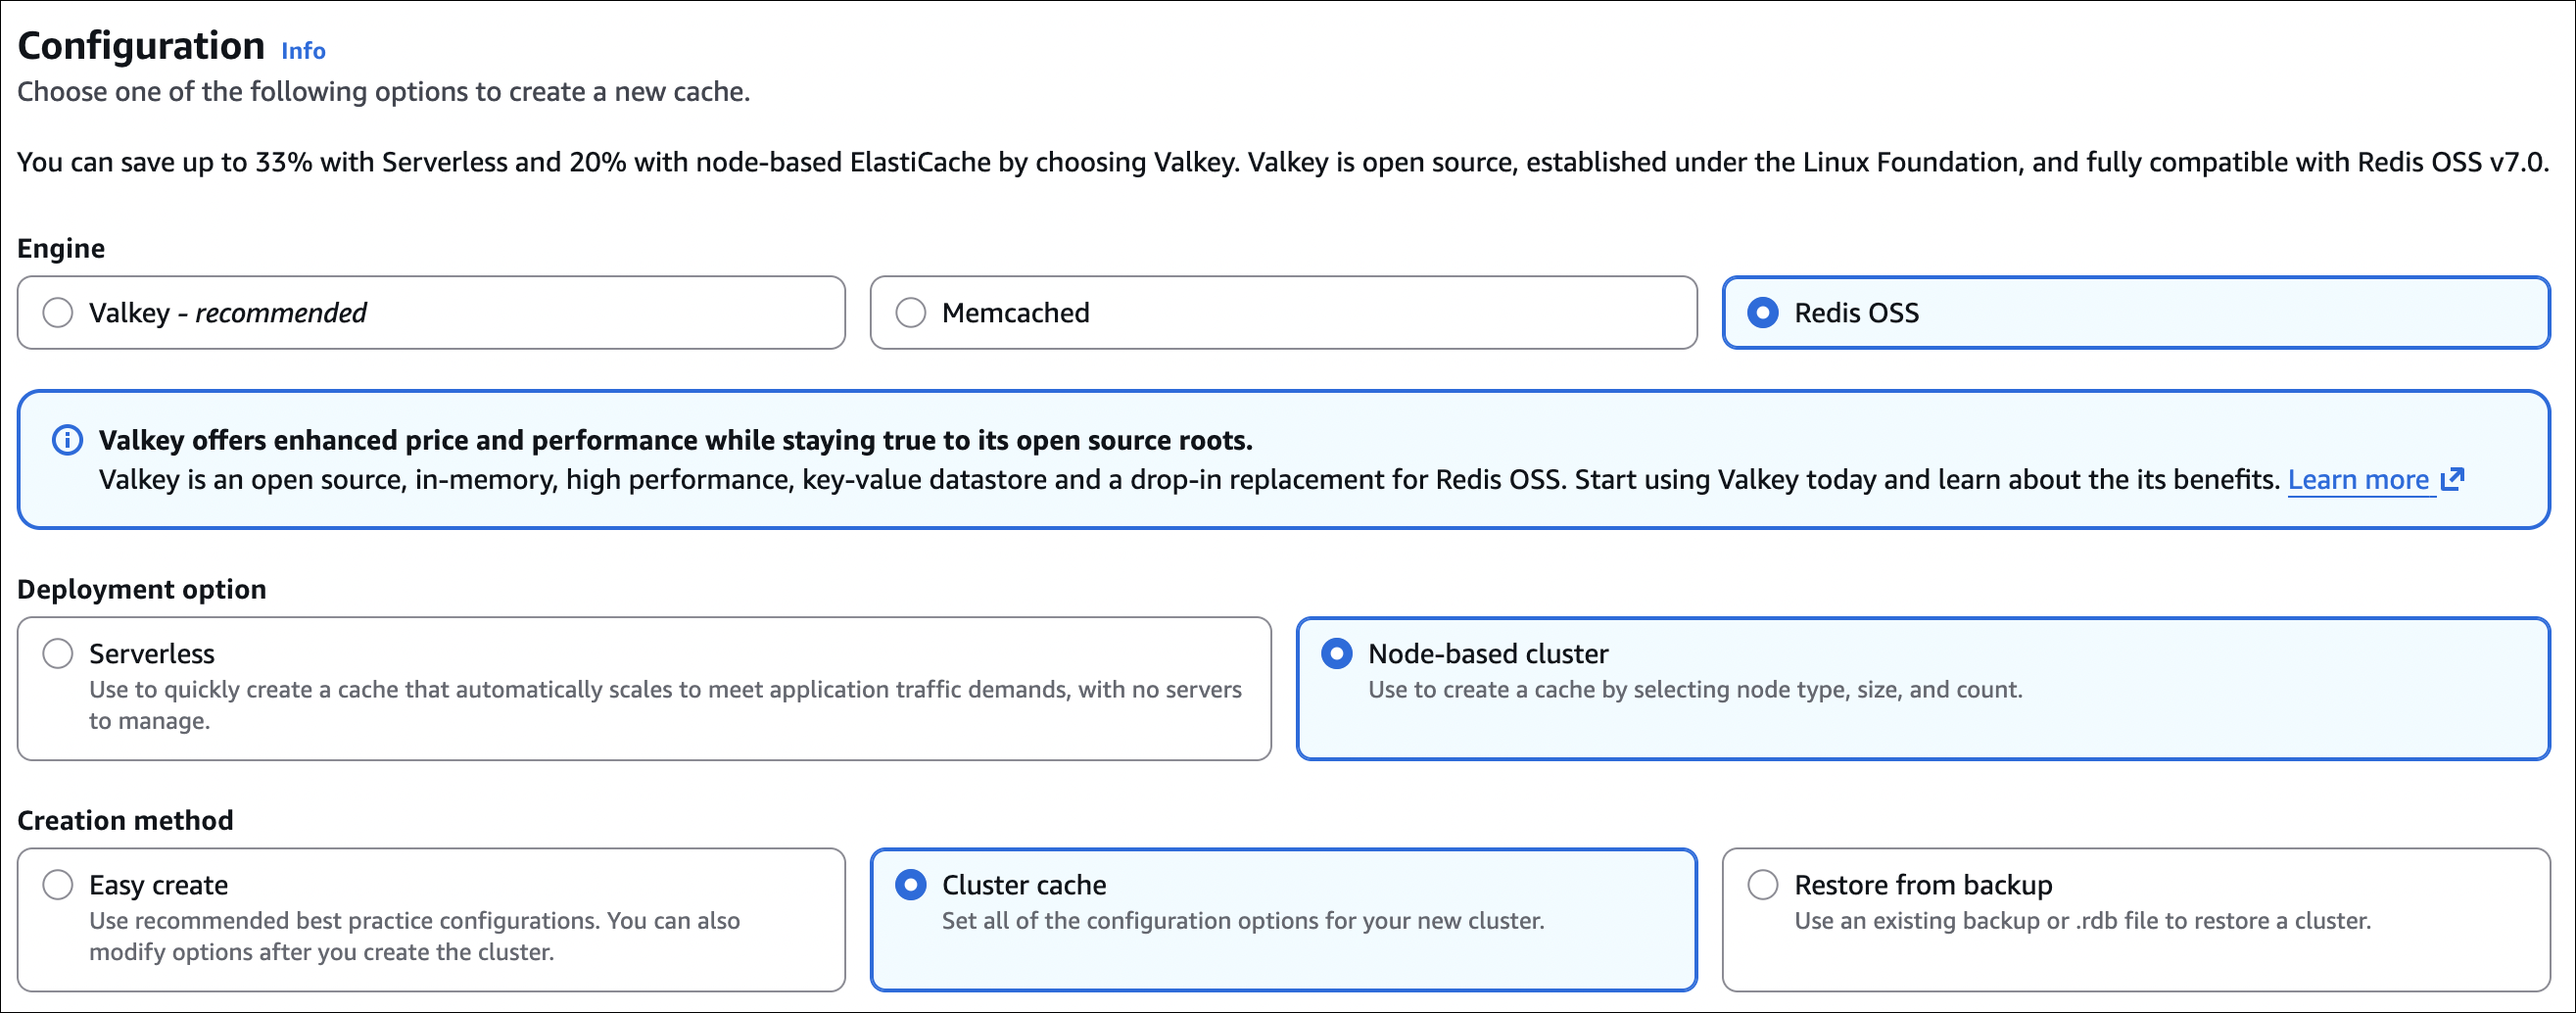
Step 4: Choose creation method
- Easy create: Use recommended best practice configurations (simpler, can modify later)
- Cluster cache: Set all configuration options manually (more control)
- Restore from backup: Restore from existing backup or .rdb file
- For this example, choose Cluster cache (to see all options)

Step 5: Configure cluster settings
- Cluster mode: Disabled (single shard) or Enabled (multiple shards)
- For this example, choose Disabled (simpler)
- Name:
my-redis-cluster(or your choice) - Description: Optional
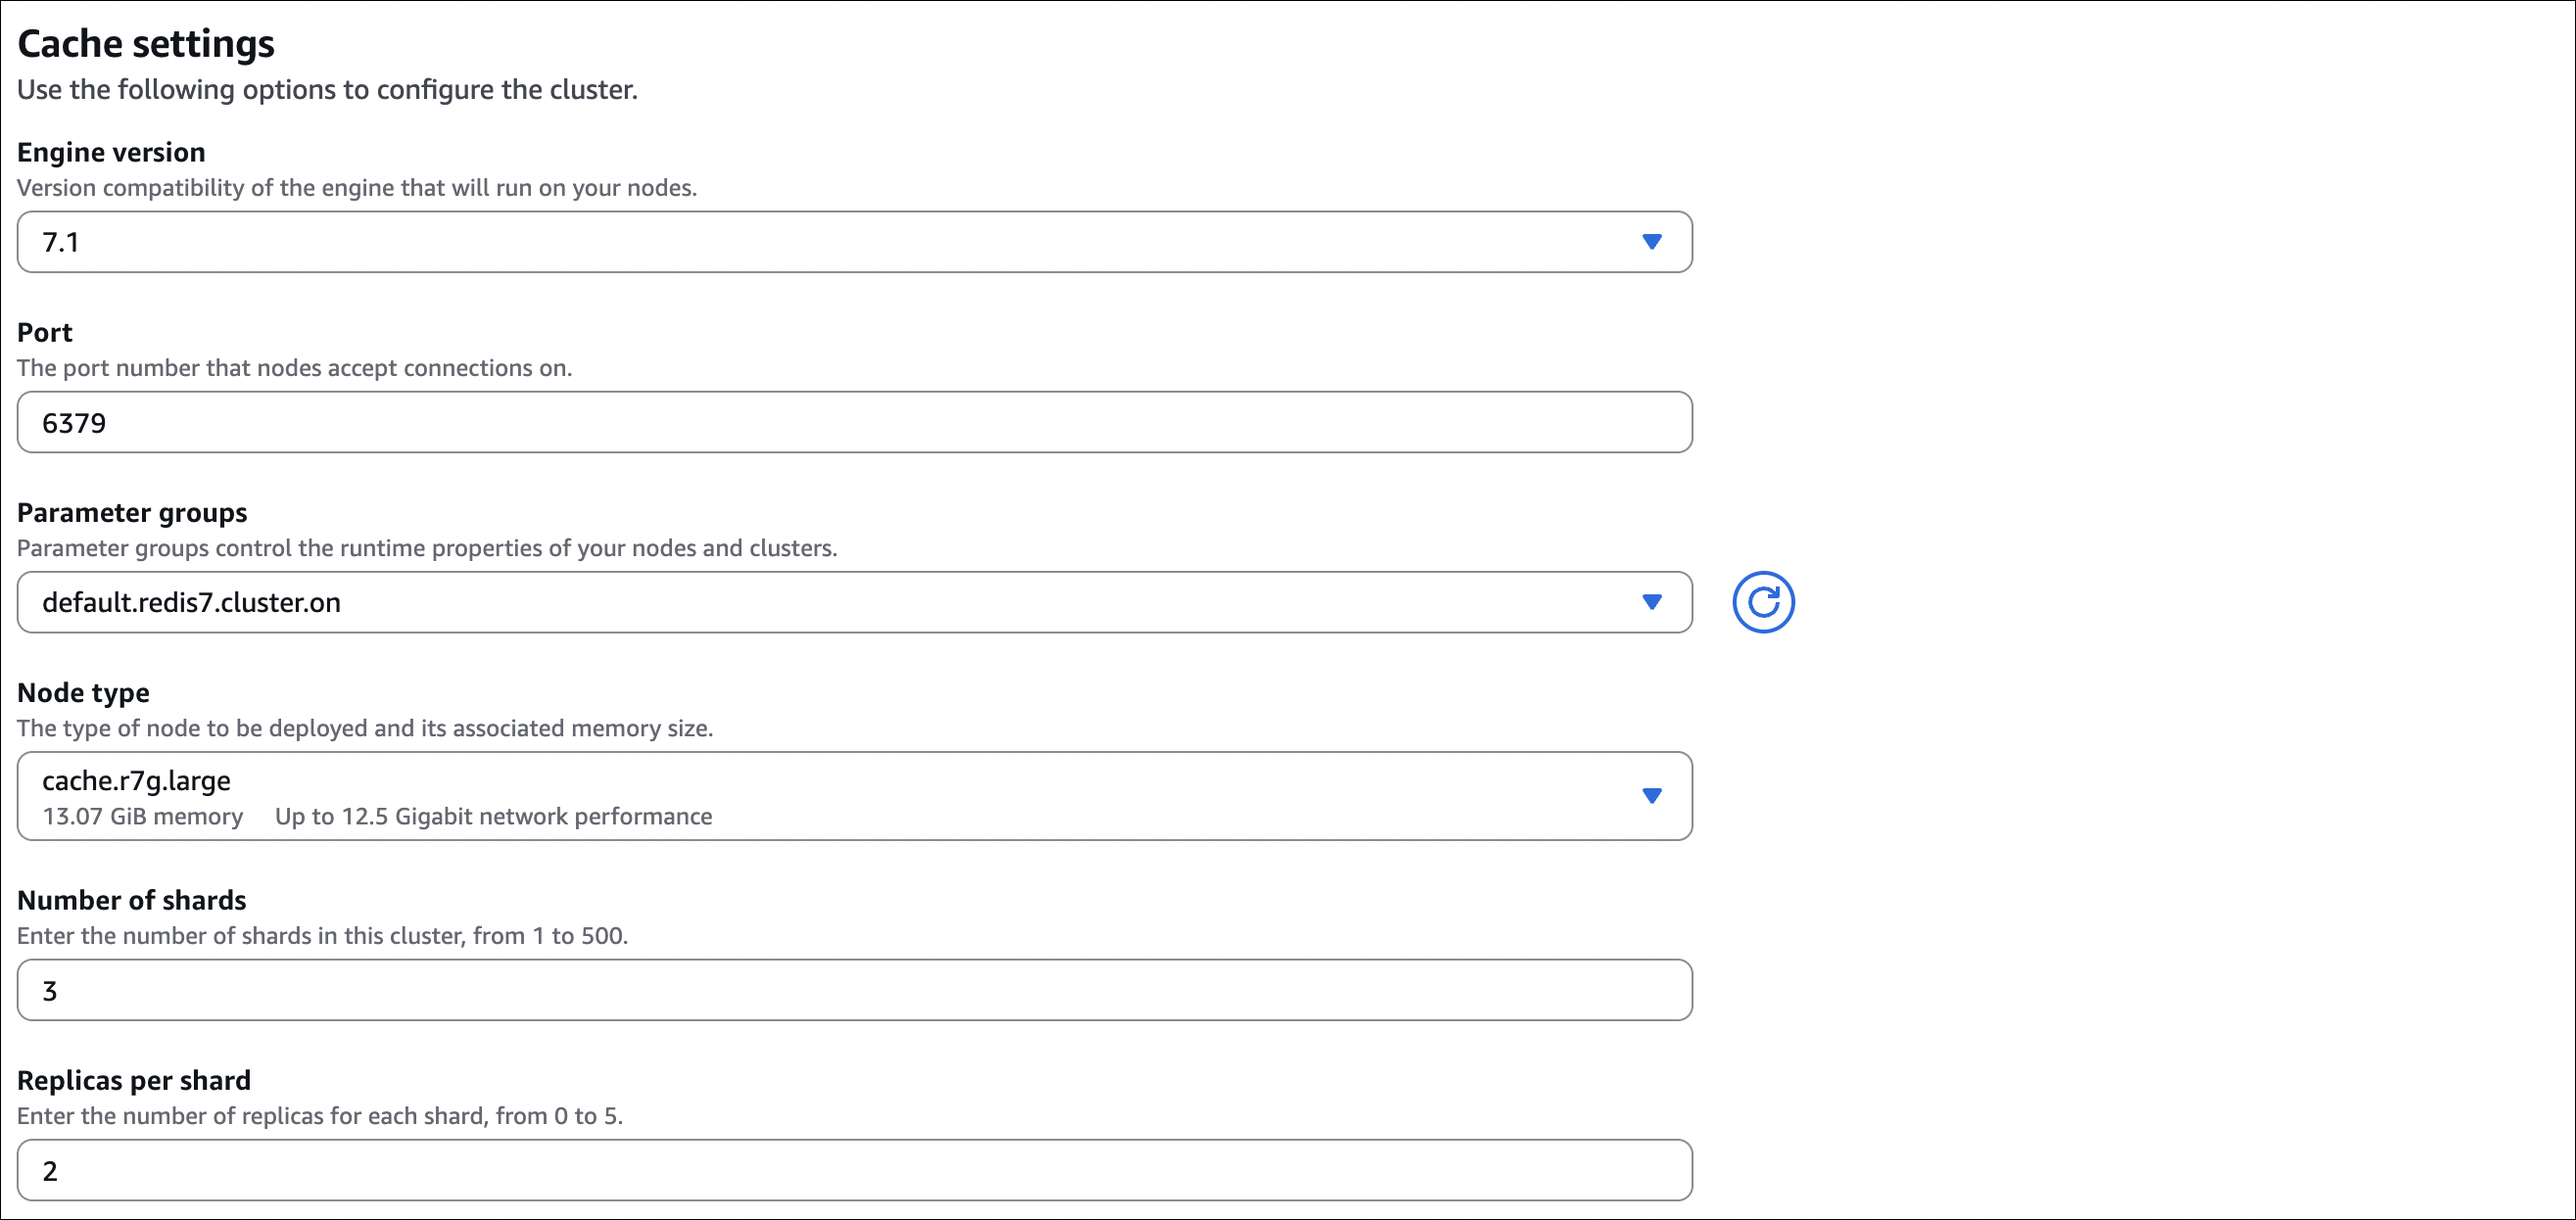
Step 6: Cache settings
- Engine version: Choose version (e.g.,
7.1)- Version compatibility of the engine that will run on your nodes
- Port: Default is
6379(Redis/Valkey default port)- The port number that nodes accept connections on
- Parameter groups: Use default or create custom parameter group
- Parameter groups control the runtime properties of your nodes and clusters
- Default:
default.redis7.cluster.on(or similar)
- Node type: Choose instance type (e.g.,
cache.r7g.large)- The type of node to be deployed and its associated memory size
- Shows memory size (e.g., 13.07 GiB) and network performance
- Number of shards: Enter number of shards (1 to 500)
- For cluster mode enabled: multiple shards (e.g., 3)
- For cluster mode disabled: 1 shard
- Replicas per shard: Enter number of replicas for each shard (0 to 5)
- More replicas = better read scaling and availability
- Example: 2 replicas per shard
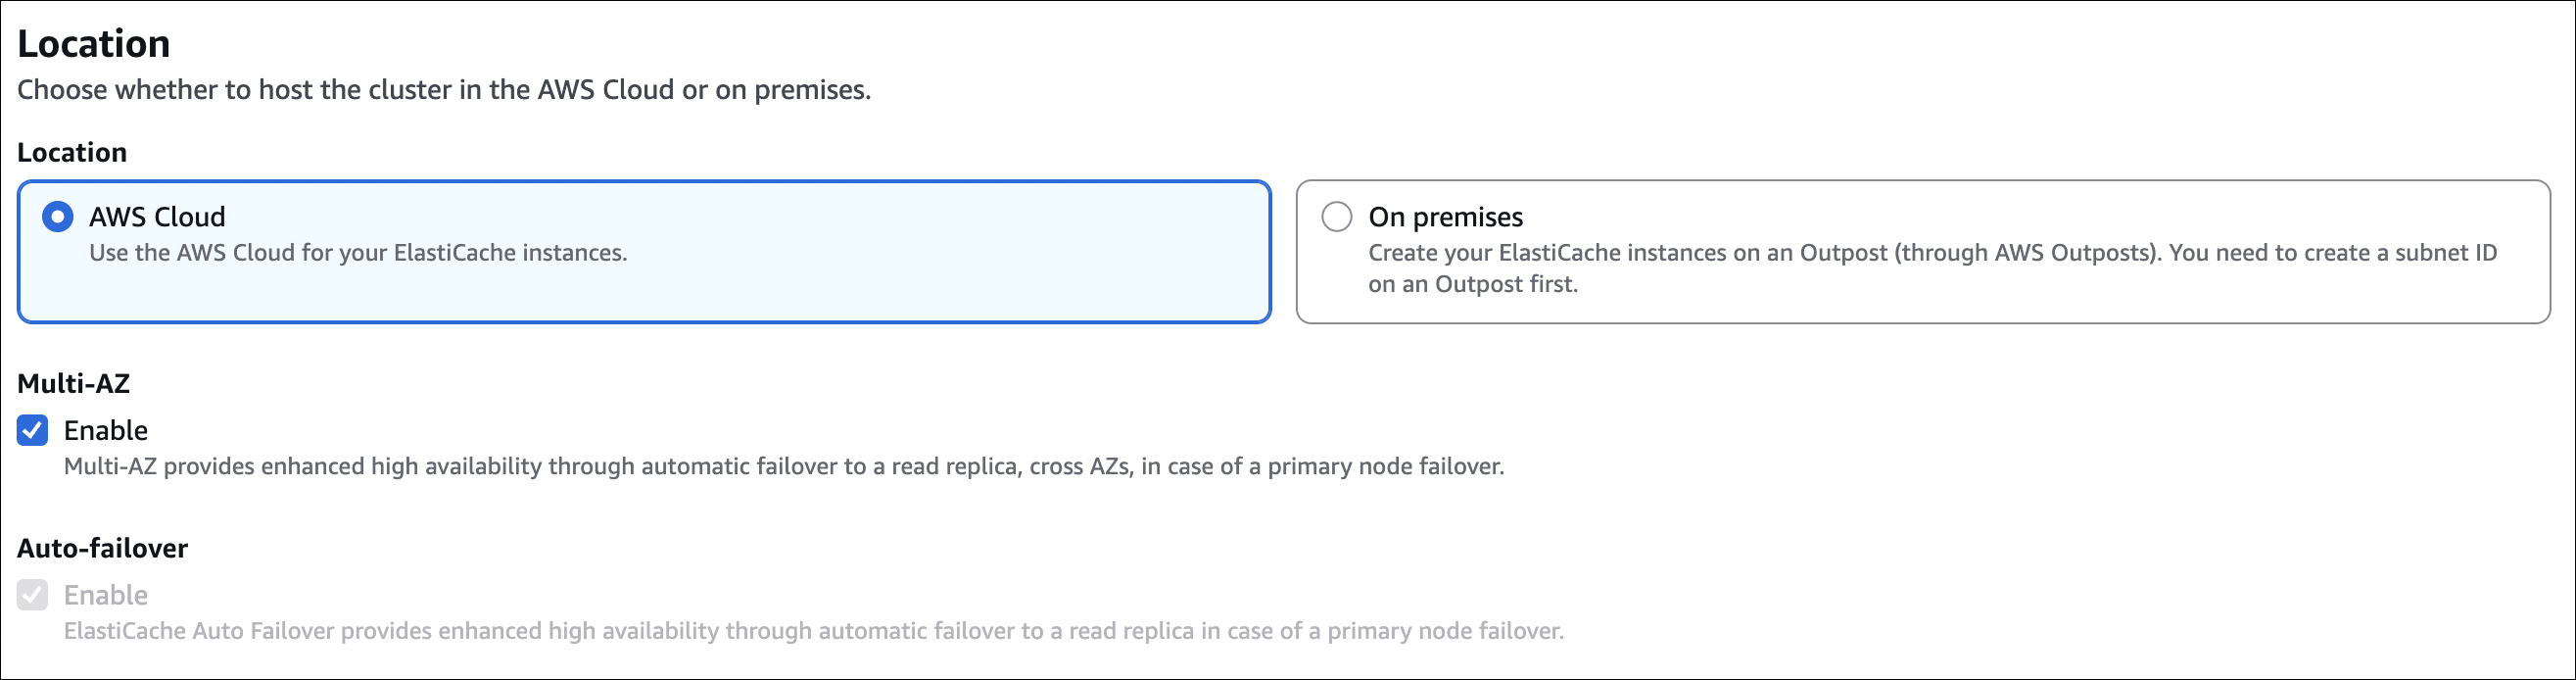
Step 7: Location
- Location: Choose one:
- AWS Cloud: Use AWS Cloud for ElastiCache instances (most common)
- On premises: Create on AWS Outposts (need Outpost subnet first)
- Multi-AZ: Enable (recommended for production)
- Provides enhanced high availability through automatic failover to a read replica across AZs
- Auto-failover: Enable (recommended for production)
- Provides enhanced high availability through automatic failover to a read replica in case of primary node failover
Step 8: Connectivity
- Network type: Choose one:
- IPv4: Resources communicate only over IPv4 protocol (most common)
- Dual stack: Supports both IPv4 and IPv6
- IPv6: Resources communicate only over IPv6
- Subnet groups: Choose existing or create new
- Choose existing subnet group: Select from dropdown
- Create a new subnet group:
- Name: Subnet group name (up to 255 characters, no spaces)
- Description: Optional
- VPC ID: Select your VPC (e.g.,
vpc-00136bac38ecfcbfc)- Can click Create VPC if needed
- Selected subnets:
- For Multi-AZ high availability, choose at least 2 subnets from 2 different Availability Zones
- Example: Select subnets from
eu-central-1a,eu-central-1b,eu-central-1c - Shows: Availability Zone, Subnet ID, Subnet name, CIDR block
- Click Manage to add/remove subnets
- Tags for subnet group: Optional tags
Step 9: Advanced settings
- Encryption at rest: Enable (recommended)
- Encryption key: Default key or Customer managed CMK
- Encryption in transit: Enable (recommended)
- Transit encryption mode: Required (only encrypted TLS connections)
- Access control:
- No access control: No authentication (not recommended)
- Selected security groups: Choose security groups
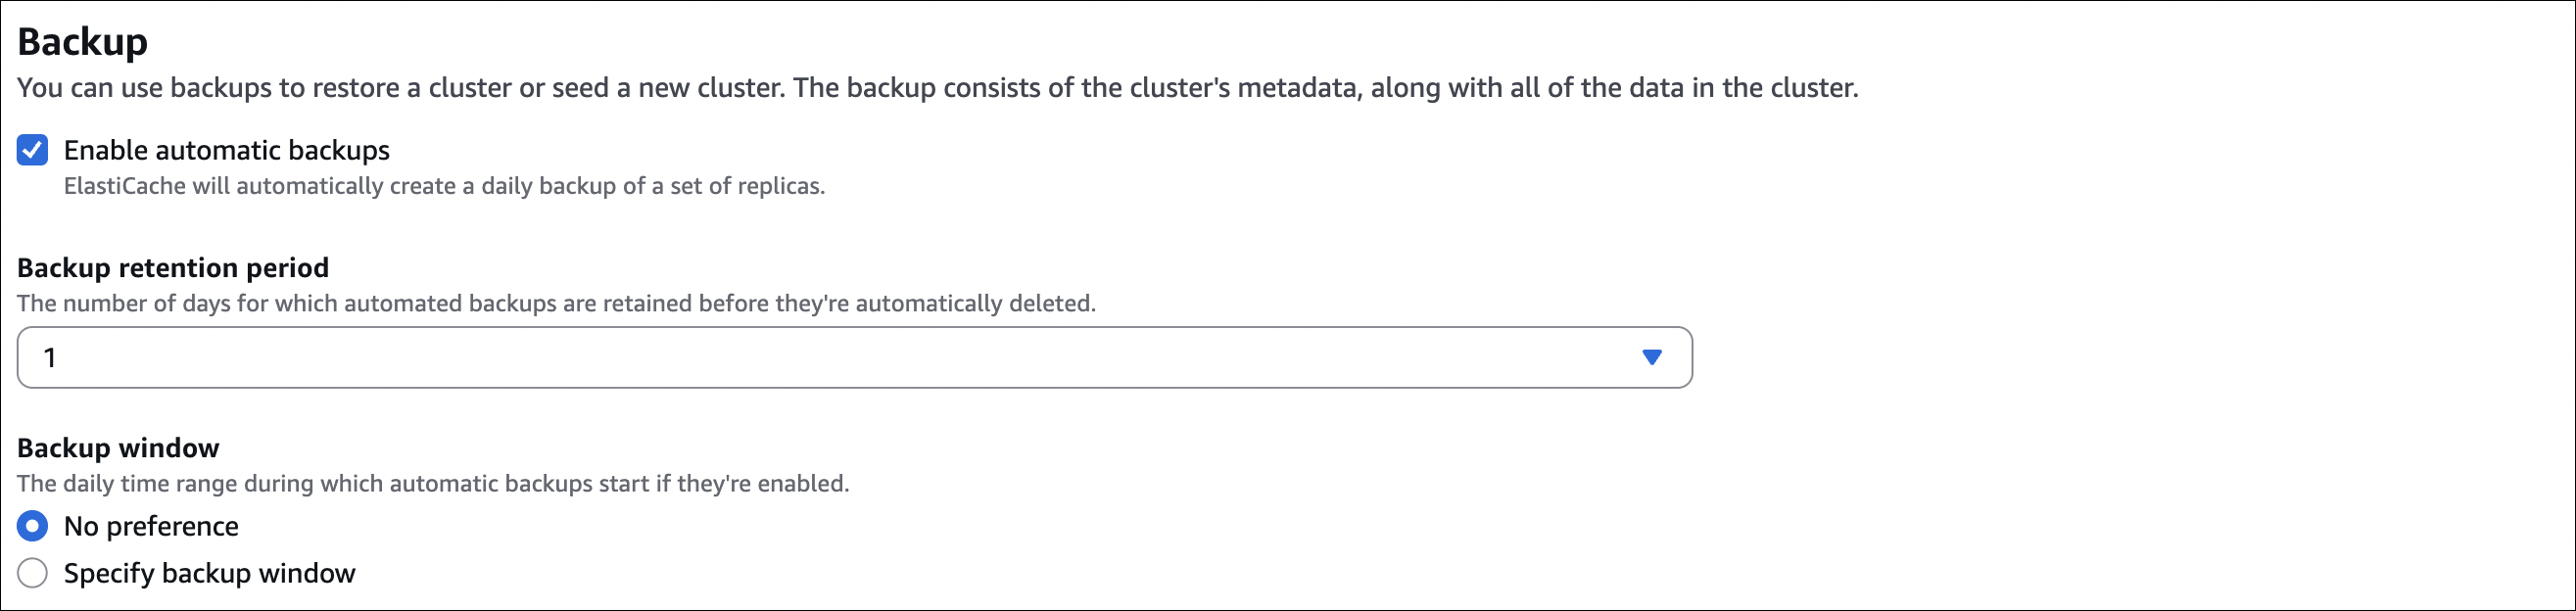
Step 10: Backup
- Automatic backups: Enable (recommended)
- Backup retention: 1-35 days (e.g., 7 days)
- Backup window: Choose time (e.g., 03:00-04:00 UTC)
- Snapshot name: Optional prefix for snapshots
Step 11: Create
- Review settings
- Click Create Redis cluster
After creation:
- Primary endpoint:
my-redis-cluster.xxxxx.cache.amazonaws.com:6379- Use this to connect to primary (read/write)
- Reader endpoint:
my-redis-cluster-ro.xxxxx.cache.amazonaws.com:6379- Use this to connect to replicas (read-only, load balanced across replicas)
- Port: 6379 (default Redis port)
Connect from EC2:
1
2
3
4
5
6
7
8
9
# Install Redis client
sudo yum install redis -y

# Connect (if auth token enabled)
redis-cli -h my-redis-cluster.xxxxx.cache.amazonaws.com -p 6379 -a YOUR_AUTH_TOKEN

# Test
SET test "Hello Redis"
GET test
Security group configuration:
- EC2 security group: Allow outbound TCP 6379 to Redis security group
- Redis security group: Allow inbound TCP 6379 from EC2 security group only
Important notes:
- Private subnets: Deploy in private subnets (not public)
- Security groups: Only allow access from application servers
- Auth token: Store in AWS Secrets Manager (don’t hardcode)
- Encryption: Enable for production (both in-transit and at-rest)
- Multi-AZ: Always enable for production (automatic failover)
- Backup: Enable automatic backups (can restore from snapshot)