AWS Notes: EC2
These are my notes about AWS EC2. I’m writing down what I learned so I don’t forget. I’ll cover the basics and some useful tips.
First, let’s talk about budgets. It’s good to set one up before you start using EC2 so you don’t get surprised by the bill.
Setting Up Budgets
A Zero-Spend Budget is really useful. It tells you when you start spending money (above $0.01). Good for free tier accounts or when you want to know if something unexpected is charging you.
To create a Zero-Spend Budget:
- Go to AWS Billing and Cost Management → Budgets
- Click Create budget
- Select Use a template (simplified)
- Choose Zero spend budget template
- Enter a budget name (e.g., “My Zero-Spend Budget”)
- Add email recipients for alerts
- Click Create budget

EC2 Basics
EC2 is AWS’s virtual server service. Basically, you can create virtual machines in the cloud. You can make them bigger or smaller whenever you want.
EC2 Capabilities
EC2 offers several key capabilities and related services:
| Service/Feature | Description |
|---|---|
| EC2 Instances | Virtual servers with different instance types (compute, memory, storage optimized) |
| Auto Scaling Groups | Automatically scale EC2 instances based on demand or schedules |
| EBS (Elastic Block Store) | Persistent block storage volumes for EC2 instances |
| ELB (Elastic Load Balancer) | Distributes incoming traffic across multiple EC2 instances |
| Security Groups | Virtual firewalls that control inbound and outbound traffic |
| Key Pairs | SSH key pairs for secure access to EC2 instances |
| AMI (Amazon Machine Image) | Pre-configured templates for EC2 instances |
| Placement Groups | Logical grouping of instances for low latency or high throughput |
EC2 User Data
User Data is cool - it’s a script that runs automatically when your EC2 instance starts for the first time. You can use it to install stuff, set things up, or run commands. Super useful for automation.
Example: Installing Nginx
Here’s a simple example to install and start Nginx on an Amazon Linux instance:
1
2
3
4
5
#!/bin/bash
yum update -y
yum install -y nginx
systemctl start nginx
systemctl enable nginx
Steps to add User Data:
- When launching an EC2 instance, go to Advanced details section
- Scroll down to User data
- Paste your script in the text box
- Continue with instance launch
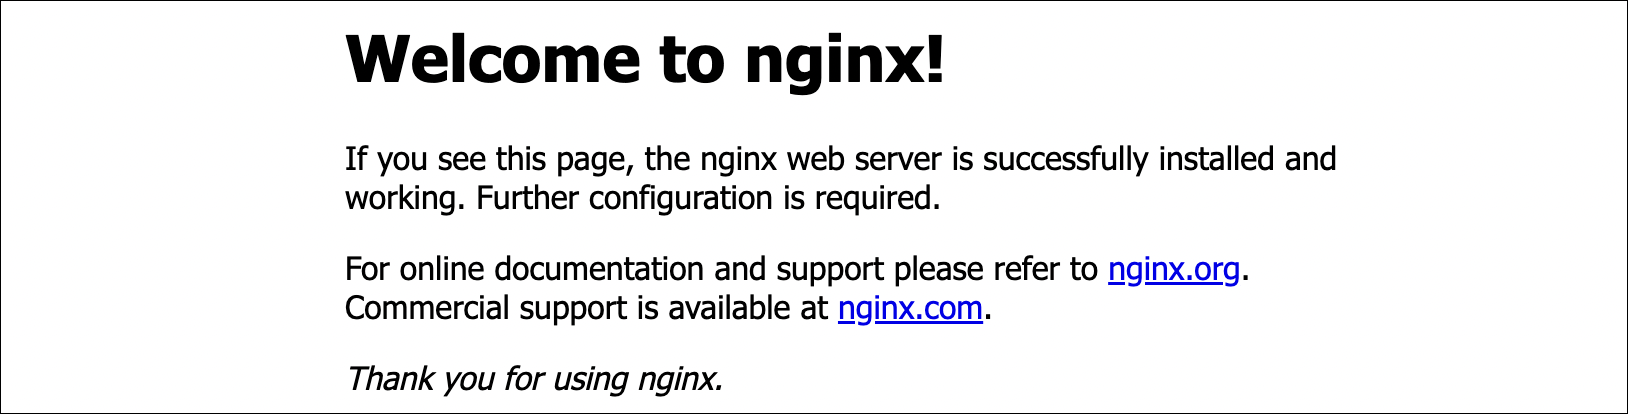
Once the instance is in running status, you can access the default Nginx welcome page by opening your browser and navigating to http://[public-ip]. Make sure your security group allows inbound traffic on port 80.
EC2 Instance Types
EC2 has different instance types. Each one is good for different things. Some have more CPU, some have more memory, some have more storage. You pick based on what you need.
| Instance Family | Use Case | Examples | Key Feature |
|---|---|---|---|
| General Purpose | Balanced compute, memory, and networking | t3, t4g, m5, m6i | Good for most applications |
| Compute Optimized | High-performance computing, batch processing | c5, c6i, c7i | More CPU power |
| Memory Optimized | Databases, caching, big data analytics | r5, r6i, x1e | More RAM |
| Storage Optimized | High I/O databases, data warehousing | i3, i4i, d2 | High storage I/O |
| Accelerated Computing | Machine learning, graphics rendering | p3, p4, g4 | GPU support |
Naming convention:
- Letter (t, m, c, r, i, d, p, g) = Family type
- Number (3, 4, 5, 6, 7) = Generation
- Size (nano, micro, small, medium, large, xlarge, 2xlarge, etc.) = Resources
Most of the time, general purpose (t3, m5) is fine. Use compute optimized (c5) if you need lots of CPU power. Use memory optimized (r5) for databases that need lots of RAM.
Useful resource: EC2 Instances Comparison - Compare EC2 instance types, pricing, and specifications.
Security Groups
Security Groups are like firewalls for your EC2 instances. They control what traffic can come in and go out. Think of them as the first line of defense.
How Security Groups Work
- Stateful: If you allow traffic in, the response automatically goes out (and the other way around)
- Default deny: By default, nothing can come in, but everything can go out
- Multiple groups: You can attach more than one security group to an instance
- Region-specific: Security groups only work in one region and VPC
Key Concepts
| Concept | Description |
|---|---|
| Inbound Rules | Control traffic coming into your instance |
| Outbound Rules | Control traffic going out from your instance |
| Source/Destination | IP addresses, CIDR blocks, or other security groups |
| Port/Protocol | Specific ports (e.g., 80, 443, 22) and protocols (TCP, UDP, ICMP) |
Common Security Group Rules
| Use Case | Port | Protocol | Source | Notes |
|---|---|---|---|---|
| Web Server (HTTP) | 80 | TCP | 0.0.0.0/0 or specific IPs | Allow HTTP traffic from internet |
| Web Server (HTTPS) | 443 | TCP | 0.0.0.0/0 or specific IPs | Allow HTTPS traffic from internet |
| SSH Access | 22 | TCP | Your IP address only | Never use 0.0.0.0/0 for security |
| MySQL Database | 3306 | TCP | Application security group | Only allow from app servers |
| PostgreSQL Database | 5432 | TCP | Application security group | Only allow from app servers |
Creating a Security Group
- Go to EC2 → Security Groups → Create security group
- Enter a name and description
- Select the VPC
- Add inbound rules:
- Type: Select protocol (HTTP, HTTPS, SSH, Custom TCP, etc.)
- Source: IP address, CIDR block, or another security group
- Port: Specific port or port range
- Add outbound rules (optional, defaults to allow all)
- Click Create security group
Key Pairs and SSH Access
To connect to your EC2 instance via SSH, you need a key pair. AWS keeps the public key, and you keep the private key on your computer. Don’t lose it!
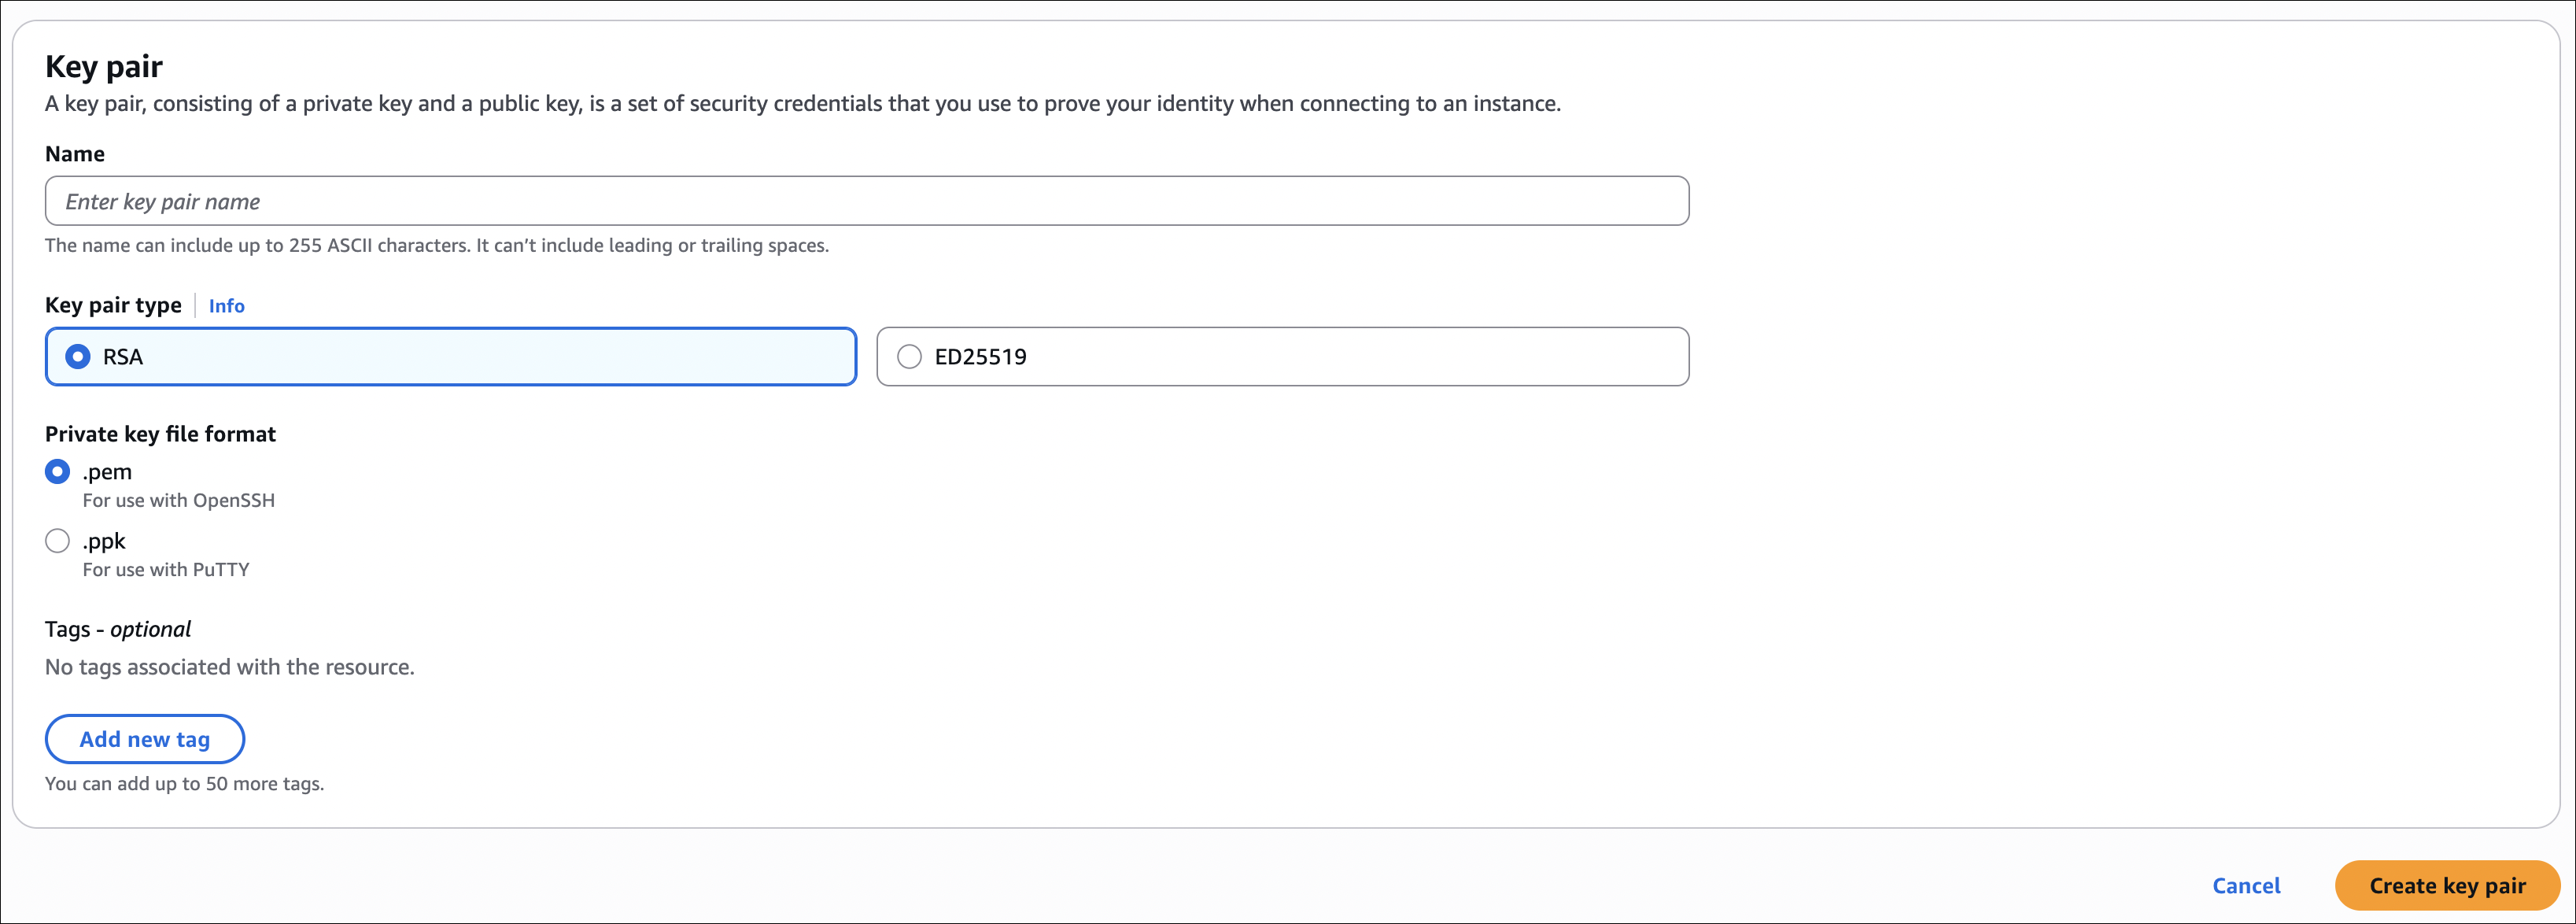
Creating a Key Pair
Option 1: Create in AWS Console
- Go to EC2 → Key Pairs → Create key pair
- Enter a name (e.g.,
my-ec2-key) - Choose key pair type:
- RSA (most common)
- ED25519 (newer, more secure)
- Choose private key file format:
- .pem (for OpenSSH, Linux/Mac)
- .ppk (for PuTTY, Windows)
- Click Create key pair
- Important: Download the private key file immediately - you cannot download it again!
Option 2: Use Existing SSH Key
If you already have an SSH key pair, you can import the public key:
- Go to EC2 → Key Pairs → Import key pair
- Paste your public key content
- Enter a name and click Import key pair
Selecting Key Pair When Launching an Instance
When you launch an EC2 instance, you must select a key pair:
- Go to EC2 → Instances → Launch instance
- Configure your instance (AMI, instance type, etc.)
- In the Key pair (login) section, select your key pair from the dropdown
- If you don’t have a key pair yet, click Create new key pair to create one
- Continue with the instance launch
Important: You cannot connect to a Linux instance via SSH without a key pair. If you launch an instance without selecting a key pair, you won’t be able to SSH into it later. You’ll need to terminate it and launch a new one with a key pair.
Connecting to EC2 Instance via SSH
Prerequisites:
- EC2 instance is running
- Security group allows inbound SSH (port 22) from your IP
- You have the private key file (.pem) downloaded
Steps:
Locate your private key file (e.g.,
my-ec2-key.pem)- Set correct permissions (Linux/Mac only):
1
chmod 400 my-ec2-key.pem - Connect using SSH:
1
ssh -i my-ec2-key.pem ec2-user@[public-ip]
The default username is ec2-user for Amazon Linux and ubuntu for Ubuntu. For other Linux distributions, check the AWS documentation.

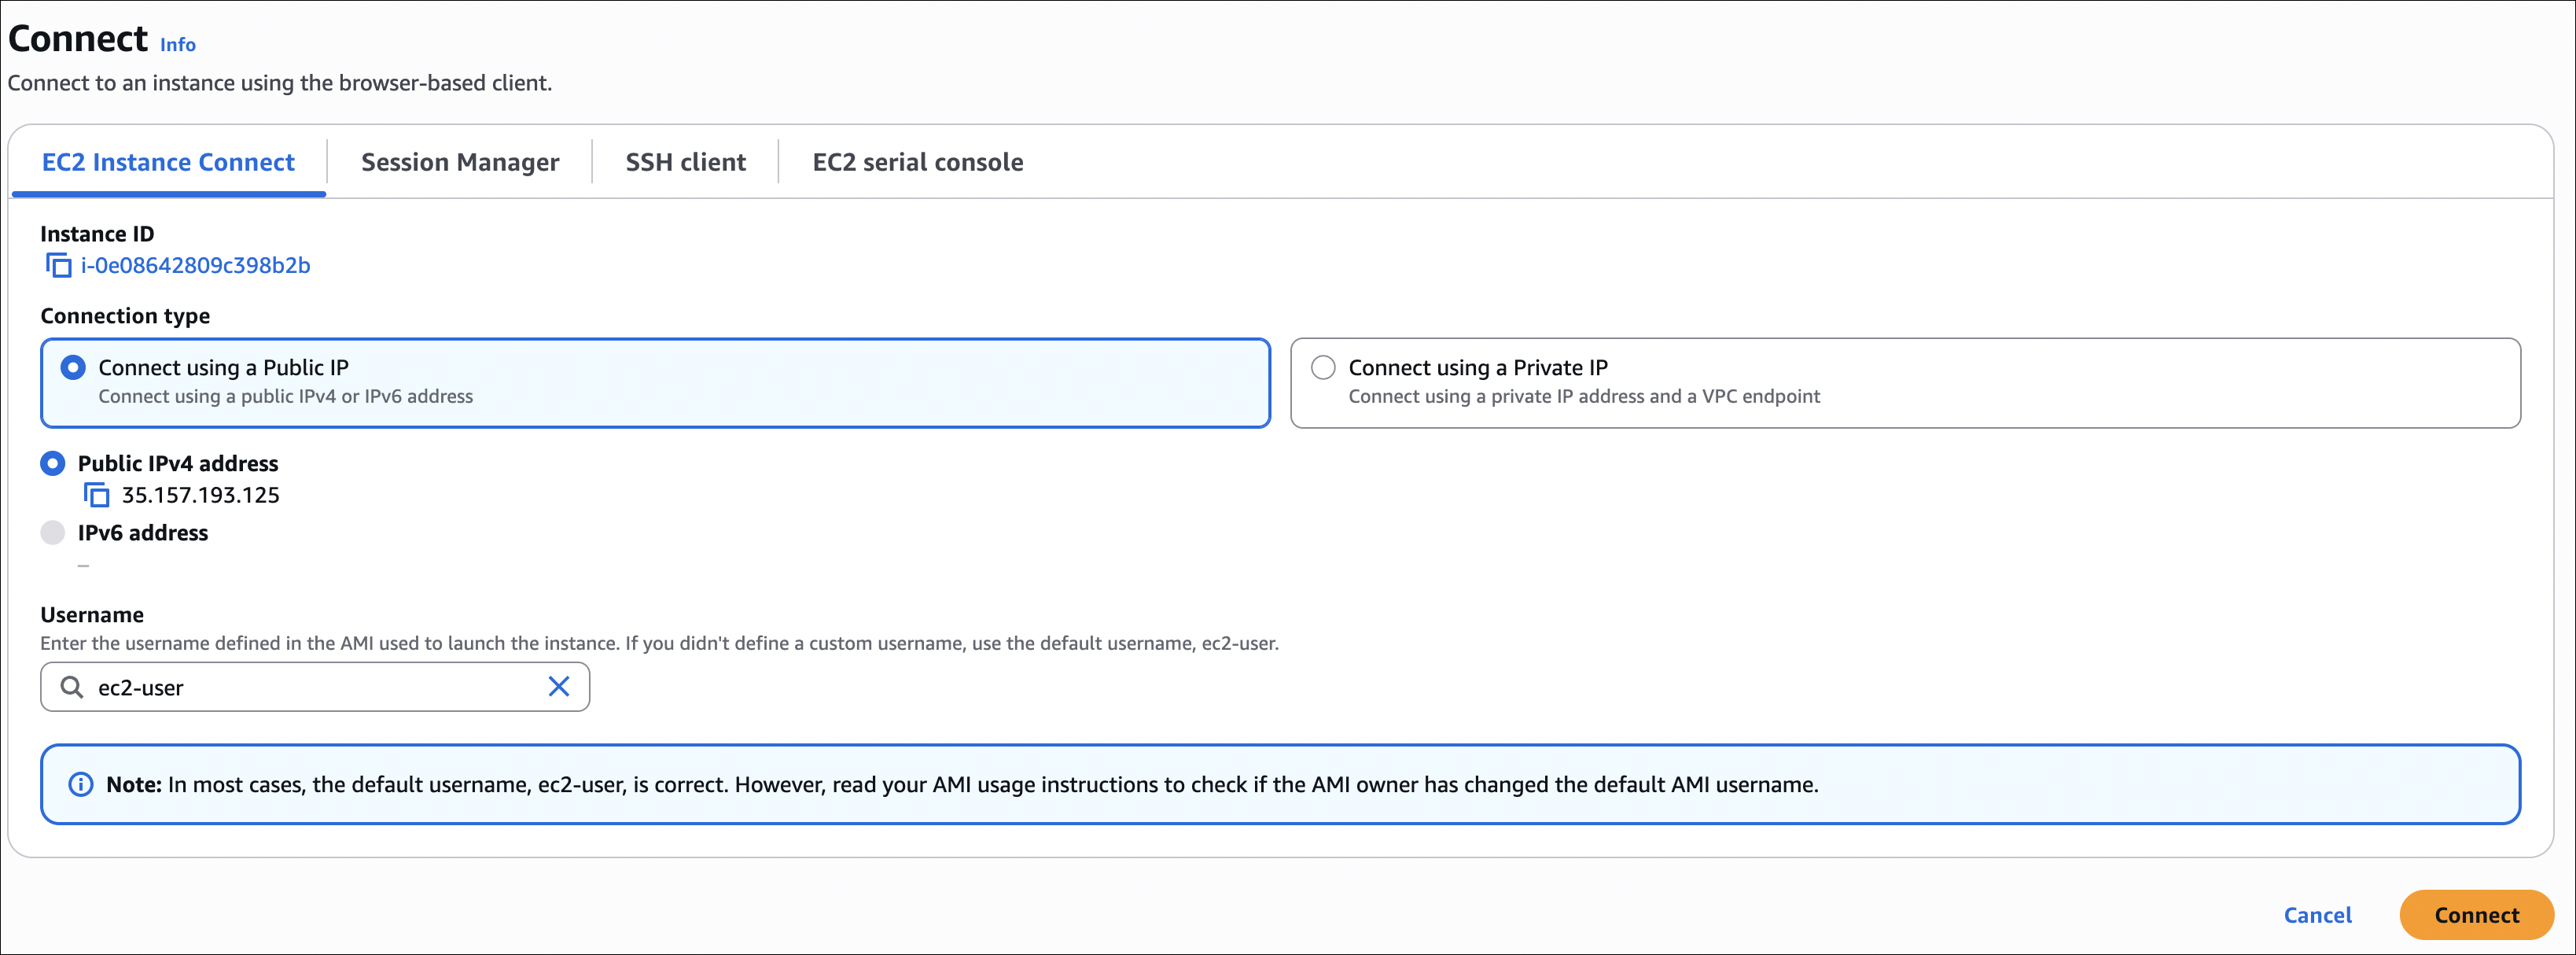
EC2 Instance Connect
EC2 Instance Connect is handy - you can connect to your instance directly from the AWS Console. No need to mess with SSH keys.
How it works:
- Uses temporary credentials (they last 60 seconds)
- No need to download or manage key files
- Just works from the browser
To connect:
- Go to EC2 → Instances
- Select your instance
- Click Connect
- Choose EC2 Instance Connect tab
- Click Connect
EC2 Instance Connect is convenient for quick access, but SSH with key pairs is more secure for production use. Instance Connect requires the instance to have a public IP and the security group must allow SSH (port 22).
EC2 Instance Roles
Don’t put AWS access keys on your EC2 instance - that’s not safe. Instead, attach an IAM role to the instance. The instance gets temporary credentials automatically to access AWS services.
Why Use Instance Roles?
Without Instance Roles:
- You need to SSH into the instance
- Run
aws configureand provide access key and secret key - Store credentials on the instance (security risk)
- Manually rotate keys when needed
With Instance Roles:
- No need to store credentials on the instance
- Automatic credential rotation
- Temporary credentials (more secure)
- No manual configuration needed
Example: Creating an Instance Role
Here’s how I create a role that lets the EC2 instance read IAM users:
- Create IAM Role:
- Go to IAM → Roles → Create role
- Select AWS service → EC2
- Click Next
- Attach Permissions:
- Search for
IAMReadOnlyAccessand select it - Click Next
- Search for
- Name the Role:
- Role name:
EC2-IAM-ReadOnly-Role - Click Create role
- Role name:
- Attach Role to EC2 Instance:
- Go to EC2 → Instances
- Select your instance
- Click Actions → Security → Modify IAM role
- Select
EC2-IAM-ReadOnly-Role - Click Update IAM role
Testing the Role
Without a role attached, if you try to run AWS CLI commands, you’ll get an error:
1
2
$ aws iam list-users
Unable to locate credentials. You can configure credentials by running "aws configure".
After attaching the role, SSH into your instance and run:
1
aws iam list-users
The command will work automatically without any aws configure or credentials. The instance uses temporary credentials from the attached role.
Instance roles use IMDS (Instance Metadata Service) to give temporary credentials. These credentials rotate automatically and never get stored on disk, so they’re much safer than static access keys.

EC2 Instance Purchase Options
When you launch an EC2 instance, you’ll see different ways to pay. Each one has different prices and works better for different situations. Let me explain what I learned about them.
Purchase Options Summary
| Option | Discount | Commitment | Interruption Risk | Best For |
|---|---|---|---|---|
| On-Demand | None | None | None | Short-term, unpredictable workloads |
| Reserved Instances | Up to 72% | 1-3 years | None | Steady-state, predictable workloads |
| Spot Instances | Up to 90% | None | High (2-min notice) | Fault-tolerant, flexible workloads |
| Savings Plans | Up to 72% | 1-3 years | None | Flexible usage across EC2/Lambda/Fargate |
| Dedicated Instances | None | None | None | Compliance requiring physical isolation |
| Dedicated Hosts | None | None | None | Licensing requiring physical server control |
On-Demand Instances
On-Demand is like “pay-as-you-go”. You pay by the hour (or second) with no upfront costs. No commitment, you can stop anytime.
When to use:
- You’re testing a new application and don’t know how long you’ll need it
- Your traffic is unpredictable (e.g., a new product launch)
- You need instances for short-term projects
- Your application can’t tolerate interruptions
Example scenario: You’re building a prototype and need a few instances for a week. You don’t want to commit to a year, so On-Demand is perfect. When you’re done, you just stop the instances.
Reserved Instances
Reserved Instances are like a subscription. You commit to using an instance for 1-3 years, and AWS gives you a discount (up to 72% off).
The catch: You save money, but you’re stuck. If you don’t need it anymore, you still pay for it.
Payment options:
- All Upfront: Pay everything now, get the biggest discount
- Partial Upfront: Pay some now, rest monthly (middle ground)
- No Upfront: Pay monthly (smallest discount, but no upfront cost)
When to use:
- You have a production database that runs 24/7
- Your application has steady, predictable traffic
- You know you’ll need the instance for at least a year
Example scenario: Your web application runs on 4 instances constantly. Instead of paying On-Demand prices, you reserve them for 1 year with All Upfront payment. You save 40-50% compared to On-Demand.
Reserved Instances make sense when you know how much you’ll use. If you’re not sure, start with On-Demand and you can convert to Reserved later.
Spot Instances
Spot Instances are AWS selling unused capacity at a huge discount (up to 90% off). The problem? AWS can take them back with just 2 minutes warning when they need the capacity.
How it works: You set a maximum price you’re willing to pay. If the current Spot price is below your max, you get the instance. If AWS needs the capacity back, they give you a 2-minute warning and terminate your instance.
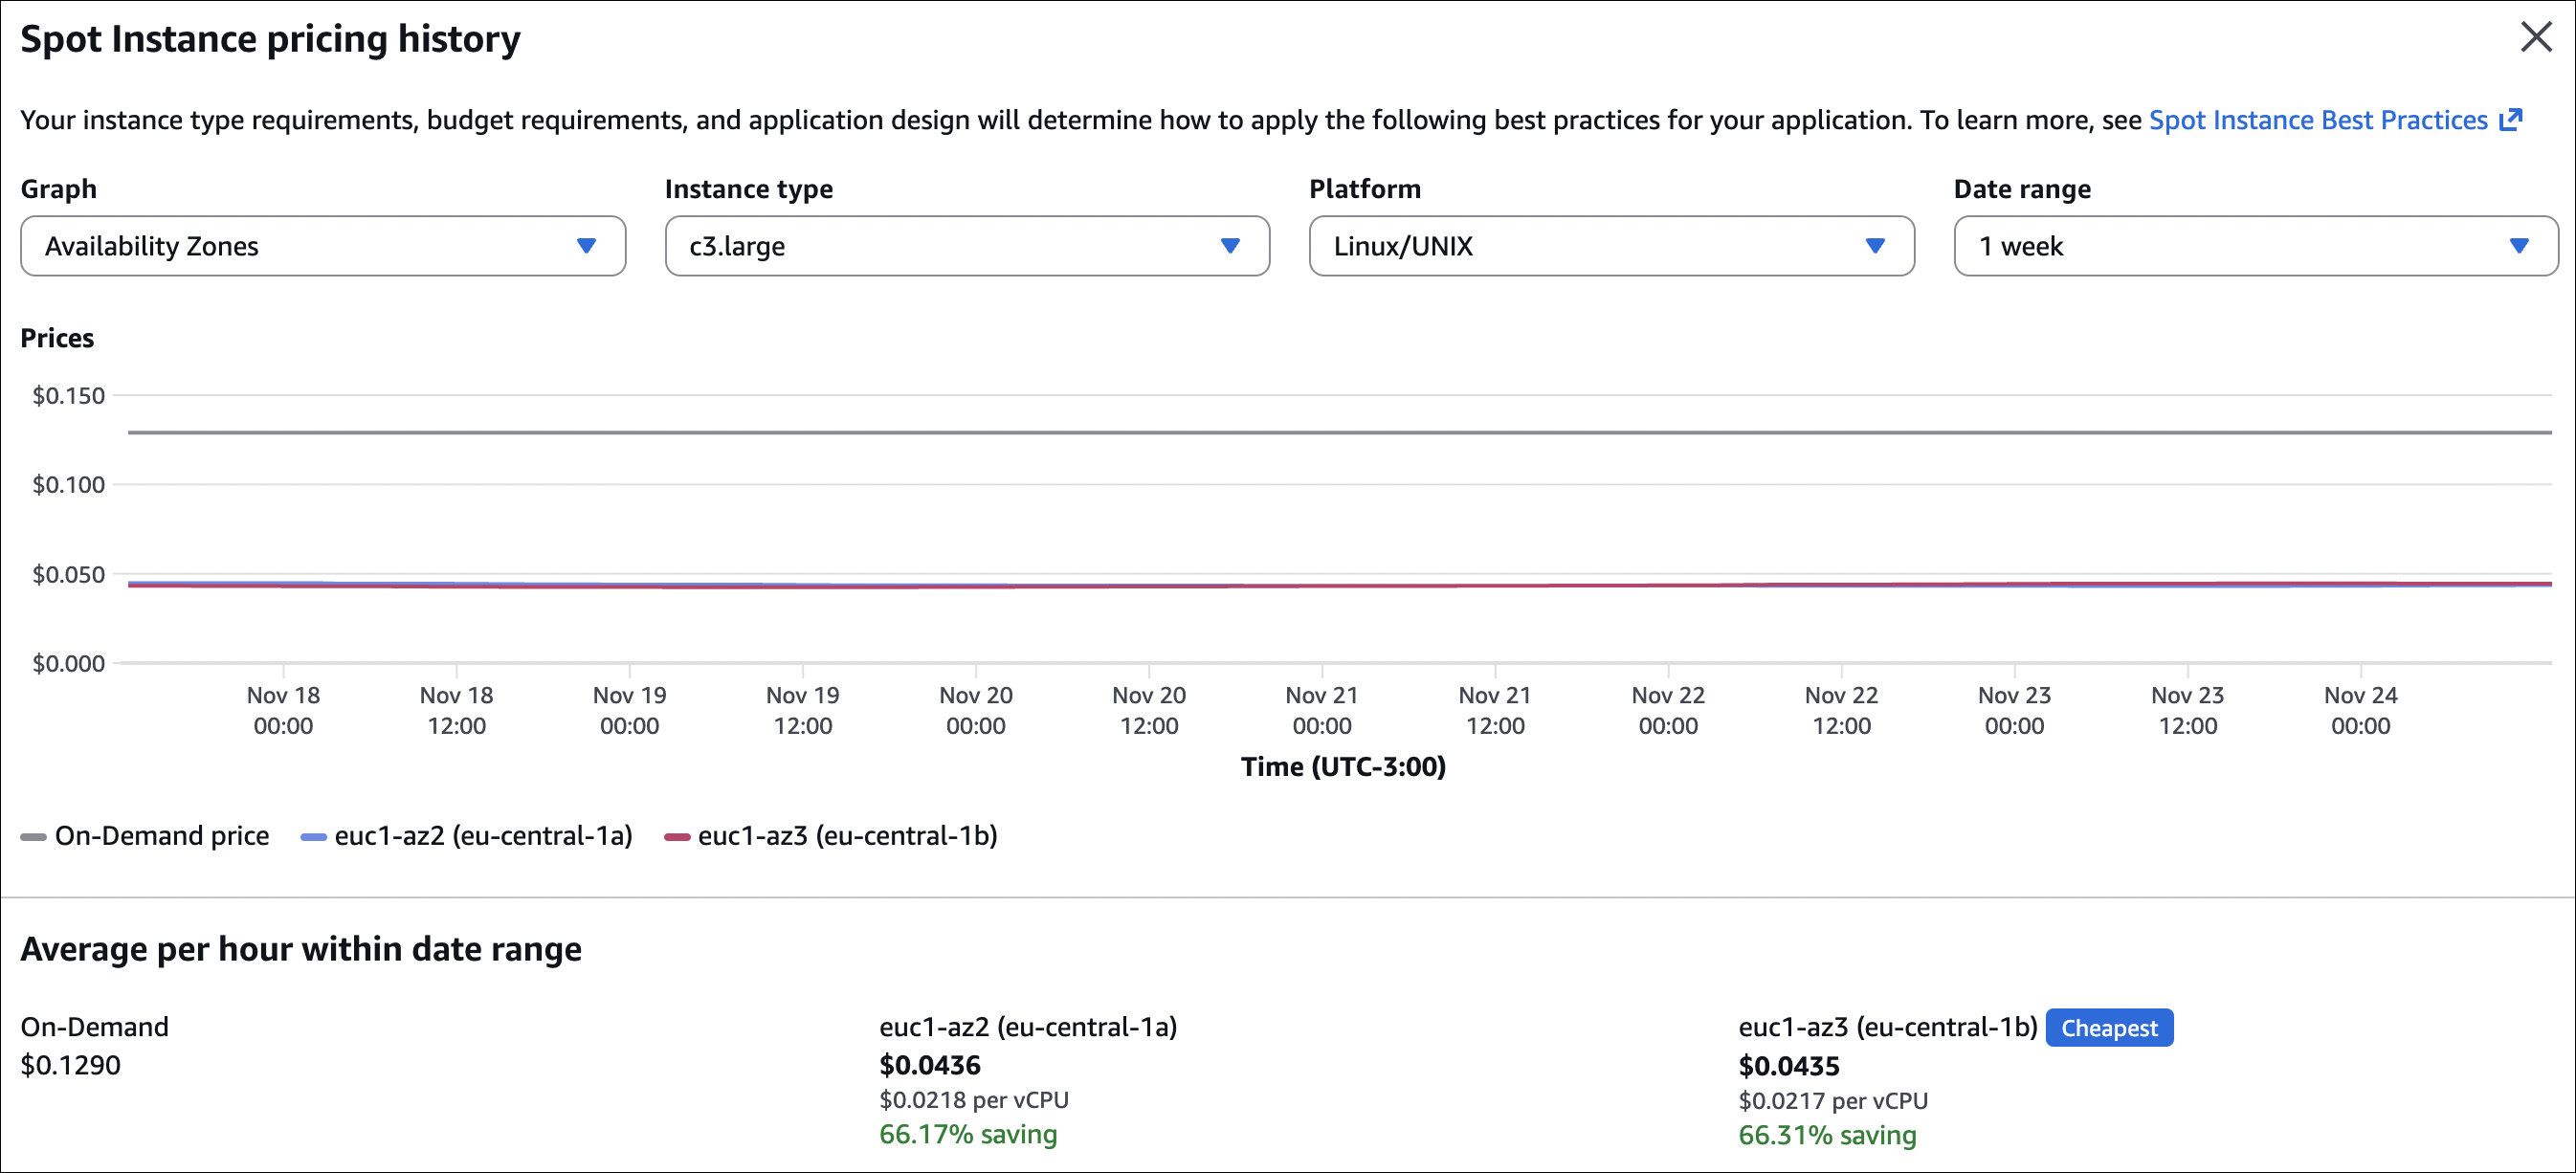
Checking Spot prices: Before you request Spot Instances, check the pricing history. Go to EC2 → Spot Requests → Pricing History to see what prices were like before. This helps you set a good maximum price.
When to use:
- You’re running batch jobs that can be restarted
- You’re doing data analysis that can handle interruptions
- You have fault-tolerant applications
- Cost is more important than guaranteed availability
Example scenario: You need to process 1000 hours of video. It doesn’t matter if it takes 10 hours or 12 hours, and if an instance gets interrupted, you can restart the job. Spot Instances can save you 70-90% compared to On-Demand.
Persistent vs One-time requests:
- One-time: Request is fulfilled once. If the instance gets interrupted, it’s gone. You need to create a new request manually.
- Persistent: Request stays active. If the instance gets interrupted, AWS automatically launches a new one when capacity is available again. You don’t need to do anything.
So yes, if you choose persistent when creating a Spot Instance, AWS will automatically replace it with a new VM when it gets interrupted (as long as capacity is available at your max price).
Spot Instances are great for cost savings, but your application must handle interruptions gracefully. With persistent requests, AWS automatically replaces interrupted instances, so you don’t need to manually create new ones.
Spot Fleet
Spot Fleet is basically a service that automatically manages a group of Spot Instances. You just say “I need 10 instances” and it handles the rest.
How it works:
- You set a target capacity (like 10 instances)
- Spot Fleet automatically creates Spot Instances using different instance types and AZs
- If an instance gets interrupted, it automatically creates a new one
- You can mix Spot and On-Demand if you want (for guaranteed capacity)
Why use it:
- Diversification: Uses different instance types and AZs, reduces interruption risk
- Automatic replacement: If an instance gets interrupted, you don’t need to do anything, it handles it
- Cost optimization: Automatically picks the cheapest combination
- Flexible: Can use multiple instance types, sizes, and AZs
When to use:
- Large batch jobs
- Data analysis work
- CI/CD pipelines
- Video/image processing
- Basically, any work that can handle interruptions
Example: You need 20 instances to process a large dataset. Instead of manually managing 20 Spot Instances, you create a Spot Fleet and say “I need 20 instances”. Spot Fleet automatically:
- Picks different instance types (m5.large, m5.xlarge, c5.large, etc.)
- Spreads them across different AZs
- Replaces interrupted instances automatically
- Picks the cheapest combination
Spot Fleet is ideal when you need multiple Spot Instances and want AWS to manage the complexity of diversification and replacement. It’s more cost-effective and reliable than manually managing individual Spot Instances.
Spot Instance vs Spot Fleet
There are two ways to create Spot Instances:
Creating one by one from EC2:
- Go to EC2 → Launch instance → Purchase options → Request Spot Instances
- You choose one instance type (like m5.large)
- You choose one Availability Zone
- If the instance gets interrupted, you need to manually create a new one
- Good for simple tasks, ideal for single instances
Using Spot Fleet:
- You create a Spot Fleet and say “I need 10 instances”
- Spot Fleet automatically picks different instance types (m5.large, m5.xlarge, c5.large, etc.)
- It spreads them across different Availability Zones
- If an instance gets interrupted, it automatically creates a new one
- Much better for multiple instances
What’s the difference? Spot Instance is manual, one by one. Spot Fleet is automatic, manages multiple instances and handles interruptions automatically.
Creating a Spot Fleet
Step 1: Create Spot Fleet Request
- Go to EC2 → Spot Requests → Spot Fleet
- Click Create Spot Fleet
Step 2: Configure Fleet Composition
- Target capacity: Set how many instances you want (e.g., 10)
- On-Demand vs Spot: Choose the mix
- 100% Spot: Maximum savings, higher interruption risk
- Mix: Some On-Demand for guaranteed capacity, rest Spot for savings
- Instance types: Add multiple instance types (e.g., m5.large, m5.xlarge, c5.large)
- Spot Fleet will choose the cheapest combination to meet your target
Step 3: Configure Launch Specifications For each instance type:
- Select AMI
- Choose instance type
- Select key pair
- Configure security groups
- Set maximum price (or use On-Demand price)
Step 4: Set Allocation Strategy
- LowestPrice: Fulfill capacity from the lowest-priced pools (can concentrate in one AZ)
- Diversified: Distribute across all pools (better for availability)
- CapacityOptimized: Launch from pools with optimal capacity (best for interruption risk)
Step 5: Review and Create
- Review your configuration
- Click Create Spot Fleet
- Spot Fleet will start requesting instances to meet your target capacity
Important: Spot Fleet handles everything automatically. If instances get interrupted, it replaces them. You can change the target capacity anytime, and Spot Fleet will adjust.
Savings Plans
Savings Plans are like Reserved Instances but more flexible. You commit to spending a certain amount per hour for 1-3 years, and you get discounts on EC2, Lambda, and Fargate.
The good part: Unlike Reserved Instances, you can change instance types, families, regions, or even switch between EC2, Lambda, and Fargate. You just need to meet your hourly spending commitment.
When to use:
- You want Reserved Instance discounts but need flexibility
- You use multiple AWS compute services (EC2, Lambda, Fargate)
- Your needs might change, but you still want to save money
Example scenario: You commit to $10/hour for 1 year. You can use any combination of EC2 instances, Lambda functions, or Fargate tasks - as long as your total compute spending averages $10/hour. This gives you flexibility while still saving 40-72% compared to On-Demand.
Savings Plans are usually easier to manage than Reserved Instances because you don’t need to worry about matching instance types. Just meet your spending commitment.
Dedicated Instances vs Dedicated Hosts
Both give you physical isolation, but they’re different:
Dedicated Instances:
- Your instances run on hardware dedicated to you
- No visibility: You can’t see which physical server your instance is on
- AWS manages placement: AWS decides which physical server to use
- Lower cost: Cheaper than Dedicated Hosts
- Use case: You need isolation but don’t need to control physical placement
Dedicated Hosts:
- A physical server fully dedicated to you
- Full visibility: You can see sockets, cores, and hypervisor details
- You control placement: You decide which instances run on which host
- Higher cost: More expensive than Dedicated Instances
- Use case: You need to meet licensing requirements (e.g., Windows Server licenses bound to physical servers)
Key difference: Dedicated Instances give you isolation without control. Dedicated Hosts give you both isolation and full control over physical placement.
When to use Dedicated Instances:
- You need physical isolation for compliance
- You don’t need to see or control physical server placement
- Cost is a concern
When to use Dedicated Hosts:
- You have software licenses tied to physical servers (BYOL - Bring Your Own License)
- You need to see and control which instances run on which physical server
- You need to meet strict compliance requirements
Example scenario: Your company has Windows Server licenses that require physical server binding. With Dedicated Hosts, you can see exactly which physical server your instances run on and use your existing licenses. With Dedicated Instances, you get isolation but can’t see the physical server, so you can’t use server-bound licenses.
Most apps don’t need dedicated hardware. Only use it when you have specific compliance or licensing requirements.
Price Comparison Example
Let me compare prices for an m5.large instance (2 vCPUs, 8 GB RAM) in US East (N. Virginia) to show you the cost differences:
| Purchase Option | Hourly Cost (approx.) | Monthly Cost (approx.) | Annual Cost (approx.) | Savings vs On-Demand |
|---|---|---|---|---|
| On-Demand | $0.096 | ~$70 | ~$840 | Baseline |
| Reserved 1yr - All Upfront | $0.053 | ~$39 | ~$465 | ~45% savings |
| Reserved 1yr - Partial Upfront | $0.058 | ~$42 | ~$505 | ~40% savings |
| Reserved 1yr - No Upfront | $0.063 | ~$46 | ~$550 | ~35% savings |
| Reserved 3yr - All Upfront | $0.031 | ~$23 | ~$270 | ~68% savings |
| Reserved 3yr - Partial Upfront | $0.035 | ~$26 | ~$305 | ~64% savings |
| Reserved 3yr - No Upfront | $0.040 | ~$29 | ~$350 | ~58% savings |
| Spot (average) | $0.029 | ~$21 | ~$250 | ~70% savings |
| Savings Plans (1yr) | $0.053 | ~$39 | ~$465 | ~45% savings |
Note: Prices are approximate and change by region, instance type, and time. Spot prices go up and down based on demand. All Upfront gives the biggest discount but you pay everything upfront. No Upfront has the smallest discount but no upfront payment. Always check current AWS pricing for accurate costs.
Creating a Spot Fleet - Step by Step Example
Here’s how I create a Spot Fleet step by step:
Step 1: Check Spot Pricing History
- Go to EC2 → Spot Requests → Pricing History
- Look at different instance types (e.g., m5.large, m5.xlarge, c5.large)
- Check different Availability Zones
- Note the prices - this helps you understand what to expect
Step 2: Create Spot Fleet Request
- Go to EC2 → Spot Requests → Spot Fleet
- Click Create Spot Fleet
Step 3: Configure Fleet Composition
- Target capacity: Set how many instances you want (e.g., 10)
- On-Demand vs Spot: Choose the mix
- 100% Spot: Maximum savings, but higher interruption risk
- Mix: Some On-Demand for guaranteed capacity, rest Spot for savings
- Instance types: Add multiple instance types (e.g., m5.large, m5.xlarge, c5.large)
- Spot Fleet will pick the cheapest combination to meet your target
Step 4: Configure Launch Specifications For each instance type you added:
- Select AMI (e.g., Amazon Linux)
- Choose instance type
- Select key pair
- Configure security groups
- Set maximum price (or use On-Demand price)
Step 5: Set Allocation Strategy
- LowestPrice: Gets instances from the cheapest pools (might put them all in one AZ)
- Diversified: Spreads across all pools (better for availability)
- CapacityOptimized: Launches from pools with best capacity (best for avoiding interruptions)
Step 6: Review and Create
- Review everything
- Click Create Spot Fleet
- Spot Fleet starts requesting instances to meet your target capacity
Important things to know:
- Spot Fleet manages everything automatically. If instances get interrupted, it replaces them.
- You can change the target capacity anytime, and Spot Fleet will adjust.
- Spot Fleet picks the cheapest combination of instances to meet your target, so you save money.
- Using multiple instance types and AZs reduces the chance of all instances getting interrupted at once.
Spot Fleet is great when you need multiple instances. It handles all the complexity for you - diversification, replacement, cost optimization. Much easier than managing individual Spot Instances.

IP Addresses in EC2
When I create an EC2 instance, it gets IP addresses. There are three types I need to remember: private IP, public IP, and Elastic IP.
| IP Type | Changes? | Cost | Use Case |
|---|---|---|---|
| Private IP | Changes on stop/start | Free | Internal communication between instances |
| Public IP | Changes on stop/start | Free | Internet access, SSH, downloads |
| Elastic IP | Stays the same | Free if attached to running instance, costs money if unused | Fixed IP for DNS, keep IP after restart |
Private IP
Every instance gets a private IP automatically. This one:
- Stays with the instance while it’s running
- Only works inside the VPC (can’t reach it from internet)
- Good for instances talking to each other (like web server to database)
- Changes when you stop and start the instance
Used for internal communication between instances (e.g., web server to database).
Public IP
A public IP lets your instance talk to the internet. This one:
- Gets assigned automatically when you launch (if you enable it)
- Changes every time you stop and start the instance
- Only works if your instance is in a public subnet
- Free, but not permanent
I use this when I need to SSH into my instance or when the instance needs to download stuff from the internet.
You can turn off public IP when launching if you don’t need internet access. More secure for instances that only talk to other instances.
Elastic IP
Elastic IP is a static public IP that doesn’t change. This one:
- Stays the same even when you stop and start the instance
- You can move it from one instance to another
The money part:
- Free if it’s attached to a running instance
- Costs money (about $0.005 per hour) if it’s not attached or attached to a stopped instance
Important: You can attach multiple Elastic IPs to one instance, but only the first one is free. If you attach 3 Elastic IPs to a running instance, the first one is free, but the other 2 will cost you money (about $0.005 per hour each). Same goes for unused Elastic IPs - they cost money too.
I use this when:
- My app needs a fixed IP (like DNS pointing to it)
- I want to keep the same IP after restarting
- I need to quickly move the IP to a different instance
How to create and use:
- Go to EC2 → Network & Security → Elastic IPs → Allocate Elastic IP address
- Click Allocate
- Select the Elastic IP → Actions → Associate Elastic IP address
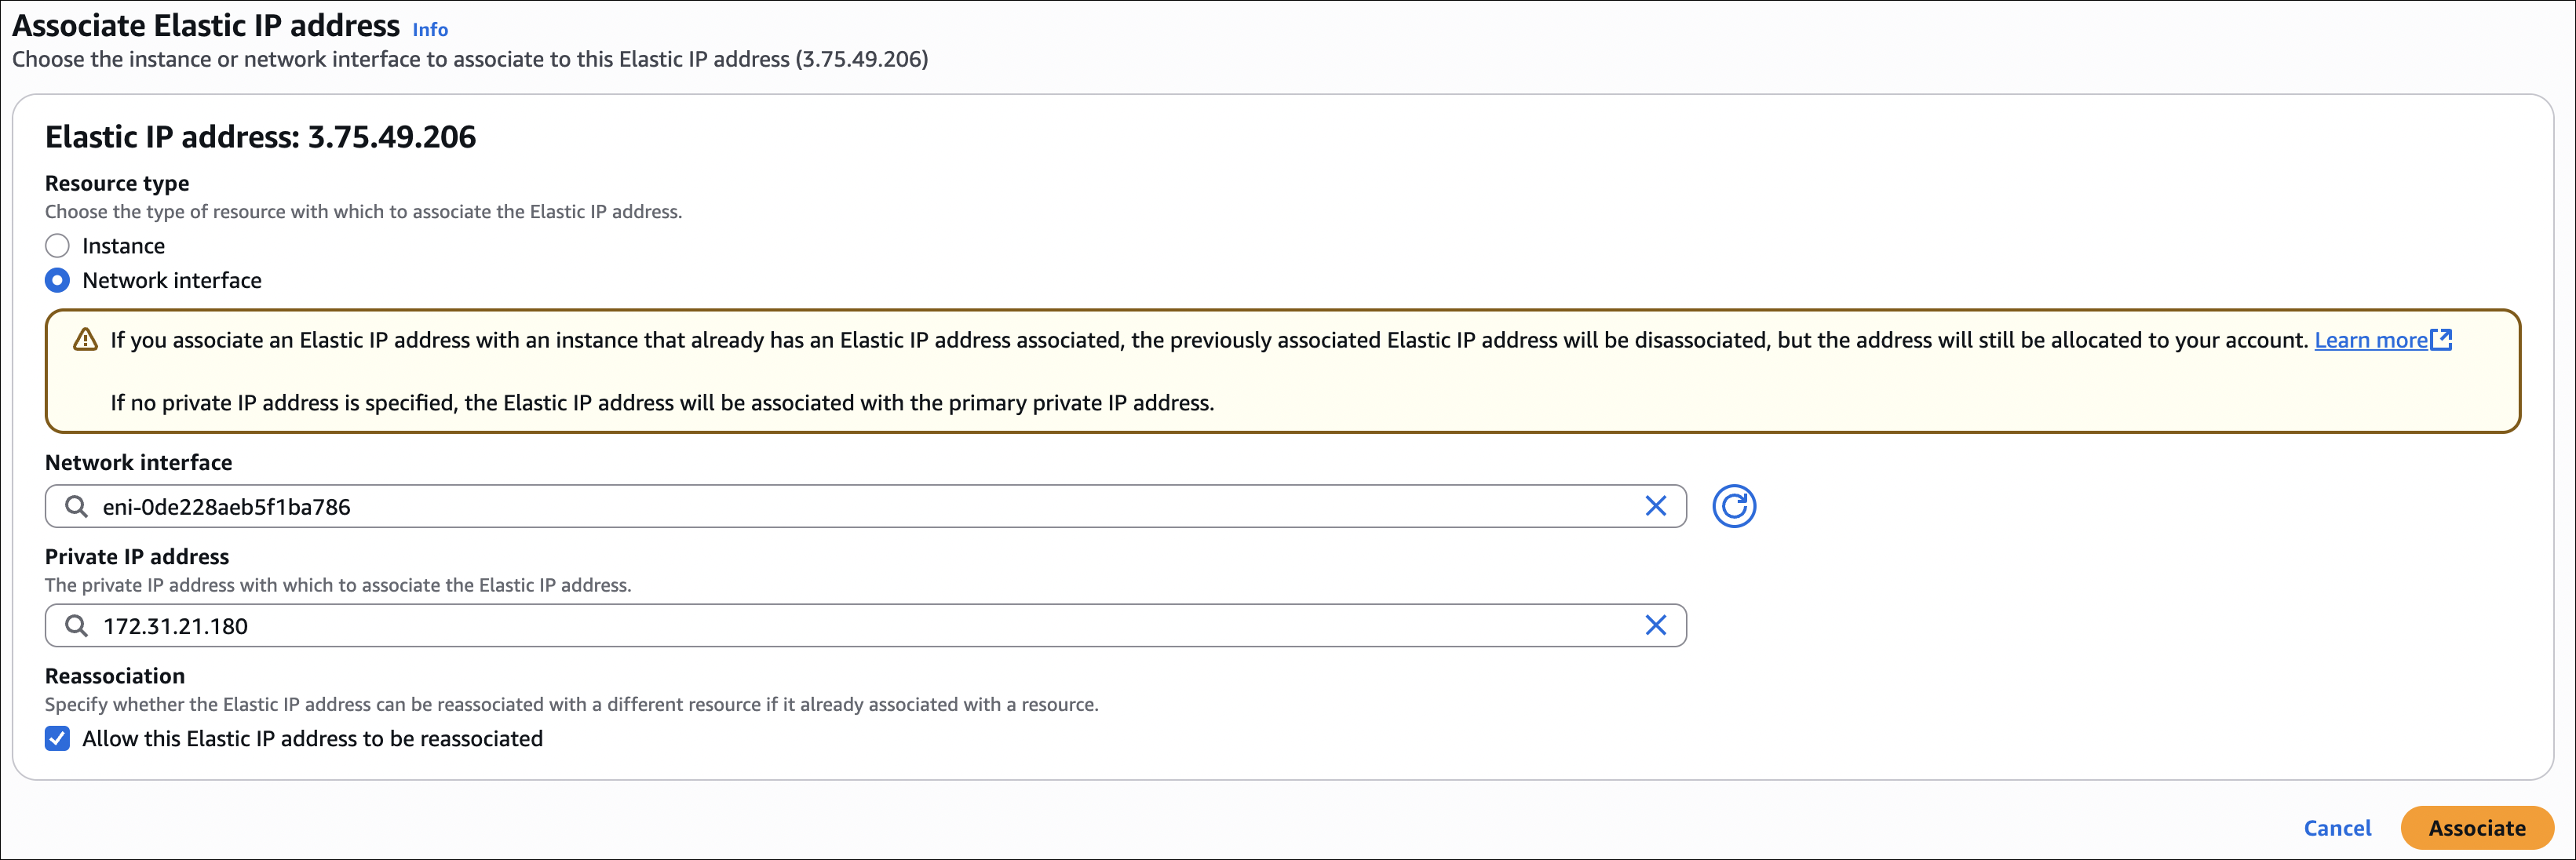
- Choose Resource type:
- Instance: Most common - attach to instance’s primary network interface
- Network interface: For multiple ENIs or unattached ENIs
- Depending on what you chose:
- If you picked Instance: Select your instance from the list
- If you picked Network interface: Select the network interface from the list
- If the Elastic IP is already attached to another resource, you’ll see a checkbox: “Allow this Elastic IP address to be reassociated”. Check this if you want to move it directly to the new resource (it will automatically disassociate from the old one). If you don’t check it, you need to disassociate it first.
- Click Associate
Important notes:
- If you attach a new Elastic IP to an instance that already has one, the old one gets disassociated automatically. But it stays allocated to your account, so check your Elastic IPs list and release the ones you’re not using to avoid charges.
- If your instance has multiple private IPs, you can choose which one to associate the Elastic IP with. If you don’t pick one, it goes to the primary private IP (which is usually fine).
When I don’t need it anymore: If it’s attached to an instance, I first disassociate it. Then I select the Elastic IP → Actions → Release Elastic IP addresses → Release. This stops the charges.
Placement Groups
Placement groups control where AWS places your EC2 instances. Sometimes you want instances close together (for low latency), sometimes you want them far apart (for fault tolerance). That’s what placement groups are for.
For detailed information, check the AWS documentation on placement strategies.
| Placement Group Type | Use Case | Limits | Availability Zones |
|---|---|---|---|
| Cluster | Low latency, high throughput (HPC, big data) | Same AZ only, same instance type recommended | Single AZ |
| Partition | Large distributed systems (HDFS, Cassandra) | Up to 7 partitions per AZ, 100s of instances | Multiple AZs |
| Spread | Critical applications, small clusters | Max 7 instances per AZ, not for Dedicated Instances | Multiple AZs |
How to create and use:

- Create the placement group first:
- Go to EC2 → Network & Security → Placement Groups → Create placement group
- Give it a name
- Choose the placement strategy: Cluster, Partition, or Spread
- Click Create placement group
- When launching an instance:
- During instance launch, go to Advanced details section (scroll down)
- Find Placement group dropdown
- Select your placement group from the list
- For Partition placement groups, you can also specify a partition number (1-7) if you want a specific partition
That’s it. The instance will be placed according to the placement group strategy you chose.

Cluster Placement Group
Puts all instances in the same AZ, close together for low latency and high throughput.
When to use: HPC, big data (Hadoop, Spark), applications needing maximum network performance.
Key points:
- Single AZ only
- Same instance type recommended (can mix but not recommended)
- Launch all instances at once to avoid capacity errors
- Up to 10 Gbps network speed (with enhanced networking)
- Not supported: T2 (burstable), Mac1, M7i-flex
Partition Placement Group
Divides instances into logical partitions. Each partition is isolated - if one fails, others keep running.
When to use: Large distributed systems (HDFS, HBase, Cassandra), hundreds of instances needing logical separation.
Key points:
- Up to 7 partitions per AZ
- Can span multiple AZs (unlike Cluster)
- Can mix instance types
- Can add instances to existing partitions
- With Dedicated Instances: max 2 partitions (instead of 7)
- Can specify partition number (1-7) when launching
Spread Placement Group
Each instance on completely separate hardware (own rack). Maximum fault tolerance.
When to use: Critical applications, small clusters (2-3 instances), production databases (primary/standby).
Key points:
- Max 7 instances per AZ (21 total in 3 AZs)
- Can span multiple AZs
- Can mix instance types
- Not supported for Dedicated Instances
- If one instance fails, others unaffected
Which One Should I Use?
Cluster → Need maximum performance and low latency? Same AZ is fine? Use Cluster.
Partition → Have a big distributed system? Need logical separation? Use Partition.
Spread → Have a small critical application? Need maximum fault tolerance? Use Spread.
Things to remember:
- Can’t change placement group type after creating it
- Can’t move instances between placement groups
- If capacity error: try launching all at once (Cluster) or try again later
- Placement groups are free
- Capacity Reservations: work with Cluster, don’t work with Partition/Spread
Elastic Network Interface (ENI)
An ENI is a virtual network interface that you can attach to an EC2 instance. Think of it as a network card for your instance.
What it does:
- Gives your instance network connectivity
- Can have multiple IP addresses (primary + secondary)
- Can attach/detach from instances (even while running)
- Can move between instances in the same AZ
When to use it:
- Need multiple IP addresses on one instance
- Want to separate network traffic (management vs data)
- Building high availability setups (failover scenarios)
- Network appliances (firewalls, load balancers)
- Need to keep the same IP when replacing an instance
Key concepts:
Primary ENI:
- Created automatically when you launch an instance
- Can’t detach it (it’s tied to the instance)
- Gets deleted when instance terminates
- Has the primary private IP
Secondary ENI:
- You create and attach manually
- Can attach/detach while instance is running
- Can move to different instances (same AZ)
- Useful for multiple IPs or network separation
ENI features:
- Multiple IPs: One primary private IP, can add secondary private IPs
- Elastic IP: Can attach Elastic IP to any private IP on the ENI
- Security Groups: Each ENI can have its own security group
- MAC Address: Each ENI has a unique MAC address
- Source/Dest Check: Enabled by default (instance must be source/dest of traffic). Disable for NAT instances, load balancers, etc.
Limits:
- Instance type determines max ENIs per instance (check AWS docs)
- Example: t3.micro = 2 ENIs, m5.large = 3 ENIs, c5n.18xlarge = 15 ENIs
- Max 50 secondary private IPs per ENI (varies by instance type)
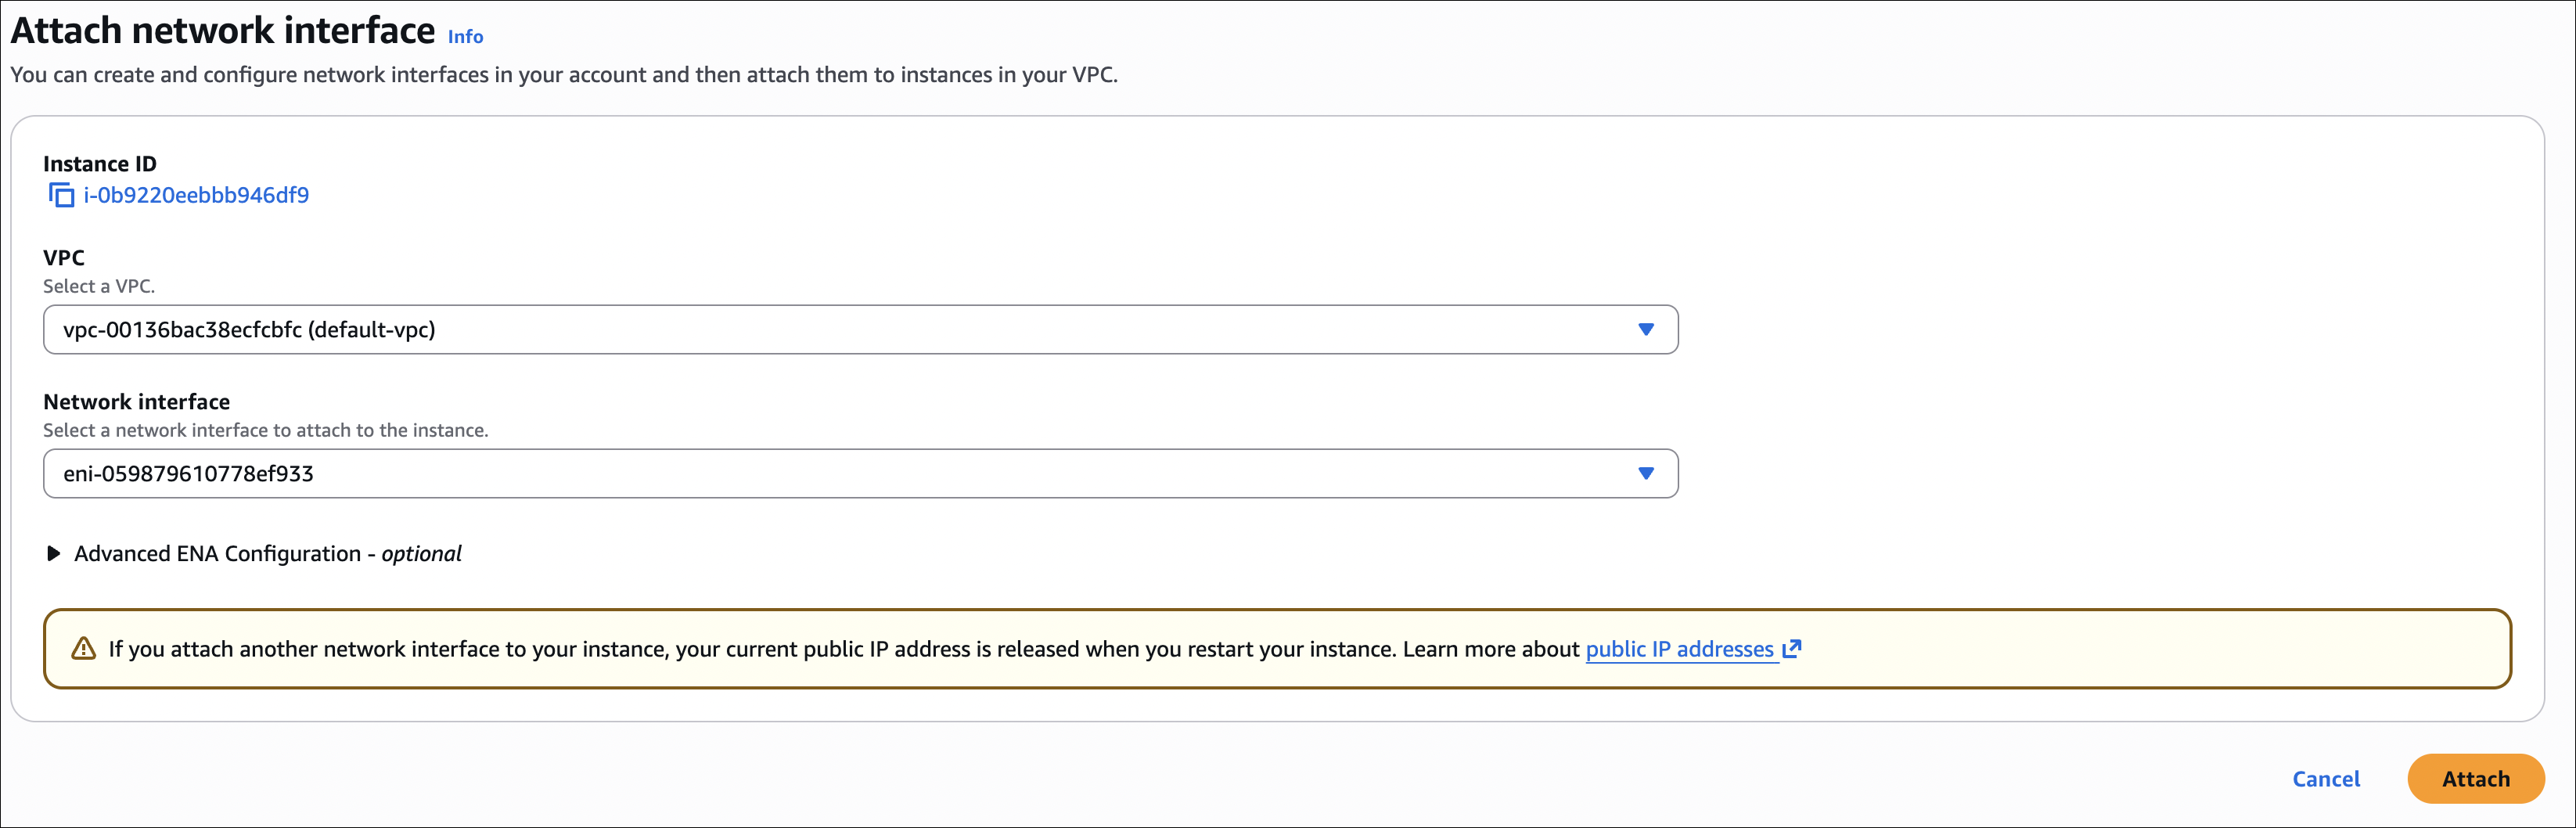
How to use:
- Create an ENI:
- Go to EC2 → Network & Security → Network Interfaces → Create network interface
- Select subnet, security group, private IP (optional)
- Click Create network interface
- Attach to instance:
- Select ENI → Actions → Attach
- Choose instance (must be in same AZ)
- Can attach while instance is running
- Detach from instance:
- Select ENI → Actions → Detach
- ENI stays available, can attach to another instance
Important notes:
- ENI must be in same AZ as instance
- Can attach Elastic IP to ENI (not just instance)
- When instance terminates, primary ENI is deleted, secondary ENIs are detached (not deleted)
- Disable source/dest check for NAT instances, transparent proxies, etc.
- ENI keeps its configuration (IPs, security groups) when moved between instances
EC2 Hibernate
Hibernate saves the instance’s RAM to disk (EBS) before stopping. When you start it again, it restores everything exactly as it was - running processes, open files, network connections, etc.
What’s the difference?
Stop/Start:
- RAM is lost
- Instance reboots (fresh start)
- Takes longer to start
- Applications need to restart
Hibernate:
- RAM is saved to EBS
- Instance resumes exactly where it left off
- Faster startup (no reboot)
- Applications continue running
When to use it:
- Long-running applications that take time to start
- Applications with complex state that’s hard to restore
- Development/test environments (pause work, resume later)
- Cost savings: stop instances but keep state
Requirements:
- Instance type: C3, C4, C5, M3, M4, M5, R3, R4, R5 (and newer generations)
- Instance size: Not supported for bare metal instances
- Root volume: Must be EBS (not instance store)
- Root volume size: Must be at least RAM size + OS and applications space
- Example: 4 GB RAM instance needs root volume with at least 4 GB free space for RAM + space for OS/apps
- AWS recommends: RAM size + enough space for your OS and applications
- If root volume is full, hibernate will fail
- AMI: Must be Amazon Linux 2, Ubuntu 16.04+, or Windows Server 2016+
- RAM: Max 150 GB RAM (for the instance)
- Encryption: Root volume must be encrypted (RAM contents are saved to disk, so encryption is required)
How to enable:
- When launching:
- First, enable EBS encryption for root volume:
- Go to Storage section
- Under root volume, check Encrypt this volume (or use encrypted AMI)
- Or enable account-level default encryption (all new volumes encrypted automatically)
- Then go to Advanced details section
- Find Stop - Hibernate behavior
- Select Enable
- First, enable EBS encryption for root volume:
- On existing instance:
- Can’t enable hibernate on running instance
- Must create new instance with:
- Encrypted root volume (check “Encrypt this volume” or use encrypted AMI)
- Hibernate enabled in Advanced details
How to use:
- Hibernate: EC2 Console → Select instance → Instance state → Stop and hibernate
- Resume: EC2 Console → Select instance → Instance state → Start
How to test it:
- SSH into your instance and check uptime:
1
uptime
Note the uptime (e.g., “up 2 hours, 15 minutes”)
- Hibernate the instance:
- EC2 Console → Select instance → Instance state → Stop and hibernate
- Wait a few minutes
- Start the instance and check uptime again:
- EC2 Console → Instance state → Start
- Wait for running, then SSH back in
1
uptime
Result:
- If hibernate worked: Uptime continues from before (e.g., “up 2 hours, 20 minutes”) - no reboot happened
- If it was regular stop/start: Uptime resets (e.g., “up 2 minutes”) - instance rebooted
That’s the easiest way to verify hibernate worked - uptime doesn’t reset because there’s no reboot.
Important notes:
- Hibernate takes a few minutes (saving RAM to disk)
- Resume is faster than regular start (no reboot)
- Charges: You pay for EBS storage while hibernated (not compute)
- Limitations: Can’t hibernate if root volume is full, can’t hibernate Spot Instances
- Data: RAM contents saved to root volume, so make sure you have enough space
- Security: Root volume must be encrypted, so RAM contents are always encrypted when saved
- Networking: Private IP can change after hibernate (unless using Elastic IP)
EBS (Elastic Block Store)
EBS is persistent block storage for EC2 instances. Think of it as a virtual hard drive that you can attach to your instances. Unlike instance store, EBS volumes persist even after you stop or terminate the instance.
- Persistent storage (survives instance stop/terminate)
- Can only attach to instances in the same Availability Zone (AZ-specific)
- Can detach and attach to different instances (same AZ only)
- Can create snapshots for backup
- Can encrypt volumes
- Can resize volumes (increase size, change type)
- Can create multiple volumes and attach to one instance
EBS Volume Types
For detailed information, check the AWS documentation on EBS volume types.
| Volume Type | Use Case | IOPS | Throughput | Min Size | Max Size | Boot Volume |
|---|---|---|---|---|---|---|
| gp3 | General purpose (most workloads) | 3,000 (up to 16,000) | 125 MB/s (up to 1,000 MB/s) | 1 GB | 16 TB | Yes |
| gp2 | General purpose (legacy) | 3 IOPS/GB (up to 16,000) | 250 MB/s | 1 GB | 16 TB | Yes |
| io2 Block Express | High performance, mission-critical | Up to 256,000 | Up to 4,000 MB/s | 4 GB | 64 TB | Yes |
| io2 | High performance, mission-critical | Up to 64,000 | Up to 1,000 MB/s | 4 GB | 16 TB | Yes |
| io1 | High performance (legacy) | Up to 64,000 | Up to 1,000 MB/s | 4 GB | 16 TB | Yes |
| st1 | Throughput optimized (sequential workloads) | 500 | 500 MB/s | 125 GB | 16 TB | No |
| sc1 | Cold HDD (infrequently accessed) | 250 | 250 MB/s | 125 GB | 16 TB | No |
Key differences:
- gp3/gp2: General purpose, default choice. gp3 is newer and 20% cheaper.
- io2 Block Express/io2/io1: High IOPS, guaranteed performance. Use when you need guaranteed high IOPS (databases, mission-critical apps).
- st1: High throughput for sequential workloads. Cannot be boot volume.
- sc1: Lowest cost, lowest performance. For rarely accessed data. Cannot be boot volume.
Delete on Termination
Controls whether the EBS volume is deleted when the instance terminates.
Default behavior:
- Root volume: Delete on Termination = YES (OS disk usually not needed after termination)
- Additional volumes: Delete on Termination = NO (data should be preserved)
Can configure per volume when launching instance or attaching volume.
EBS Multi-Attach
Multi-Attach allows you to attach the same EBS volume to multiple EC2 instances in the same Availability Zone.
Supported volume types:
- io1 and io2 only (not gp3, gp2, st1, sc1)
- io2 Block Express does not support multi-attach
When to use:
- Clustered applications
- Applications that need shared storage across multiple instances
- High availability setups where multiple instances need access to same data
Important requirements:
- All instances must be in the same Availability Zone
- Volume must be io1 or io2 type
- File system must support concurrent access (e.g., cluster file systems)
- All instances can read and write simultaneously
Limitations:
- Max 16 instances per volume
- Only io1/io2 volumes (not io2 Block Express)
- Same AZ only
How to use:
- Create an io1 or io2 volume
- Attach it to first instance (normal attachment)
- Attach same volume to additional instances (up to 16 total)
- Format and mount with cluster file system (e.g., GFS2, OCFS2)
Using regular file systems (ext4, xfs) with multi-attach can cause data corruption. Use cluster file systems that support concurrent access. Alternatively, consider using EFS (managed file system) for shared storage across multiple instances.
EBS Encryption
Encrypts data on disk and data moving between instance and volume. Uses KMS keys (AWS managed or your own).
How to encrypt new volume:
When creating volume or launching instance, just check Encrypt this volume. That’s it. No performance hit.
How to encrypt existing unencrypted volume:
Can’t encrypt it directly. Here’s what I do:
- Create snapshot of the unencrypted volume
- Copy snapshot → Check Encrypt this snapshot → Choose KMS key
- Create new volume from the encrypted snapshot
- Attach new encrypted volume to instance (replace the old one)
- Delete old unencrypted volume and snapshot
Bit of a hassle, but that’s the only way.
Account-level default encryption:
Can enable this so all new volumes are encrypted automatically. Still can create unencrypted ones manually if you want.
Things to remember:
- Once encrypted, can’t disable it
- Encrypted volumes create encrypted snapshots (and vice versa)
- EC2 Hibernate needs encrypted root volume
- Can share encrypted volumes/snapshots with other accounts (they need KMS key access)
Creating and Attaching EBS Volume to Existing Instance
Let’s create a new EBS volume and attach it to an existing EC2 instance.
Step 1: Check Instance Availability Zone
First, we need to know which AZ our instance is in:
- Go to EC2 → Instances
- Select your instance
- Check the Availability Zone in the instance details (e.g.,
eu-central-1a)
The EBS volume must be in the same Availability Zone as the instance. You can’t attach a volume from a different AZ.
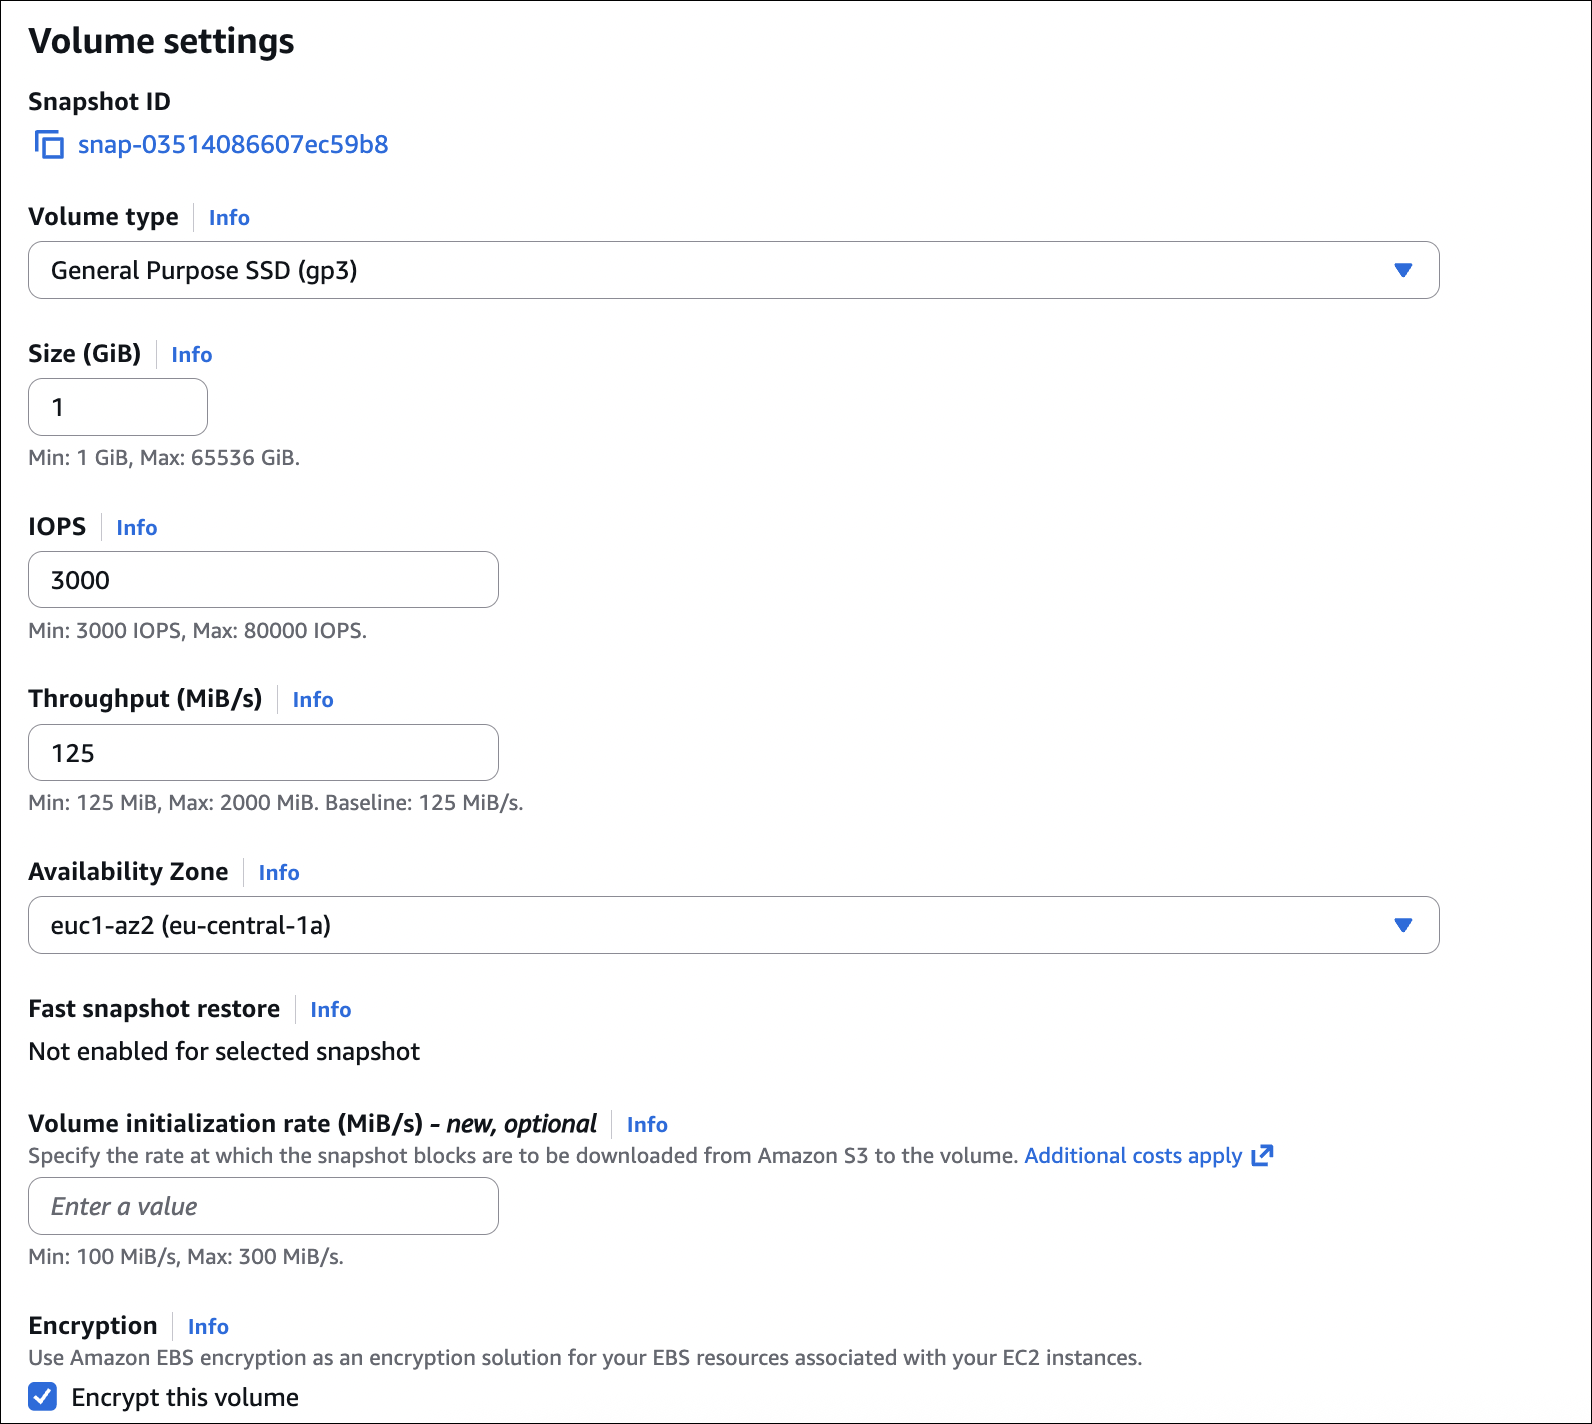
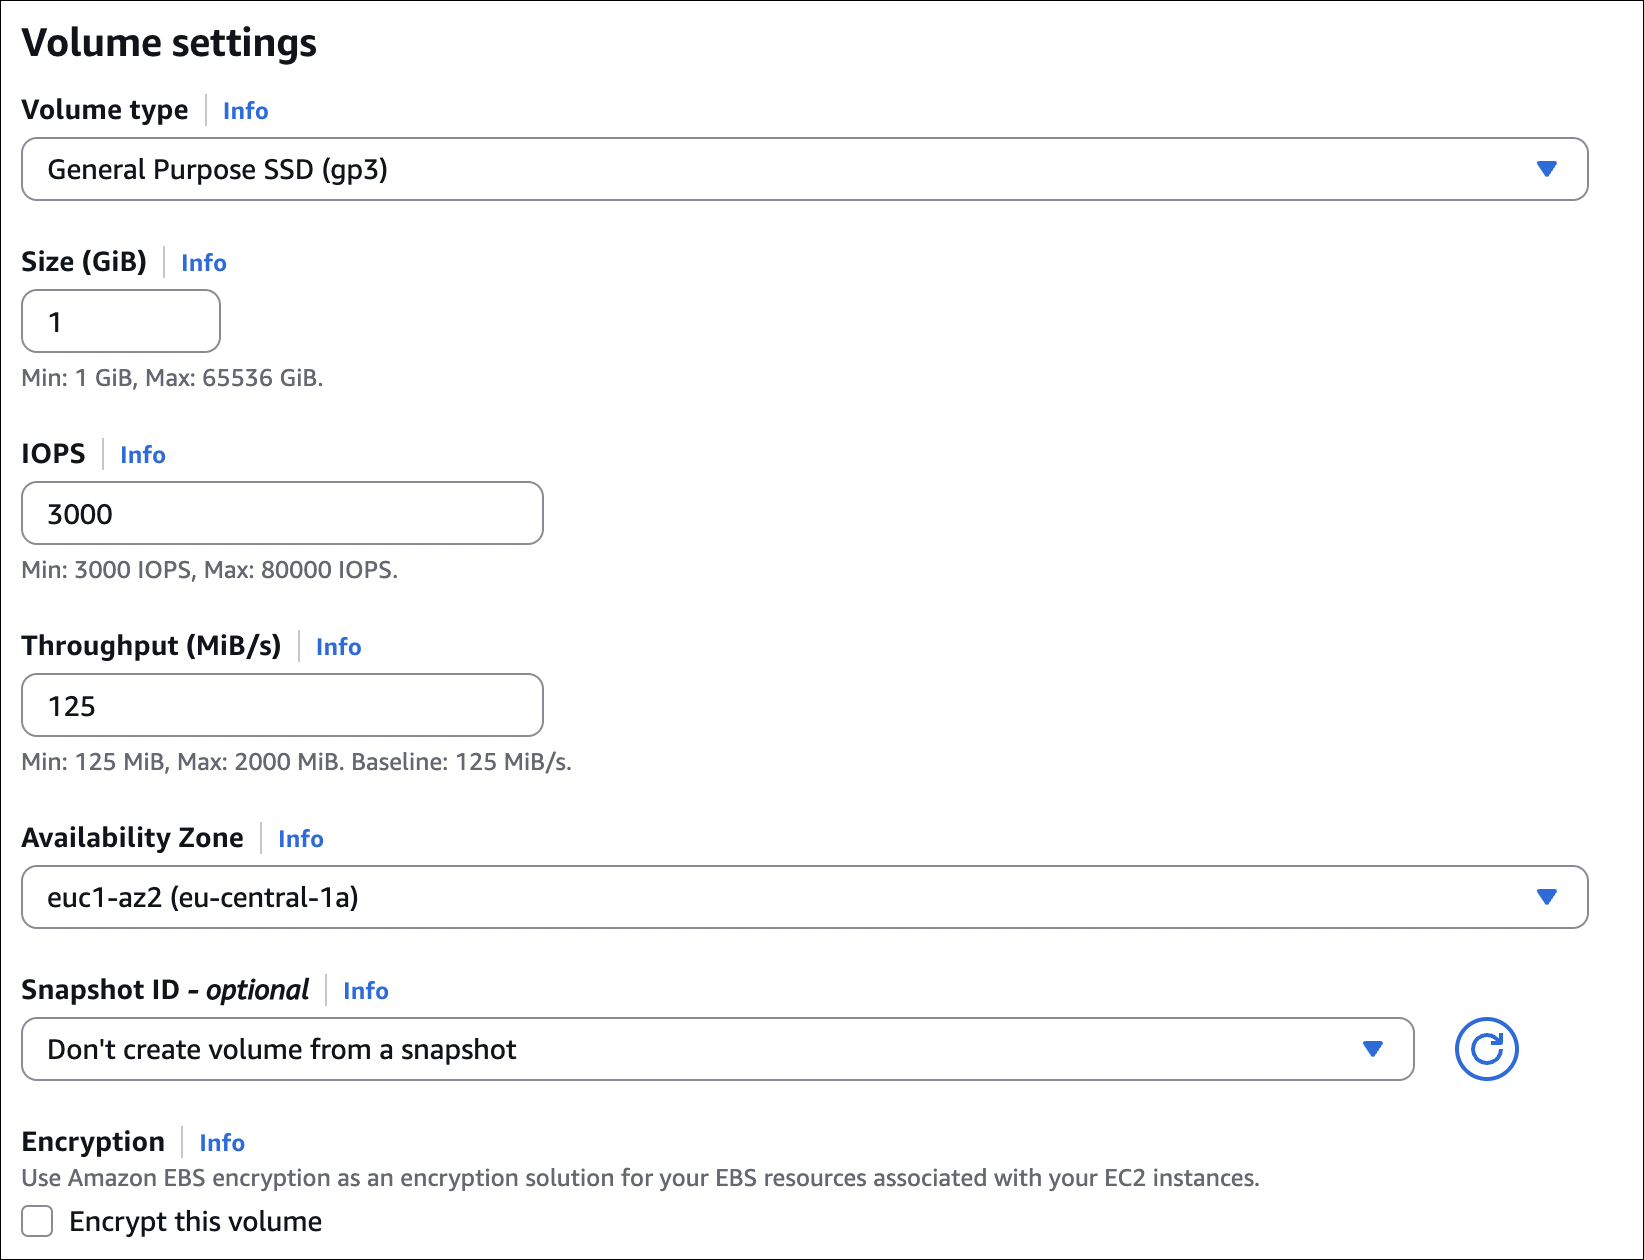
Step 2: Create EBS Volume
- Go to EC2 → Elastic Block Store → Volumes → Create volume
- Availability Zone: Select the same AZ as your instance
- Volume type: Choose your type (e.g., gp3 for general purpose)
- Size: Enter size in GiB (e.g., 10)
- Encryption: Choose if you want encryption (optional)
- Snapshot ID: Leave empty (we’re creating a new empty volume)
- Click Create volume
Step 3: Attach Volume to Instance
- Select the volume you just created
- Click Actions → Attach volume
- Instance: Select your instance from the dropdown (only instances in the same AZ will appear)
- Device name: AWS will suggest a device name (e.g.,
/dev/sdf). You can change it if needed, but the default is usually fine. - Click Attach
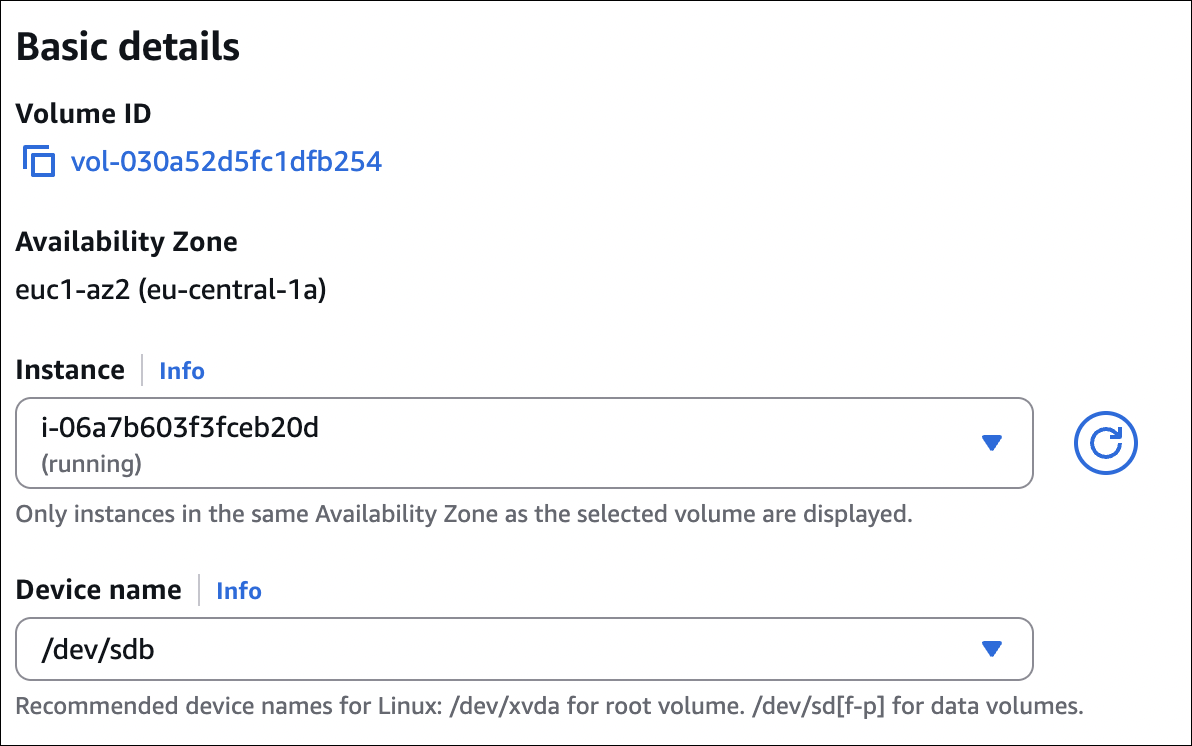
If you don’t see your instance in the dropdown, it means the instance is in a different AZ. You’ll need to create the volume in the correct AZ.
Step 4: Verify Attachment
- Go to EC2 → Instances
- Select your instance
- Go to Storage tab
- You should see your new volume listed
The volume is now attached, but you still need to format and mount it in the operating system (if it’s a new empty volume).

Summary
- Always check instance AZ before creating volume
- Volume and instance must be in the same AZ
- Can attach while instance is running (no need to stop)
- Device name is assigned automatically (can customize)
EBS Snapshots
Snapshots are point-in-time backups of your EBS volumes. They’re stored in S3 (you don’t see them in S3 console, but they’re there).
- Incremental backups (only changed blocks since last snapshot)
- Can create snapshots of attached volumes (no need to detach)
- Can create AMI from snapshot
- Can copy snapshots across regions
- Can share snapshots with other AWS accounts
- Encrypted volumes create encrypted snapshots
How snapshots work:
- First snapshot: Full backup
- Subsequent snapshots: Only changed blocks (incremental)
- When you delete a snapshot, only blocks unique to that snapshot are deleted
- To restore: Create new volume from snapshot
How to create a snapshot:
- Go to EC2 → Elastic Block Store → Volumes
- Select the volume you want to snapshot
- Click Actions → Create snapshot
- Add description and tags (optional)
- Click Create snapshot
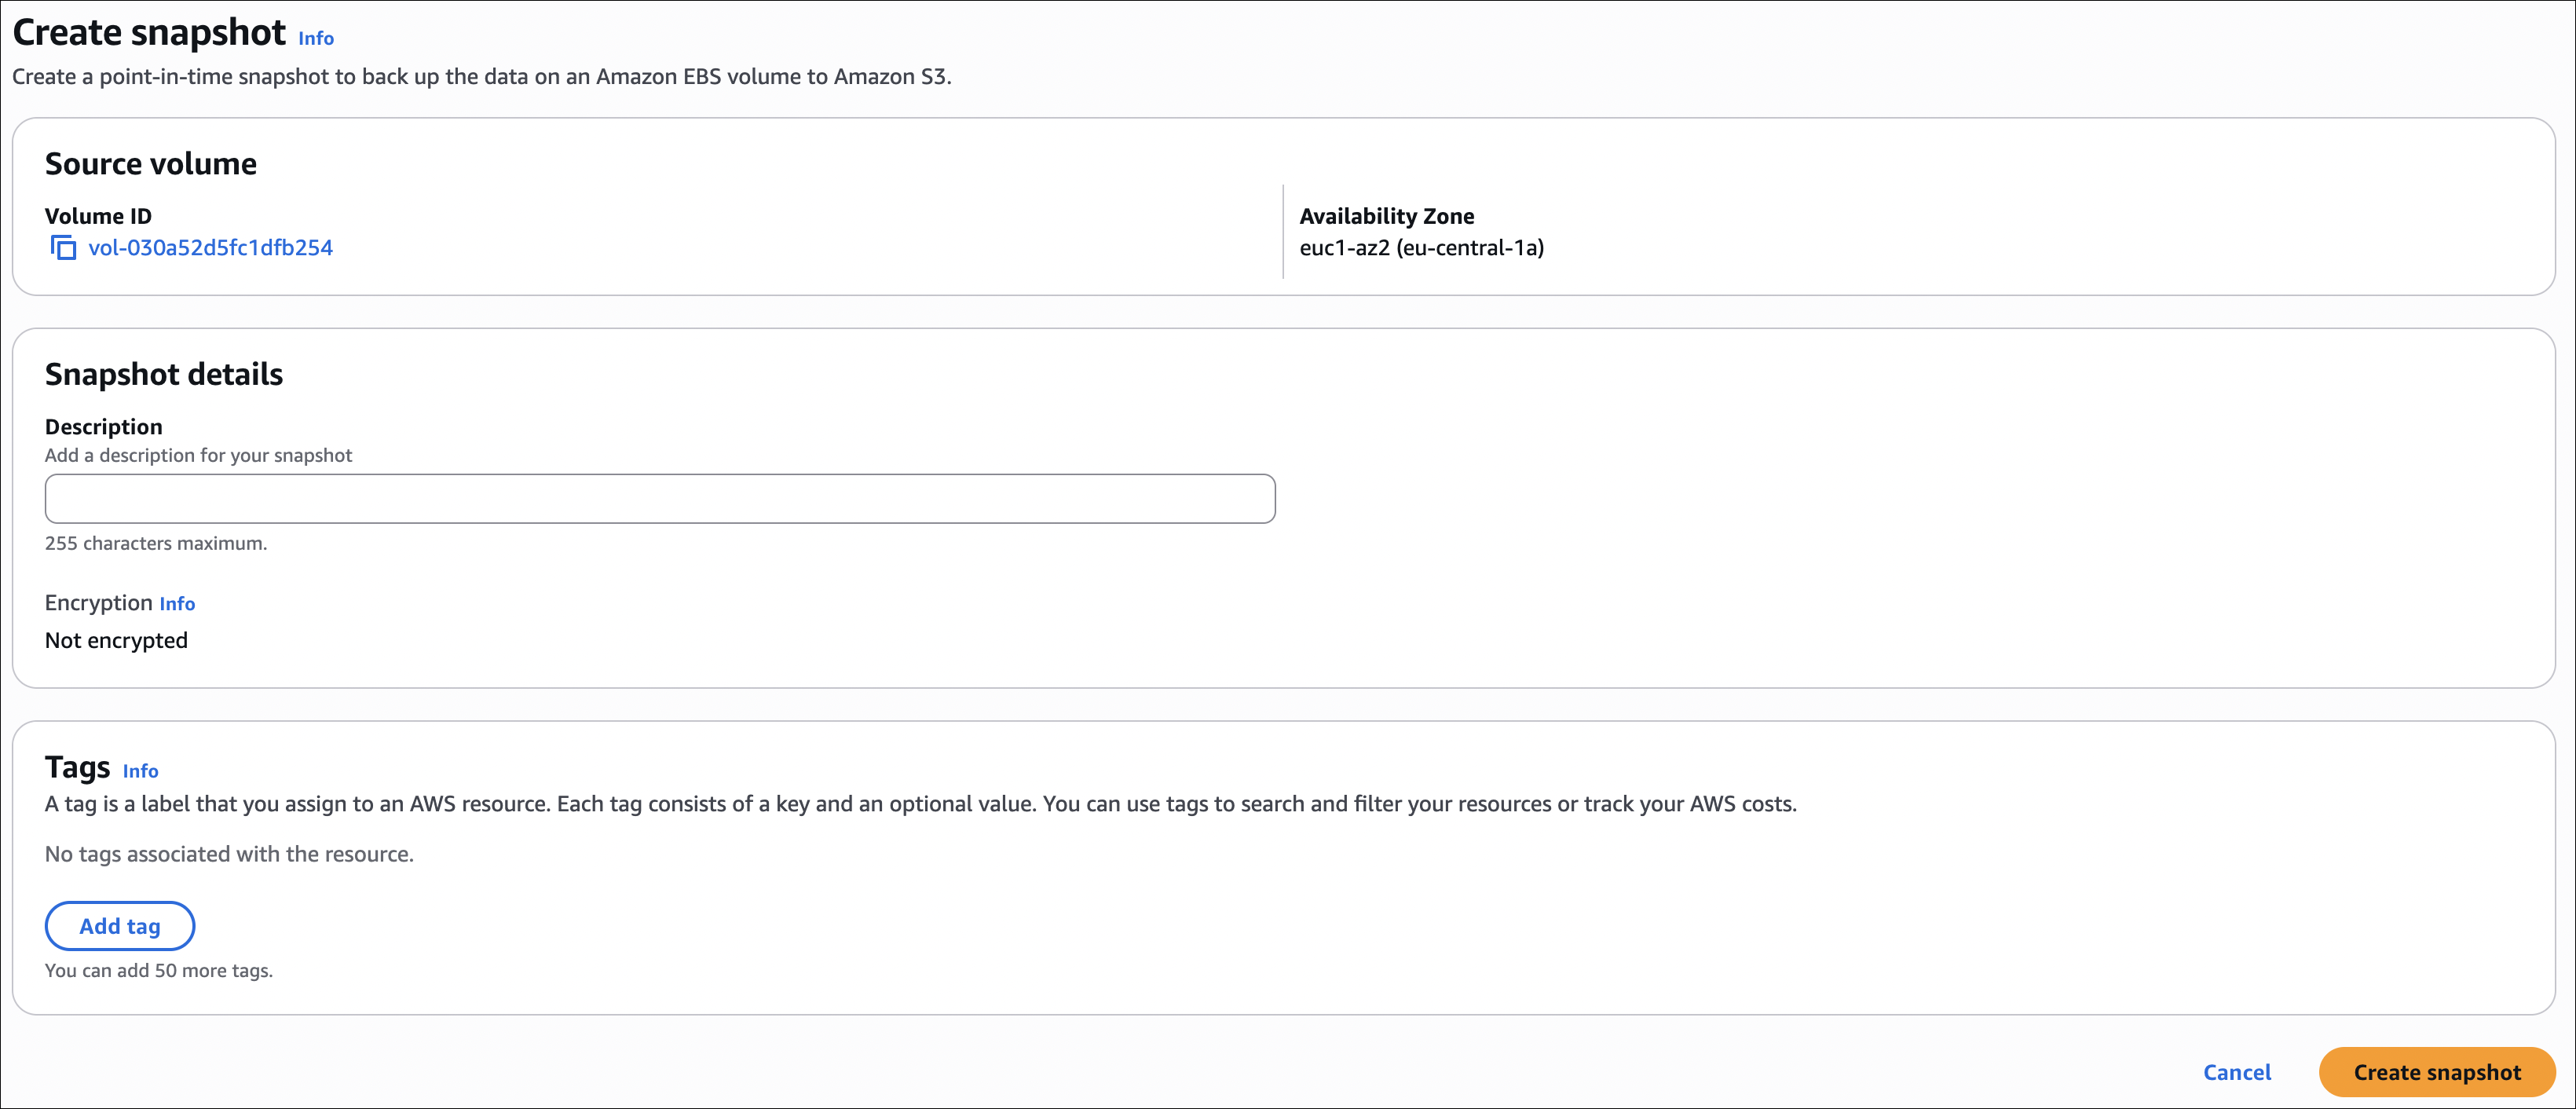
Note: You can create snapshots of attached volumes while the instance is running. No need to detach or stop the instance.
How to create volume from snapshot:
- Go to EC2 → Elastic Block Store → Snapshots
- Select the snapshot you want to restore
- Click Actions → Create volume from snapshot
- Availability Zone: Choose any AZ you want (unlike original volume, you can pick different AZ)
- Size: Can increase size (must be at least snapshot size, can’t decrease)
- Volume type: Can change type (e.g., gp2 to gp3)
- Encryption: Can enable encryption even if snapshot wasn’t encrypted
- Click Create volume
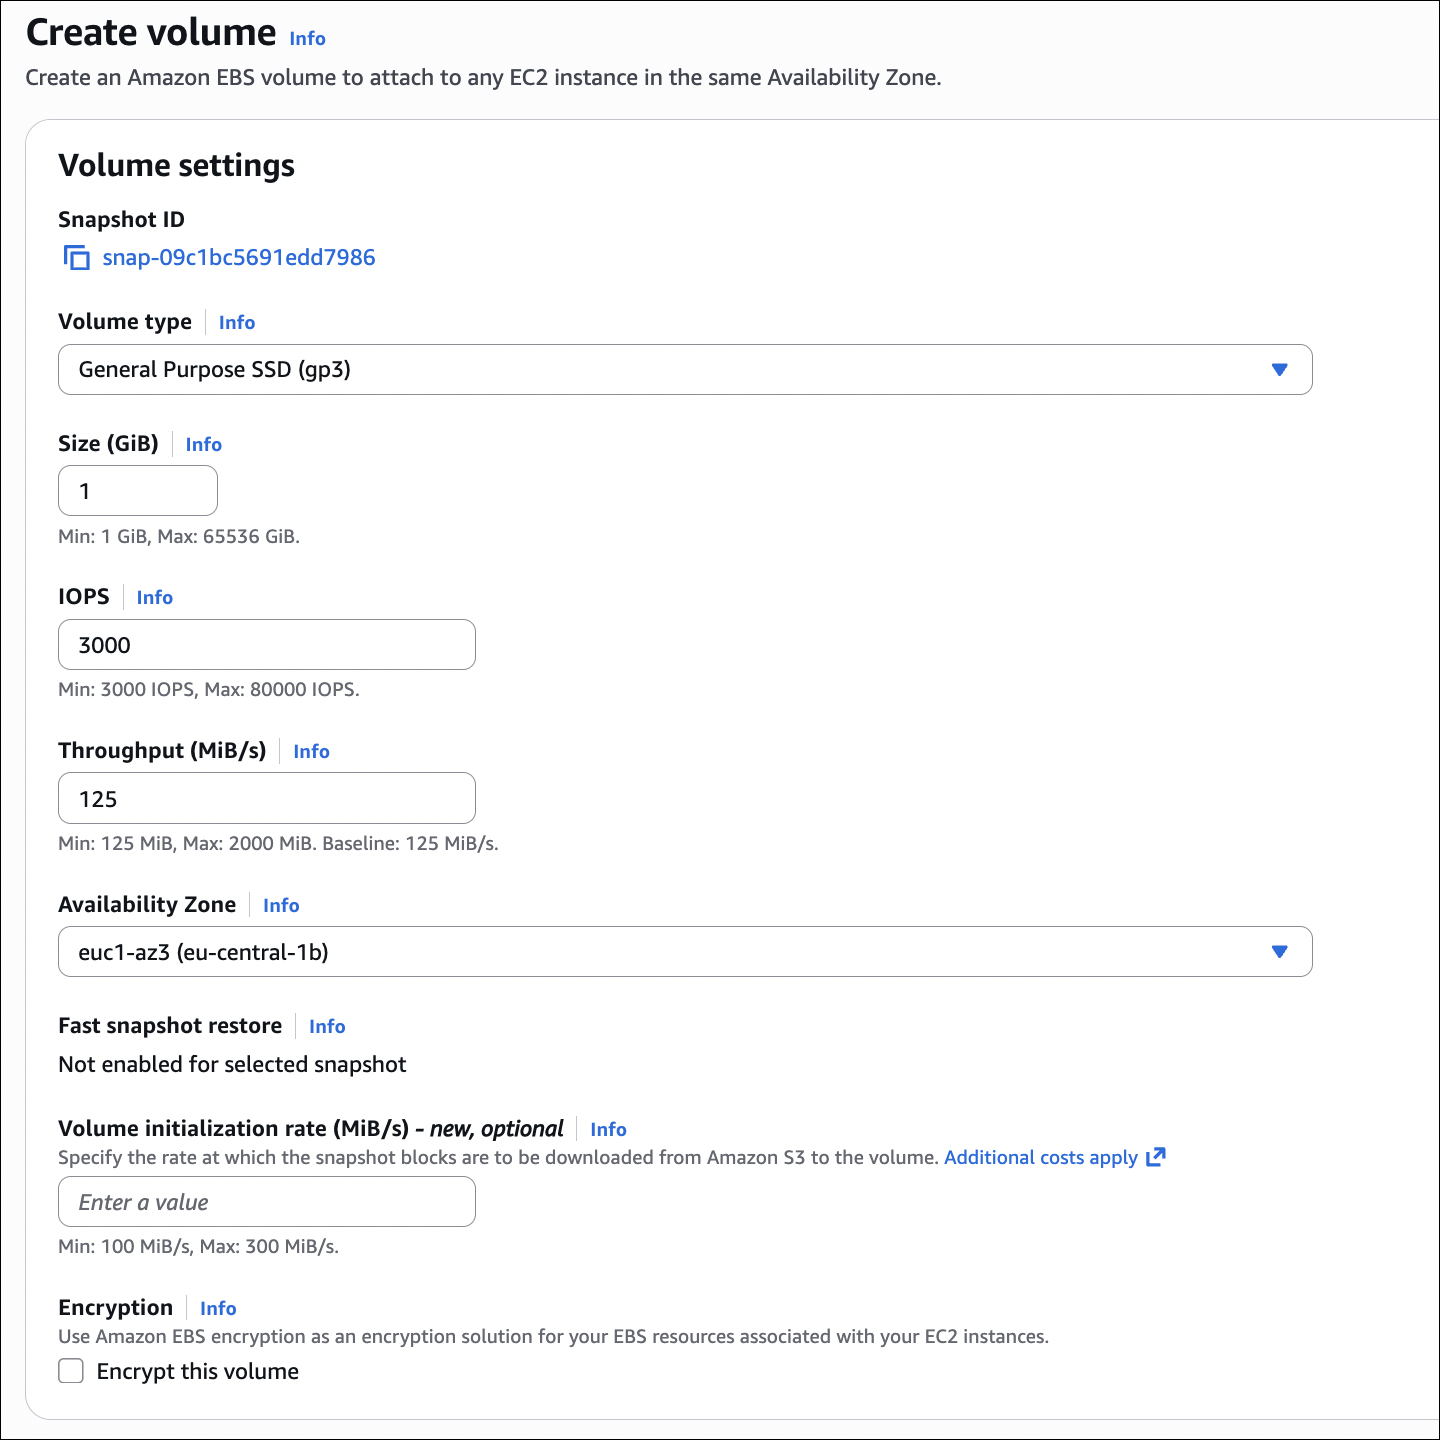
Important: When creating volume from snapshot, you can choose any Availability Zone (not limited to original volume’s AZ). This is how you move volumes between AZs.
Archive Tier
For long-term retention. 75% cheaper than standard, but restore takes 24-72 hours.
When to use: Compliance requirements, rarely accessed snapshots, cost optimization.
How to use: Select snapshot → Actions → Archive snapshot. To restore: Actions → Restore snapshot → Wait 24-72 hours.
Fast Snapshot Restore (FSR)
Eliminates initialization delay when restoring snapshots. Volumes are instantly ready with full performance.
When to use: Critical applications, production databases needing instant restore.
- Must enable per availability zone
- Costs extra (hourly fee)
- Works with io1, io2, gp3 volumes
- Max 50 snapshots per AZ
How to enable: Snapshot → Actions → Enable fast snapshot restore → Select AZs.
Recycle Bin
Protects snapshots from accidental deletion. Deleted snapshots go to Recycle Bin for retention period (1-365 days).
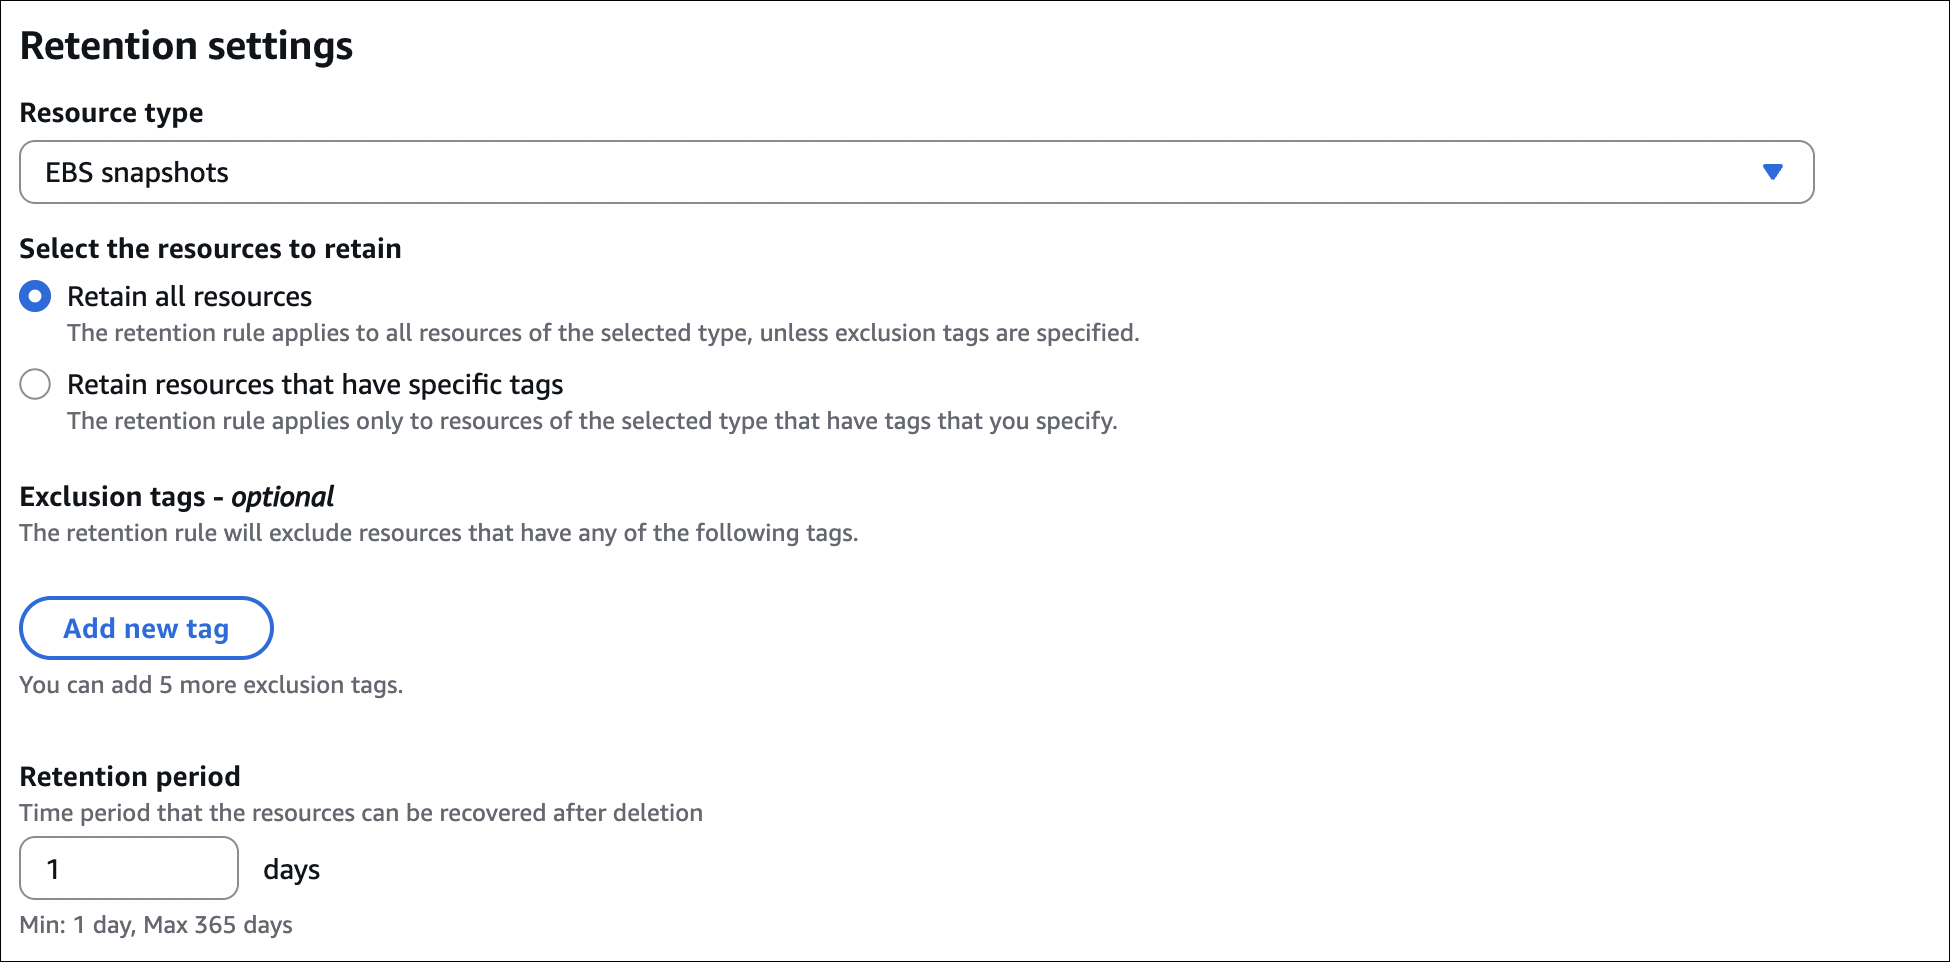
How it works:
- Must enable before deletion
- Free during retention period
- Can restore during retention period
- Permanently deleted after retention period
How to enable: EC2 → Lifecycle Manager → Recycle Bin → Create retention rule → Set period (1-365 days).
AMI (Amazon Machine Image)
AMI is a template for creating EC2 instances. It contains the operating system, applications, and configuration needed to launch an instance.
What’s in an AMI:
- Operating system (Linux, Windows)
- Application software
- Configuration settings
- Data volumes
AMI features:
- Root device is EBS volume (EBS-backed AMI)
- Can stop/start instances (data persists)
- Can create AMI from running/stopped instance
- Faster instance launch
- Can modify instance attributes (instance type, etc.) after launch
AMI lifecycle:
- Create AMI from running/stopped instance
- Launch instances from AMI
- Deregister AMI when no longer needed (snapshots remain, must delete separately)
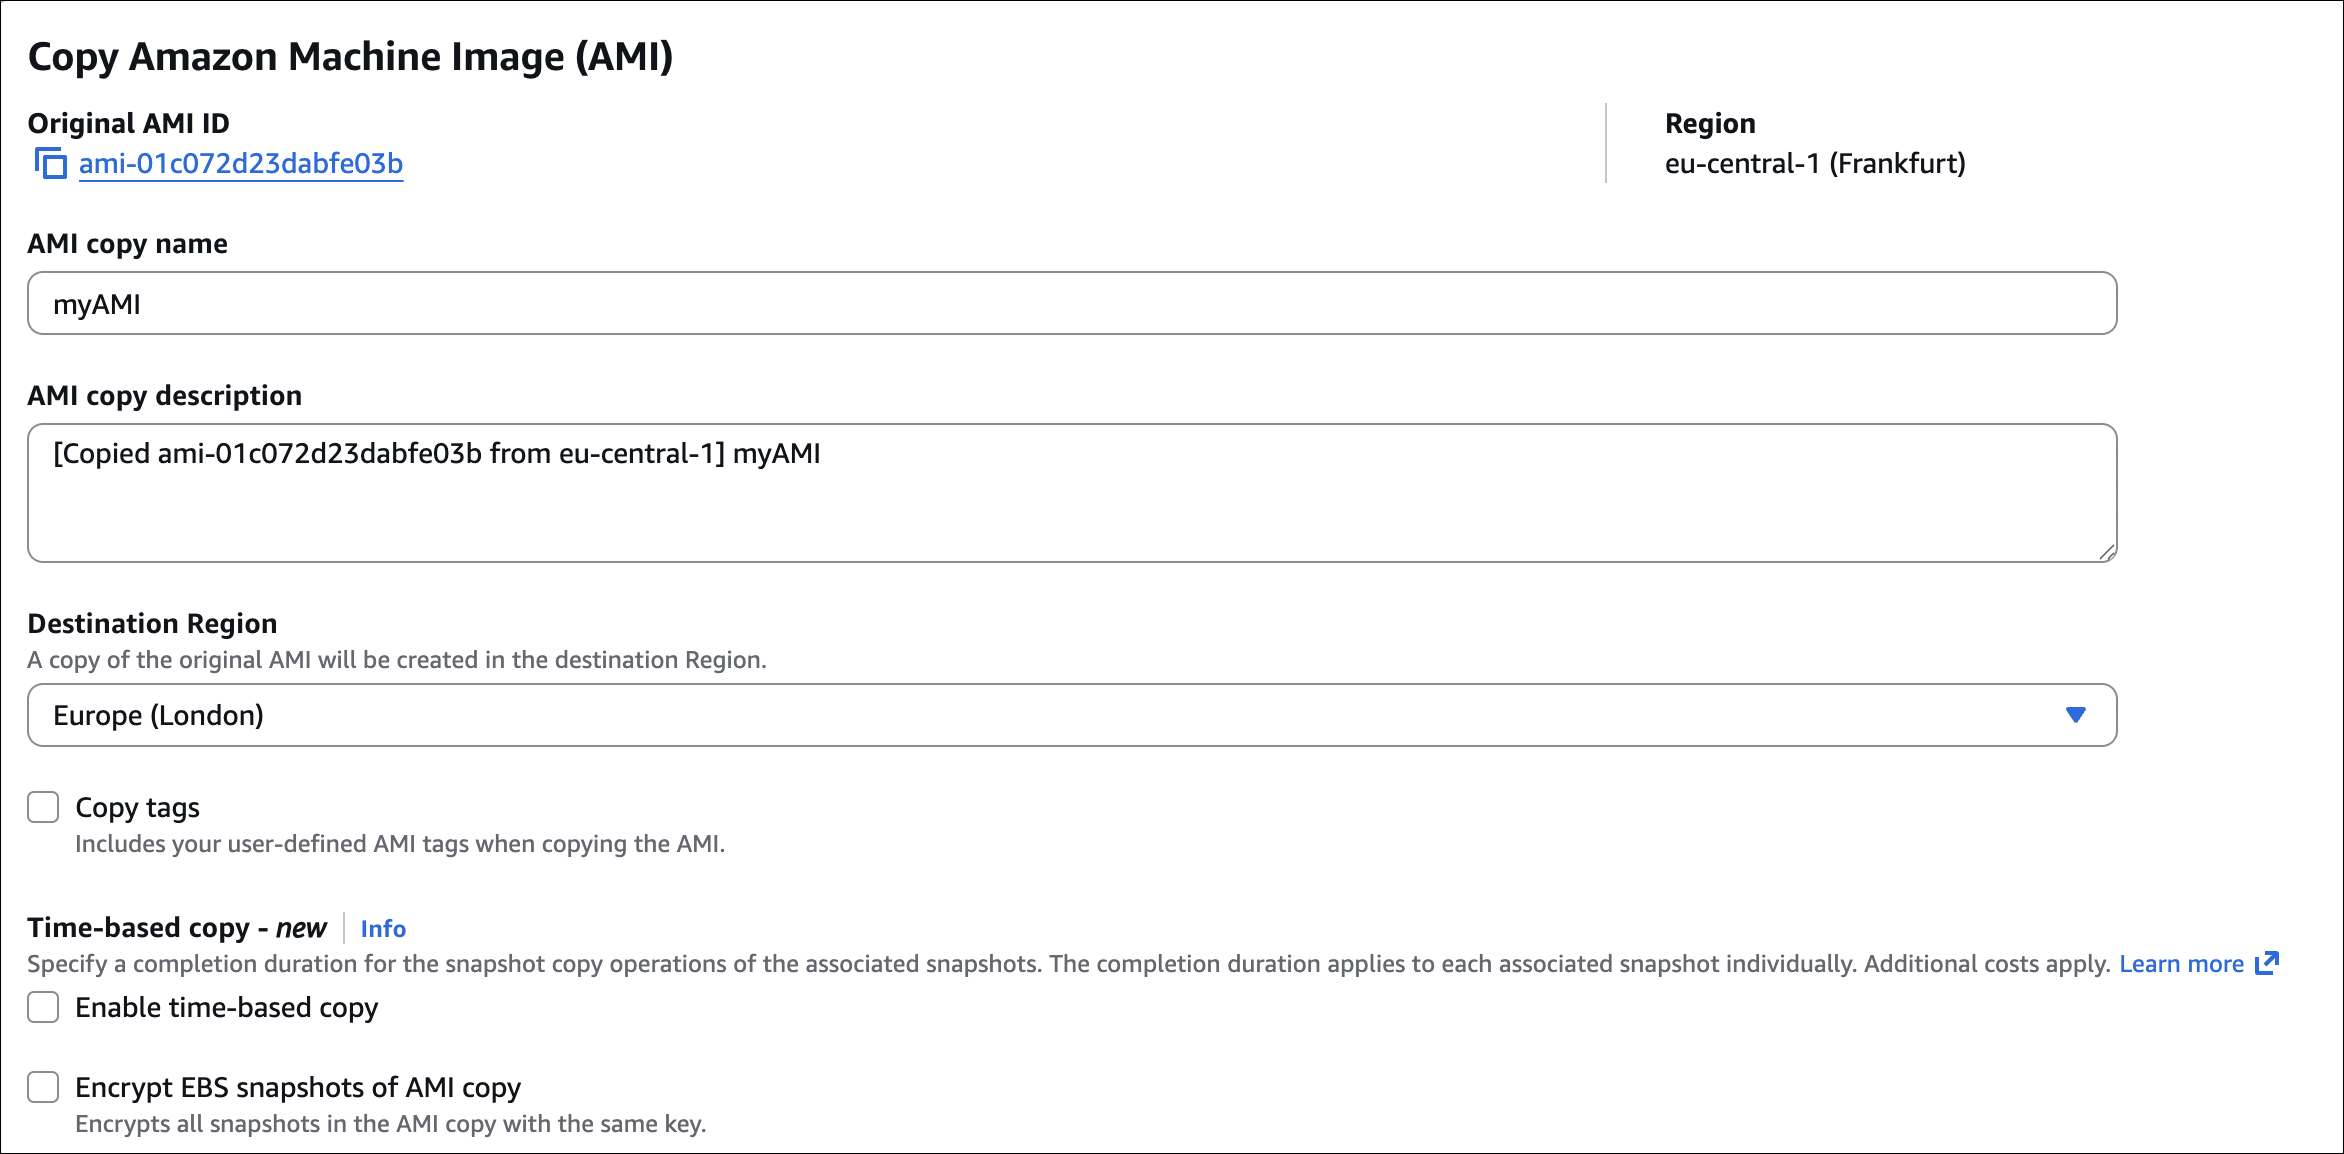
- Copy AMI to different regions/accounts
How to create AMI:
- Go to EC2 → Instances
- Select your instance (running or stopped)
- Click Actions → Image and templates → Create image
- Image name: Give it a name
- No reboot: Check if you want to create AMI without stopping instance (recommended for running instances)
- Click Create image

What happens:
- Creates snapshot of root volume (and any additional volumes if selected)
- Snapshots are stored in S3 (you don’t see them in S3 console)

Important notes about snapshots:
- If you delete snapshots: AMI becomes unusable (can’t launch instances from it)
- If you delete AMI: Snapshots remain (must delete separately to stop charges)
- Copying AMI to another region: Snapshots are automatically copied with the AMI
- Cost: You pay for snapshot storage even after deregistering AMI

How to launch instance from AMI:
- Go to EC2 → AMIs
- Select your AMI
- Click Launch instance from AMI
- Configure instance (type, storage, networking, etc.)
- Launch

AMI sharing:
- Can share AMI with other AWS accounts
- Can make AMI public (anyone can use it)
- Shared AMIs appear in recipient’s AMI list
- Recipient pays for instances launched from shared AMI
Important notes:
- AMI is region-specific (must copy to use in different region)
- EBS-backed AMI creates snapshots (you pay for snapshot storage)
- Deregistering AMI doesn’t delete snapshots (must delete separately)
- Can’t modify AMI after creation (must create new AMI)
- AMI includes root volume snapshot (and additional volumes if selected during creation)
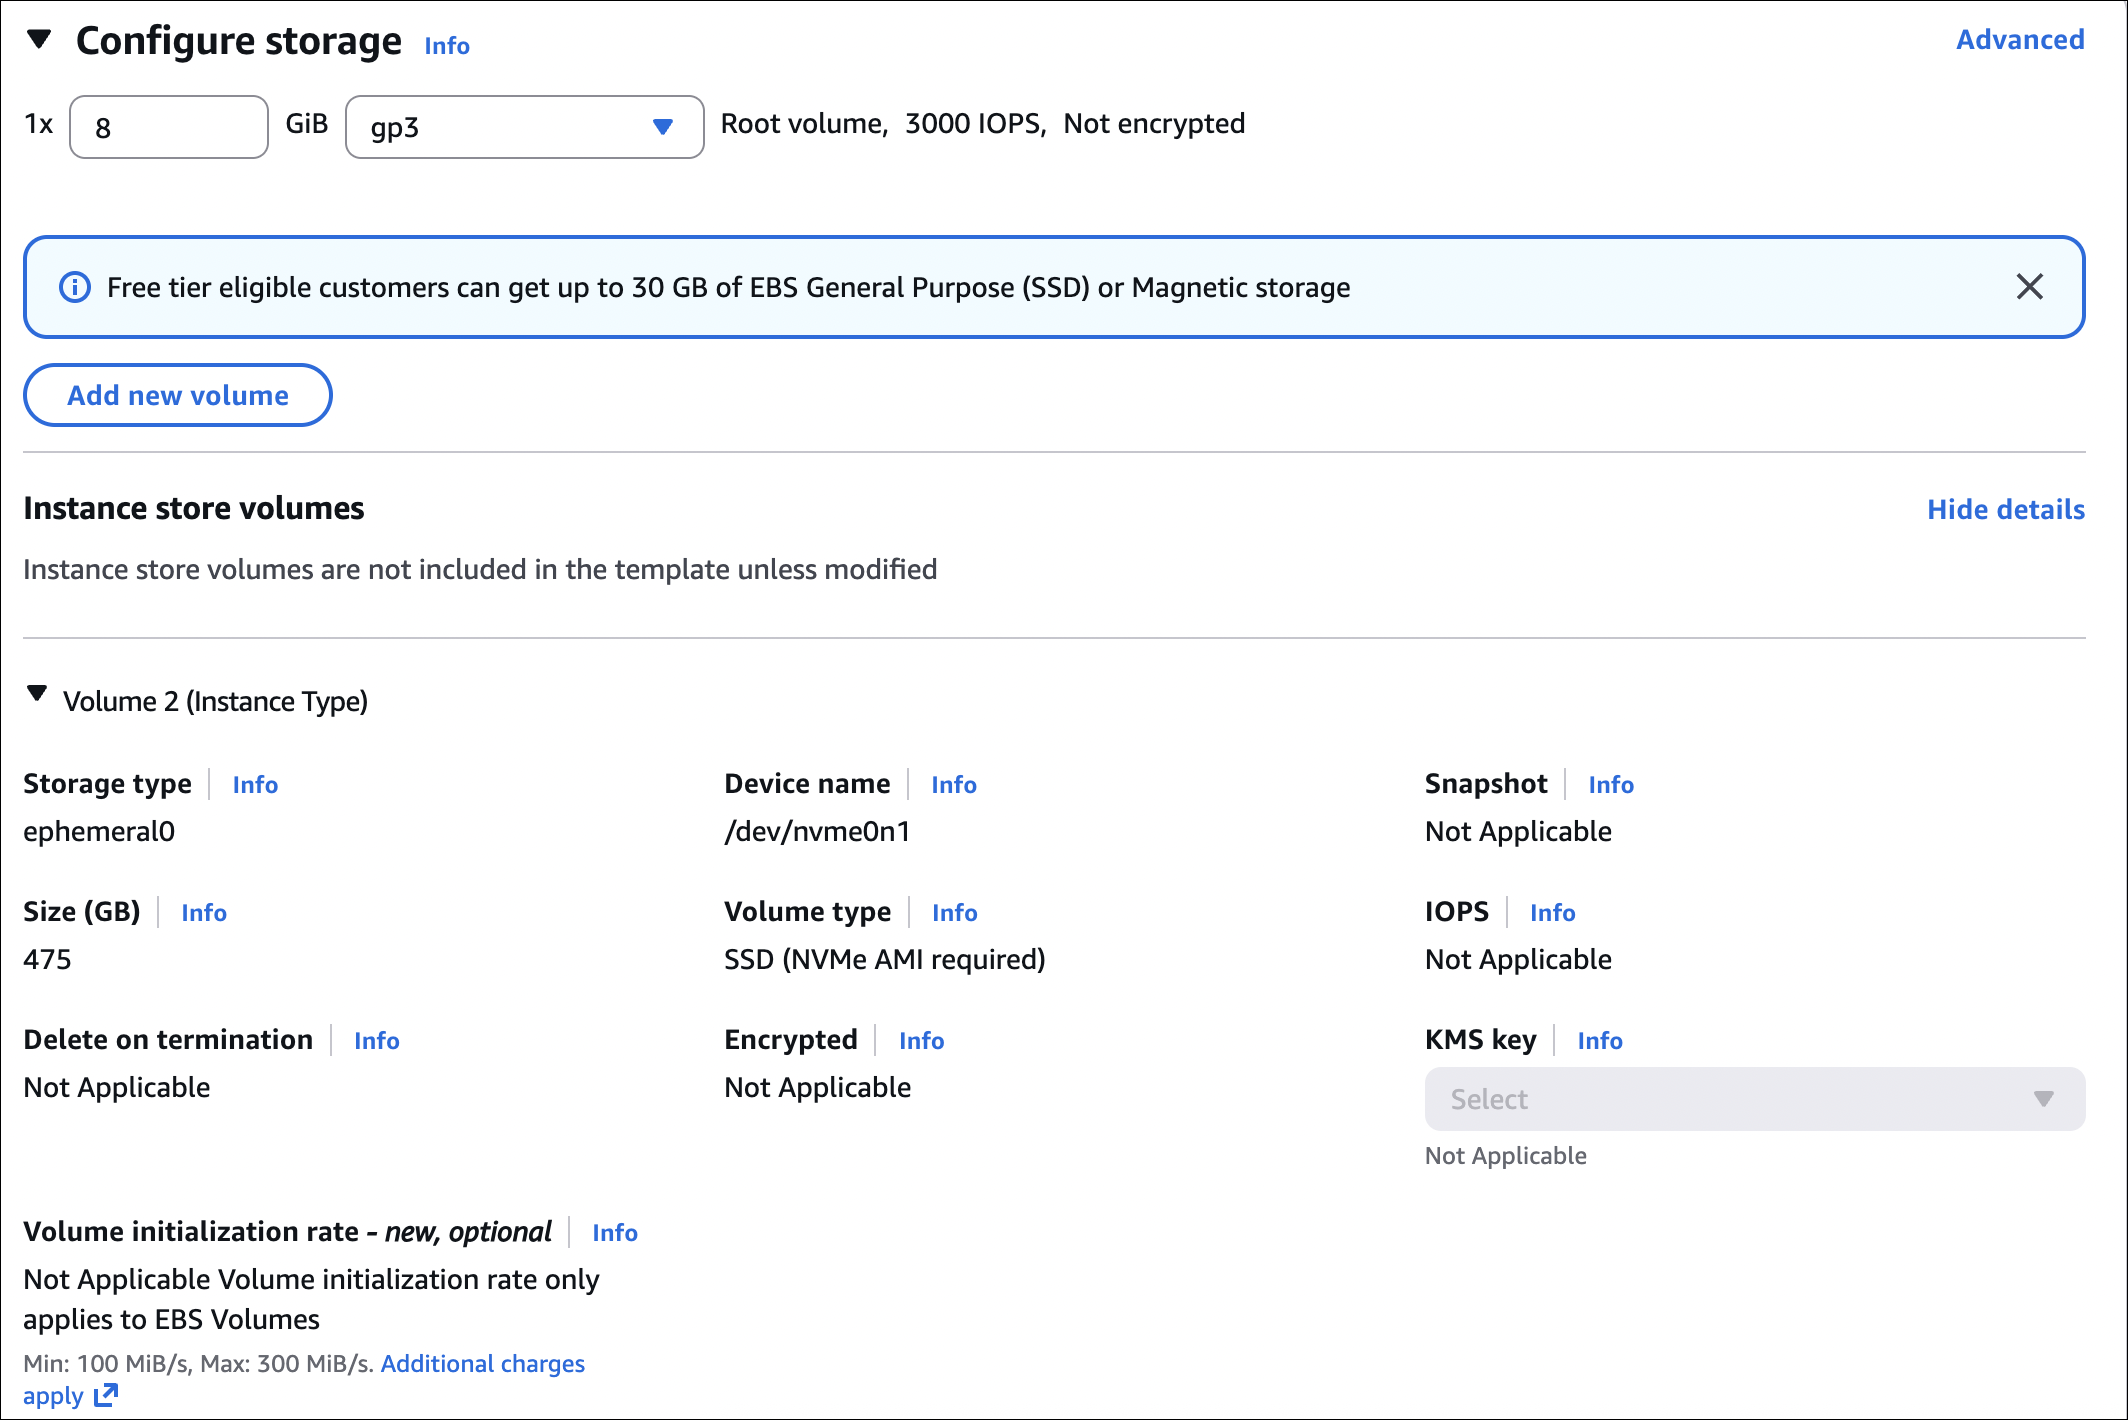
EC2 Instance Store
Instance Store is the physical NVMe/SATA SSD on the EC2 instance’s physical host machine.
- Physical disk (not network-attached like EBS)
- Super fast (very high IOPS and low latency)
- Ephemeral - data is lost when instance stops, terminates, or host changes
- Free (included with instance)
- Fixed size (depends on instance type)
When to use:
- Temporary data (cache, buffers, scratch space)
- High-performance temporary storage
- Data that can be rebuilt quickly
- Applications that don’t need persistence
When NOT to use:
- Boot volumes (use EBS instead)
- Databases (data must persist)
- Any data that needs to survive instance stop/terminate
Important notes:
- Cannot stop instance (only terminate) - stopping loses all data
- Cannot detach/attach to different instances
- Cannot create snapshots
- Data survives reboot, but not stop/terminate
- Some instance types have no instance store (check before launching)
How to use Instance Store:
When launching instance:
- Select an instance type that supports instance store (e.g., c5d, m5d, r5d)
- Instance store is automatically available (no need to configure)
- Check instance type details to see instance store size
After instance is running:
- SSH into your instance
- Instance store appears as block devices (e.g.,
/dev/nvme1n1on Linux) - Format and mount it like any other block device:
1
2
3
4
5
6
7
8
9
10
11
# Check available instance store devices
lsblk

# Format (example for /dev/nvme1n1)
sudo mkfs -t ext4 /dev/nvme1n1

# Create mount point
sudo mkdir /mnt/instance-store

# Mount
sudo mount /dev/nvme1n1 /mnt/instance-store
Use it for:
- Temporary files, cache, logs
- High-performance temporary storage
- Scratch space for processing
Instance store devices vary by instance type. Check AWS documentation for your specific instance type to see device names and sizes.
Instance Store vs EBS:
| Feature | Instance Store | EBS |
|---|---|---|
| Persistence | Lost on stop/terminate | Survives stop/terminate |
| Performance | Very high (local NVMe) | Good to excellent |
| Cost | Free (included) | Pay per GB |
| Resize | Fixed size | Can resize |
| Backup | No snapshots | Snapshots available |
| Use case | Temporary data | Persistent data |
EFS (Elastic File System)
EFS is a managed NFS file system. Multiple EC2 instances can mount and access it at the same time. Think of it as a shared network drive that scales automatically.
EFS vs EBS:
| Feature | EFS | EBS |
|---|---|---|
| Type | File system (NFS) | Block storage |
| Multiple instances | Yes (simultaneous access) | No (one instance, unless multi-attach) |
| Availability Zones | Cross-AZ (multi-AZ) | Single AZ only |
| Protocol | NFS v4.1 | Block device |
| Performance | Lower latency, shared access | Higher IOPS, dedicated |
| Use case | Shared storage, web content | Databases, boot volumes |
| Pricing | Pay per GB stored | Pay per GB provisioned |
| Scaling | Auto-scales | Fixed size (can resize) |
| Multi-attach | Built-in (multiple instances) | Only io1/io2, same AZ |
When to use EFS:
- Need shared storage for multiple instances
- Web servers sharing content
- Content management systems
- Container storage (ECS, EKS)
- Data analytics with shared datasets
Performance modes:
| Mode | When to use |
|---|---|
| General Purpose | Most workloads (default) |
| Max I/O | High throughput, lots of parallel access |
Throughput modes:
| Mode | How it works |
|---|---|
| Bursting | Throughput scales with size (default) |
| Provisioned | Set specific throughput (pay extra) |
| Elastic | Auto-scales based on demand |
Storage classes:
- Standard: Frequently accessed files
- EFS-IA (Infrequent Access): Rarely accessed files - 90% cheaper storage, but retrieval fee
Lifecycle policies: Move files to EFS-IA automatically after X days of no access. Saves money, but watch out for retrieval fees if you access those files later.
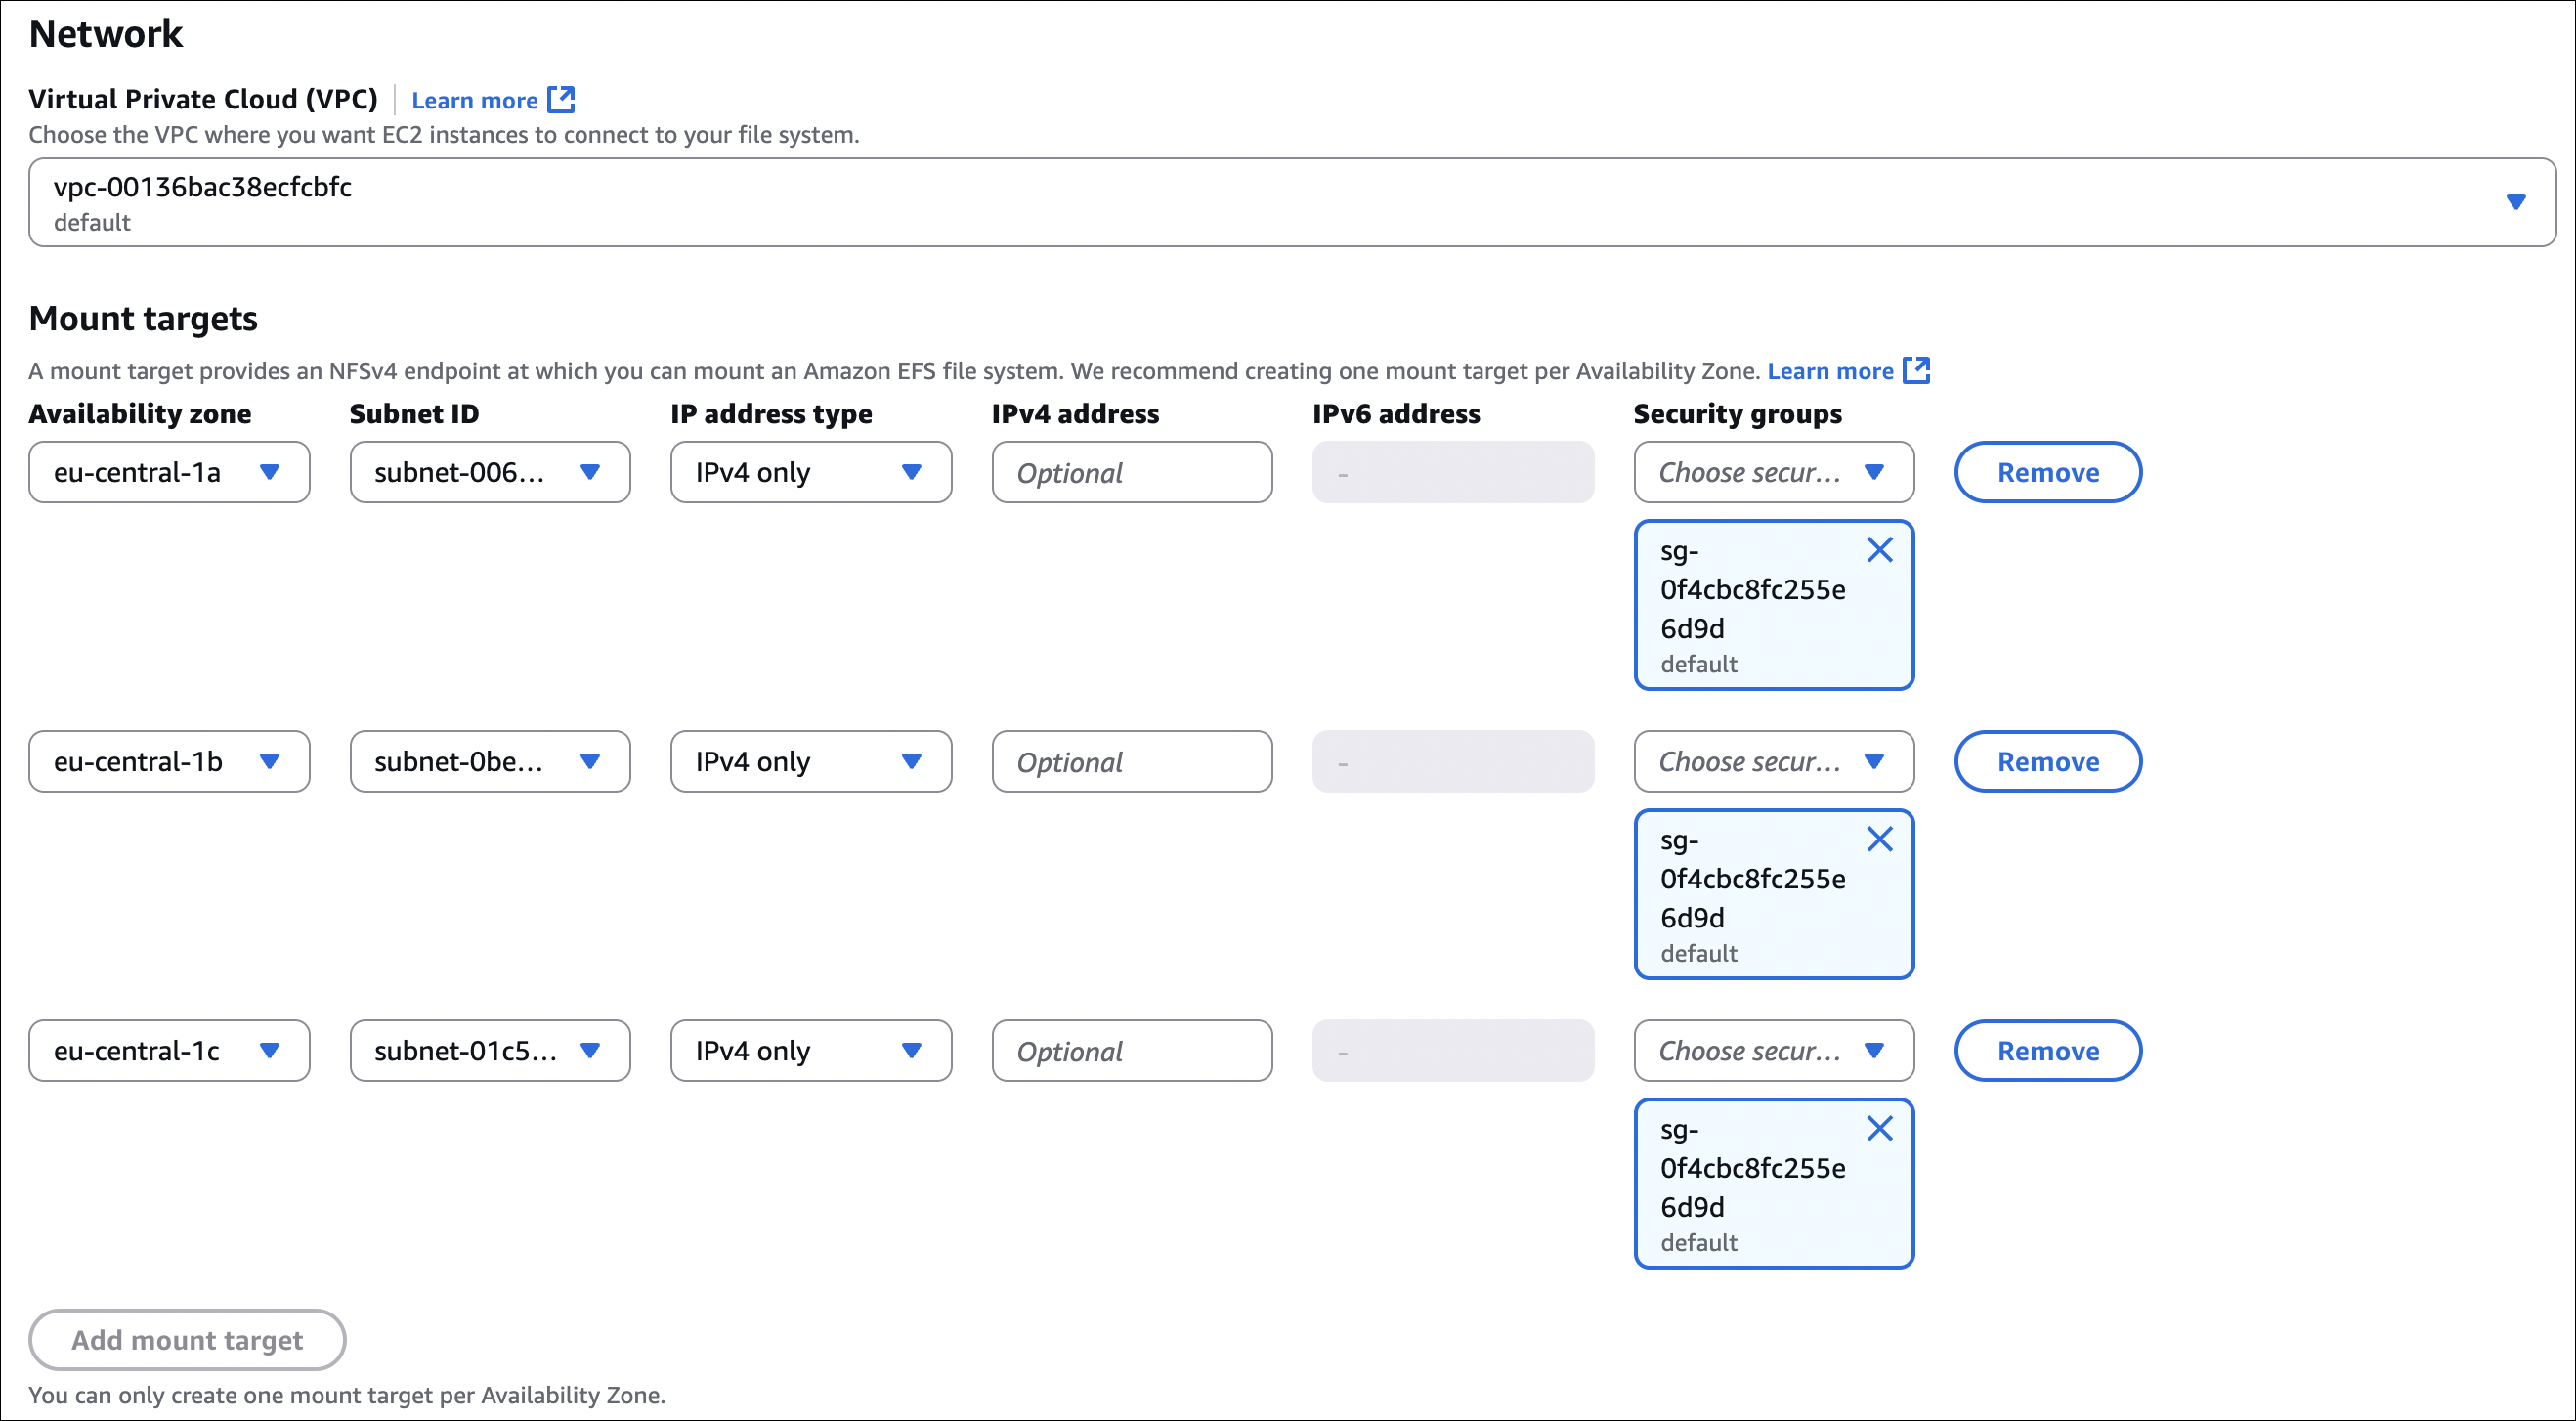
How to create EFS:
When creating EFS, you’ll see these options:
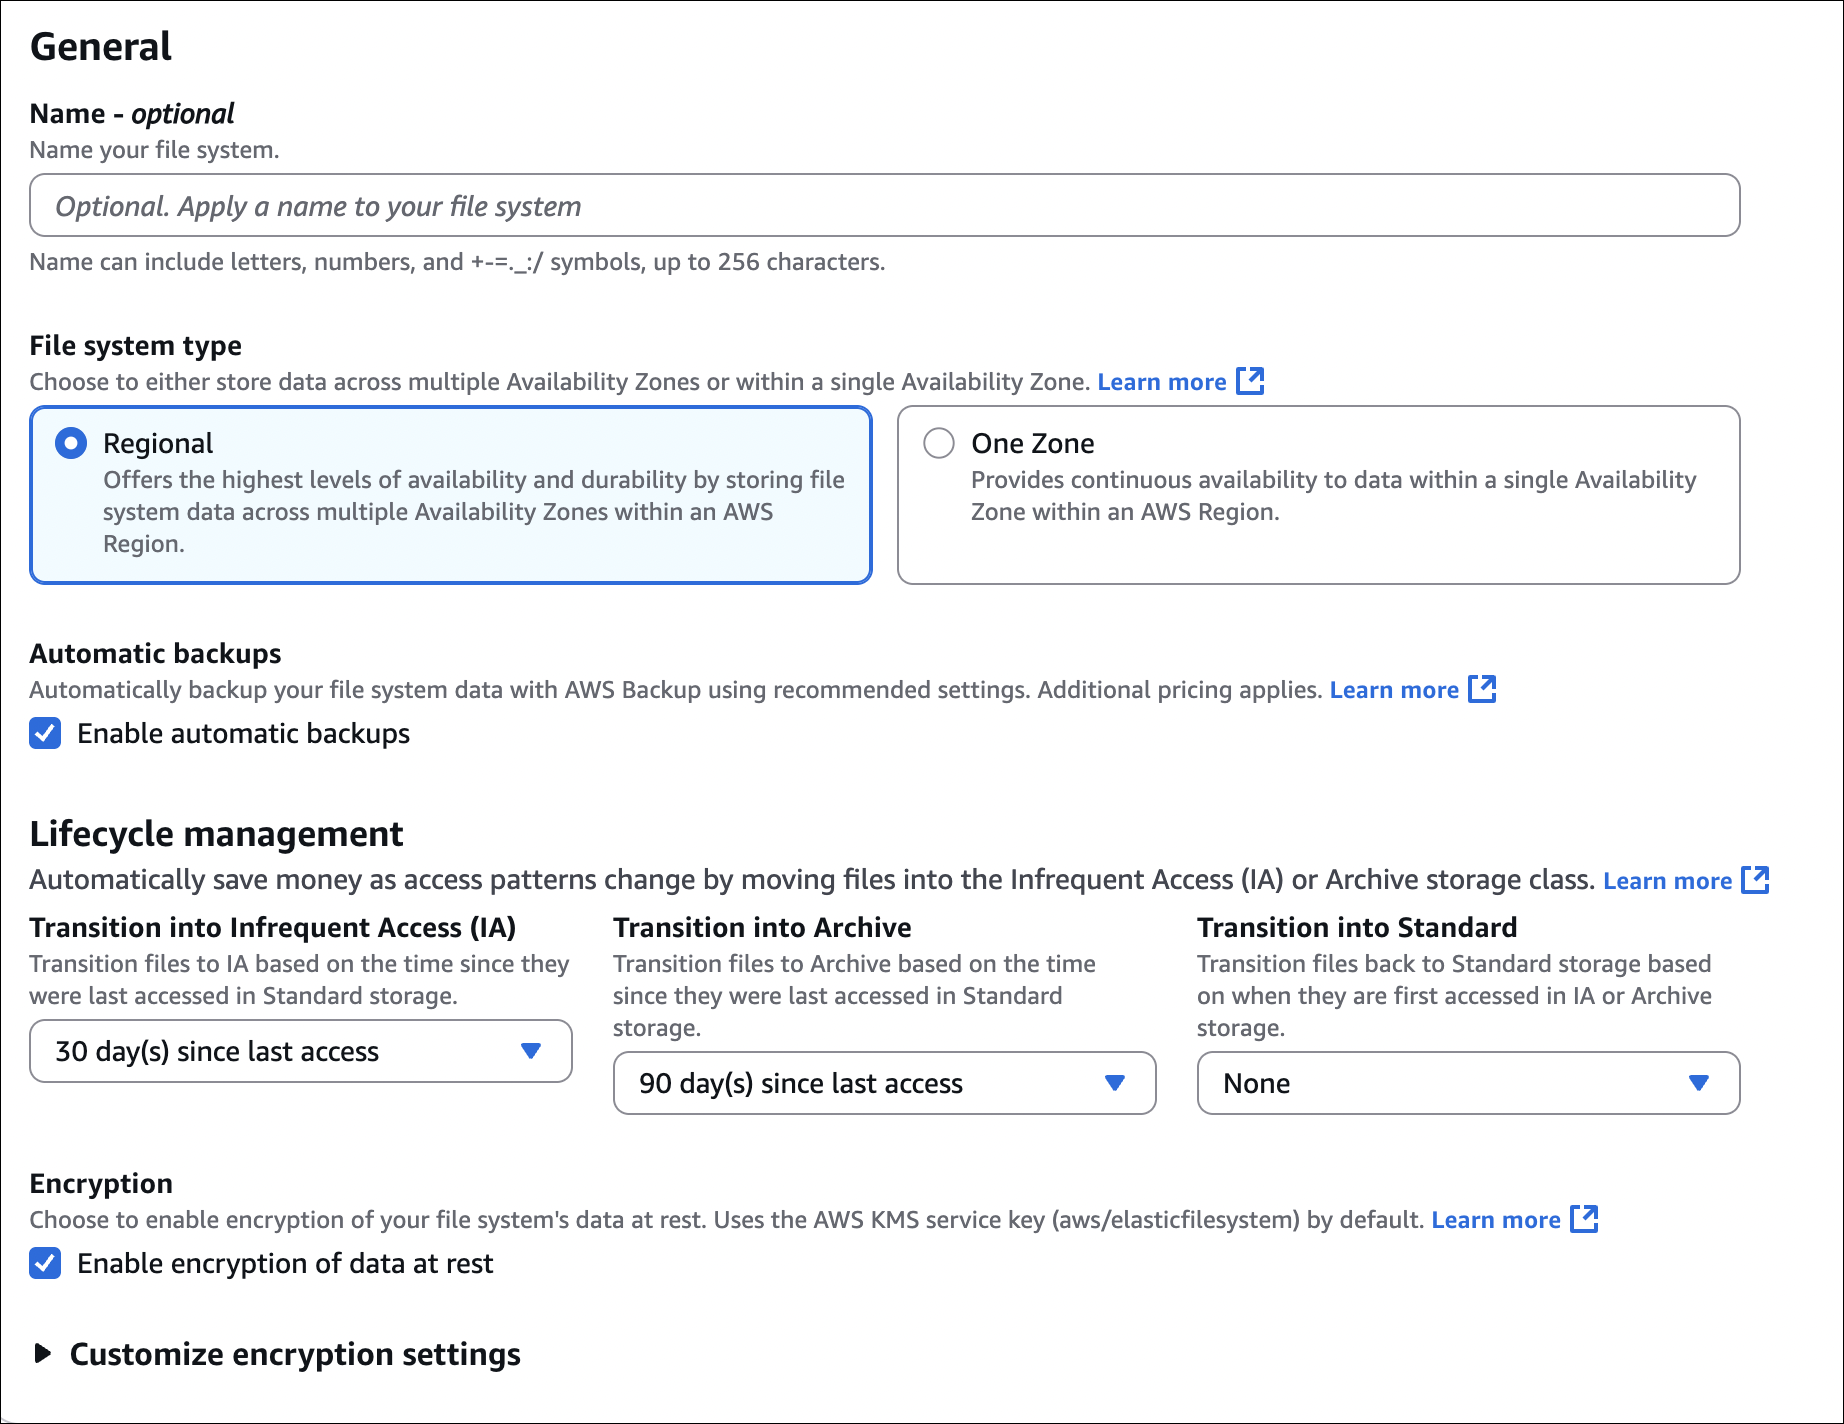
VPC: Choose the VPC where your instances are (or will be)
Availability Zones: Select AZs where you want mount targets. You can select multiple AZs (recommended for high availability). Each AZ gets a mount target.
- Security groups:
- Check Automatically create and attach security group (AWS creates security group that allows port 2049 from your instances)
- Or create/select your own security group (must allow NFS traffic - port 2049 from your instances)
- Performance mode:
- General Purpose: Default, low latency (use this unless you need Max I/O)
- Max I/O: Higher throughput, more parallel access, slightly higher latency
- Throughput mode:
- Bursting: Default, throughput scales with file system size
- Provisioned: Set specific throughput (pay extra, use if you need guaranteed throughput)
- Elastic: Auto-scales based on demand (newer option)
- Encryption:
- At rest: Encrypts data on disk (uses KMS)
- In transit: Encrypts data when mounting (TLS)
- Lifecycle management: Automatically move files to EFS-IA after X days of no access (saves money)
Mount on instance:
Auto-mount when creating instance:
When launching EC2 instance:
- Go to File systems section
- Click Add file system
- Select your EFS file system
- Choose mount point (e.g.,
/mnt/efs) - Check Automatically mount with user data script
- AWS automatically adds the mount script to User Data
That’s it! EFS will be mounted automatically when instance starts.
Important things:
- Must be in same VPC (or connected via peering/VPN)
- Security groups must allow NFS (port 2049)
- Can encrypt at rest and in transit
- Can create access points for different mount paths
- EFS-IA retrieval fee - only use lifecycle policies if files are truly infrequent
Key Takeaways
- EBS: AZ-specific, one instance per volume (unless multi-attach with io1/io2). Root volume deletes on termination by default, additional volumes don’t.
- EBS Volume Types: gp3 for general purpose, io2/io1 for high IOPS, st1/sc1 for sequential workloads (can’t be boot volume).
- Snapshots: Incremental backups in S3. Delete snapshot = AMI unusable. Delete AMI = snapshots remain (delete separately).
- AMI: Region-specific, creates snapshots, depends on snapshots (don’t delete them).
- Instance Store: Ephemeral, super fast, free, but data lost on stop/terminate.
- EFS: Shared file system, multiple instances, cross-AZ, NFS protocol, auto-scales.