AWS Notes: CloudFront and AWS Global Accelerator
CloudFront
CloudFront is AWS’s CDN. Think of it like this: you have files in S3 (or EC2, ALB), but users around the world are far away. CloudFront copies your files to servers near users, so they get content faster.
Simple example: You have images in S3 in us-east-1. User in Tokyo requests image → without CloudFront, goes all the way to us-east-1 (slow). With CloudFront, gets it from edge location in Tokyo (fast).
How it works: Create a distribution pointing to your origin (S3, EC2, whatever). CloudFront copies content to edge locations worldwide. First request hits origin, gets cached at edge. Next requests come from edge (much faster). Default cache time is 24 hours, but you can change it.
What you need to know:
Origin: Where your content lives. S3 bucket, EC2 instance, ALB, or any HTTP server. Even on-premises works.
Distribution: The thing you create. Points to origin, gives you a CloudFront URL like d1234567890.cloudfront.net.
Edge locations: Servers around the world that cache your content. Hundreds of them.
Cache: Copies of your content at edge locations. First request fetches from origin, next ones come from cache.
Common setup - S3 + CloudFront: S3 static website hosting is slow globally. Put CloudFront in front: S3 bucket → CloudFront distribution → users. Benefits: HTTPS (free SSL), custom domain, faster, cheaper data transfer than direct S3.
Cache behavior: You control what gets cached. /images/* → cache for 1 year (static images don’t change). /api/* → don’t cache (dynamic data). /static/* → cache for 30 days.
Invalidation: Update a file but CloudFront still serves old cached version? Invalidate the cache. /* clears everything (expensive), or specific paths like /images/photo.jpg. Costs money, so use sparingly.
Signed URLs: Want to restrict access? Generate signed URLs that expire. User gets URL, accesses content, URL expires. Useful for private content or paid downloads.
Geo-restriction: Block or allow specific countries. Example: block China because of licensing restrictions.
Origin access: S3 bucket private? Use OAC (Origin Access Control) - newer, recommended. Or OAI (Origin Access Identity) - older but still works. CloudFront can access private bucket, users can’t.
Lambda@Edge: Run Lambda functions at edge locations. Modify requests/responses, add headers, redirect based on country, A/B testing. Runs closer to users, faster than regular Lambda.
Origin failover: Set primary and secondary origins. Primary fails? CloudFront automatically switches to secondary. Good for high availability.
Important notes:
- Distribution takes 10-15 minutes to deploy (propagates to edge locations)
- Custom domain needs DNS CNAME + ACM certificate
- CloudFront doesn’t cache if origin sends
Cache-Control: no-cache - Compression is automatic (gzip, brotli) - reduces transfer size
- CloudFront logs go to S3, can analyze with Athena
CloudFront vs S3 Cross-Region Replication:
Different things for different purposes.
CloudFront: CDN for performance. Caches content at edge locations, users get it fast. Content is cached (can expire). Use when you want fast global access.
S3 CRR: Replication for backup. Copies objects to another region’s bucket. Content is permanent (not cached). Use when you need backup/disaster recovery.
Key difference: CloudFront = fast delivery (performance), CRR = backup (durability). CloudFront serves cached copies from edge locations, CRR creates actual copies in S3 buckets.
Example: You have images in S3. Use CloudFront for fast global delivery (users get images fast). Use CRR for backup (if us-east-1 fails, you have copies in eu-west-1). Use both together - CloudFront for users, CRR for backup.
Hands-On: S3 + CloudFront
Let’s set up S3 bucket, upload an image, and access it via CloudFront.
Step 1: Create S3 bucket
- Go to S3 Console → Create bucket
- Bucket name:
my-cloudfront-test-2024(or whatever unique name) - Region: Choose a region (e.g.,
us-east-1) - Block Public Access: Keep enabled for now (we’ll use OAC)
- Create bucket
Step 2: Upload an image
- Go to your bucket → Upload
- Choose an image file (e.g.,
test-image.jpg) - Upload
- Note the object key (e.g.,
test-image.jpg)
Step 3: Create CloudFront distribution
- Go to CloudFront Console → Create distribution
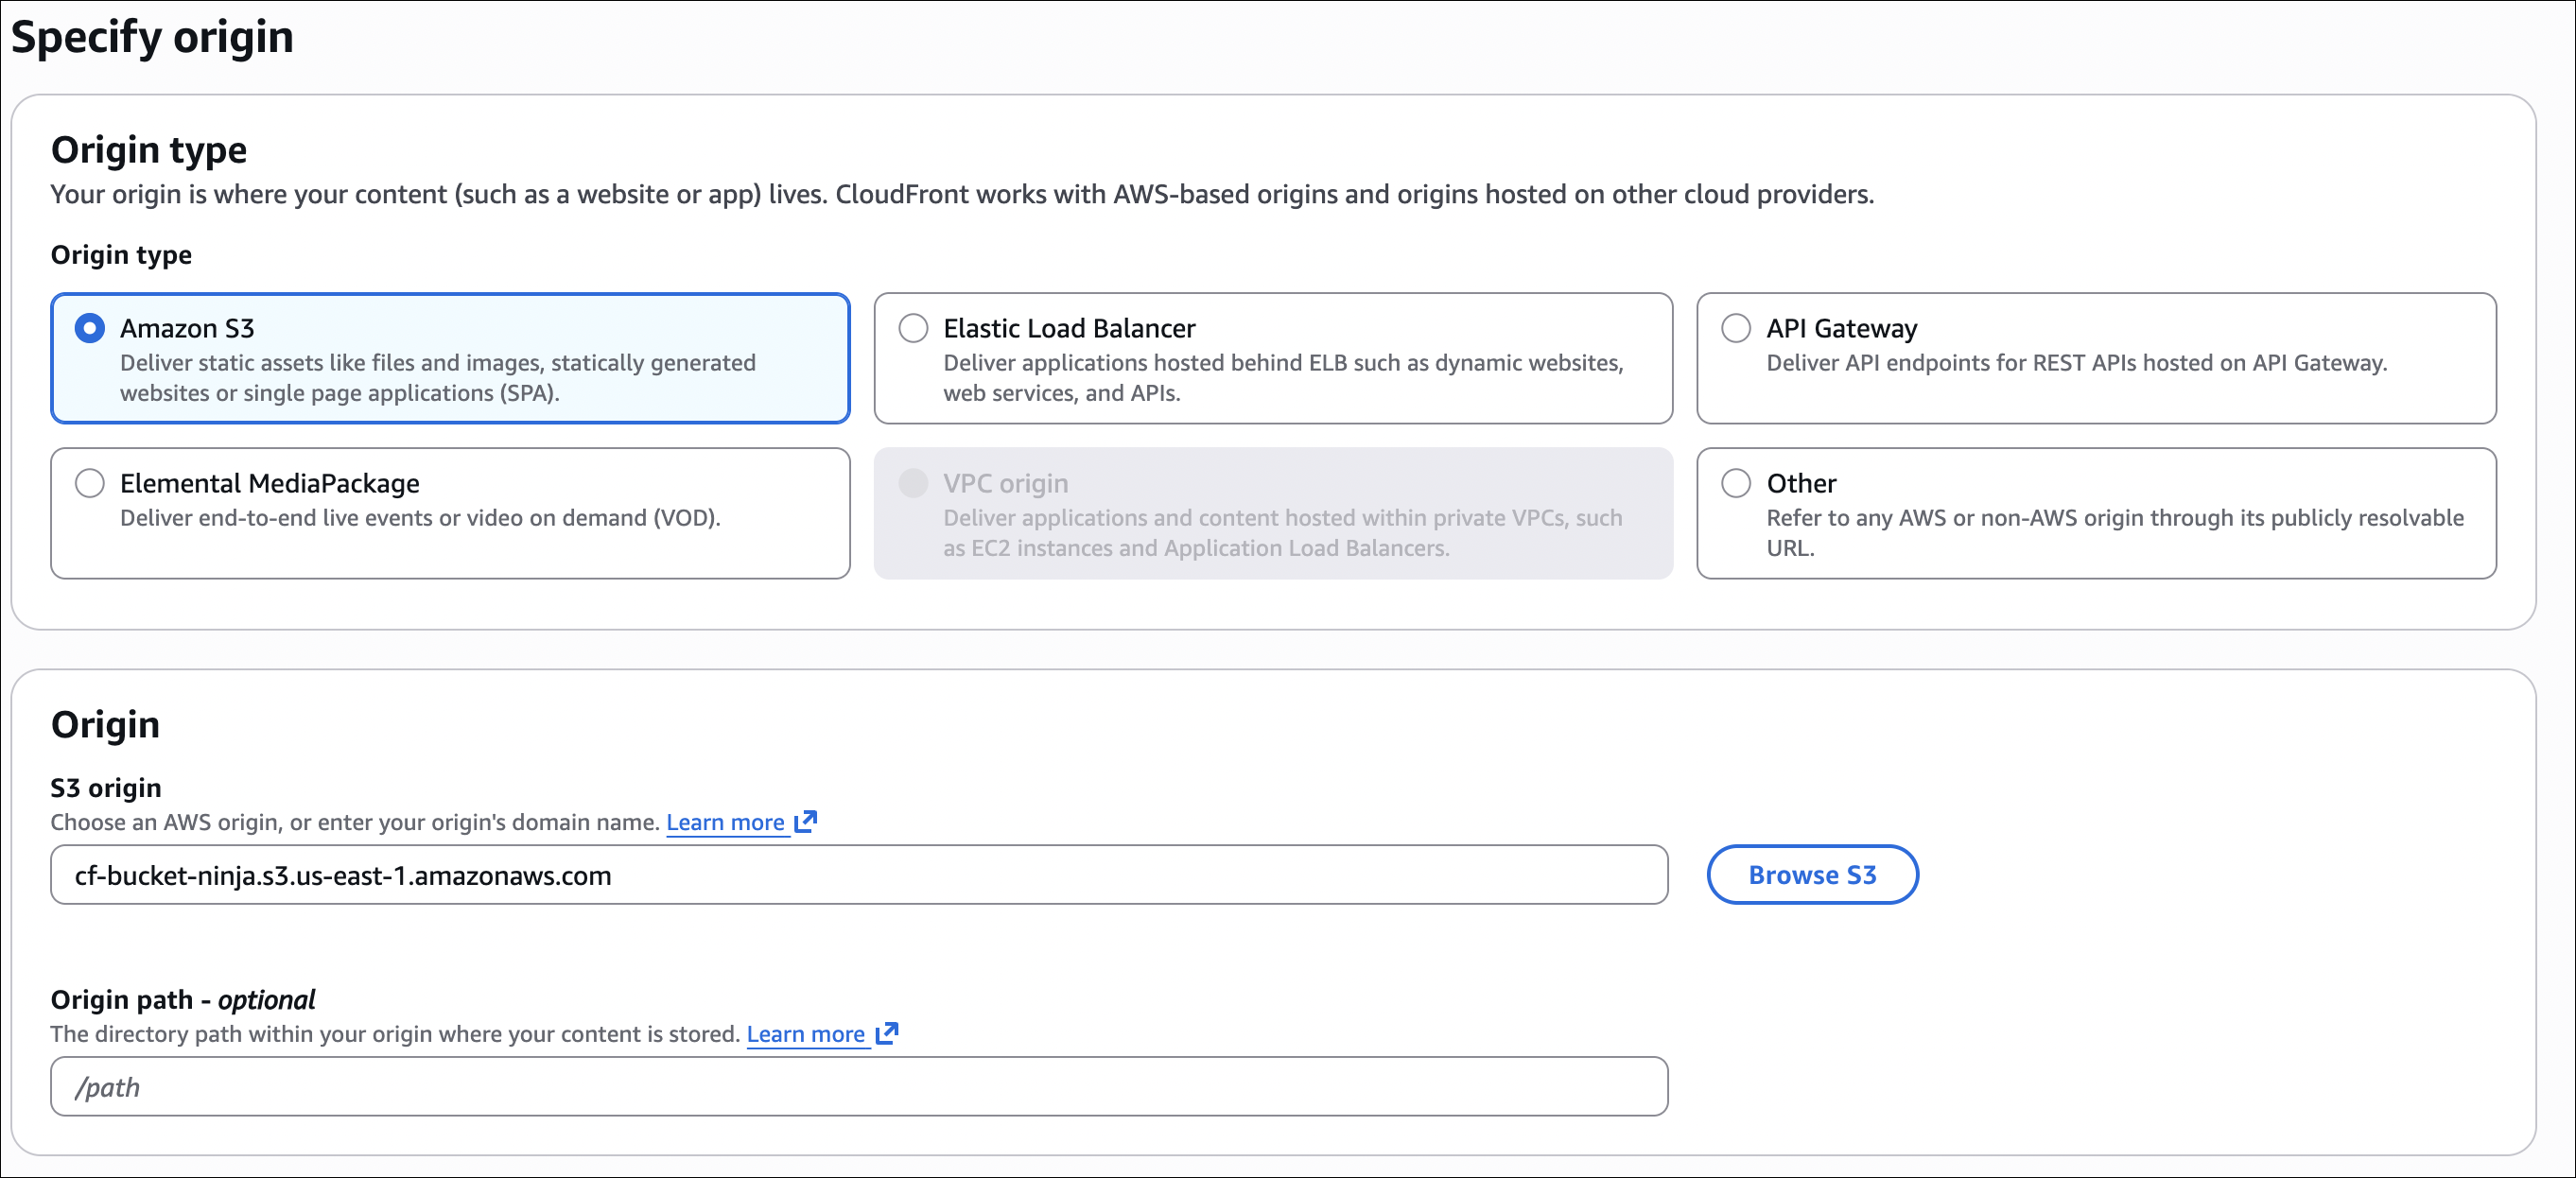
- Origin settings:
- Origin domain: Select your S3 bucket (e.g.,
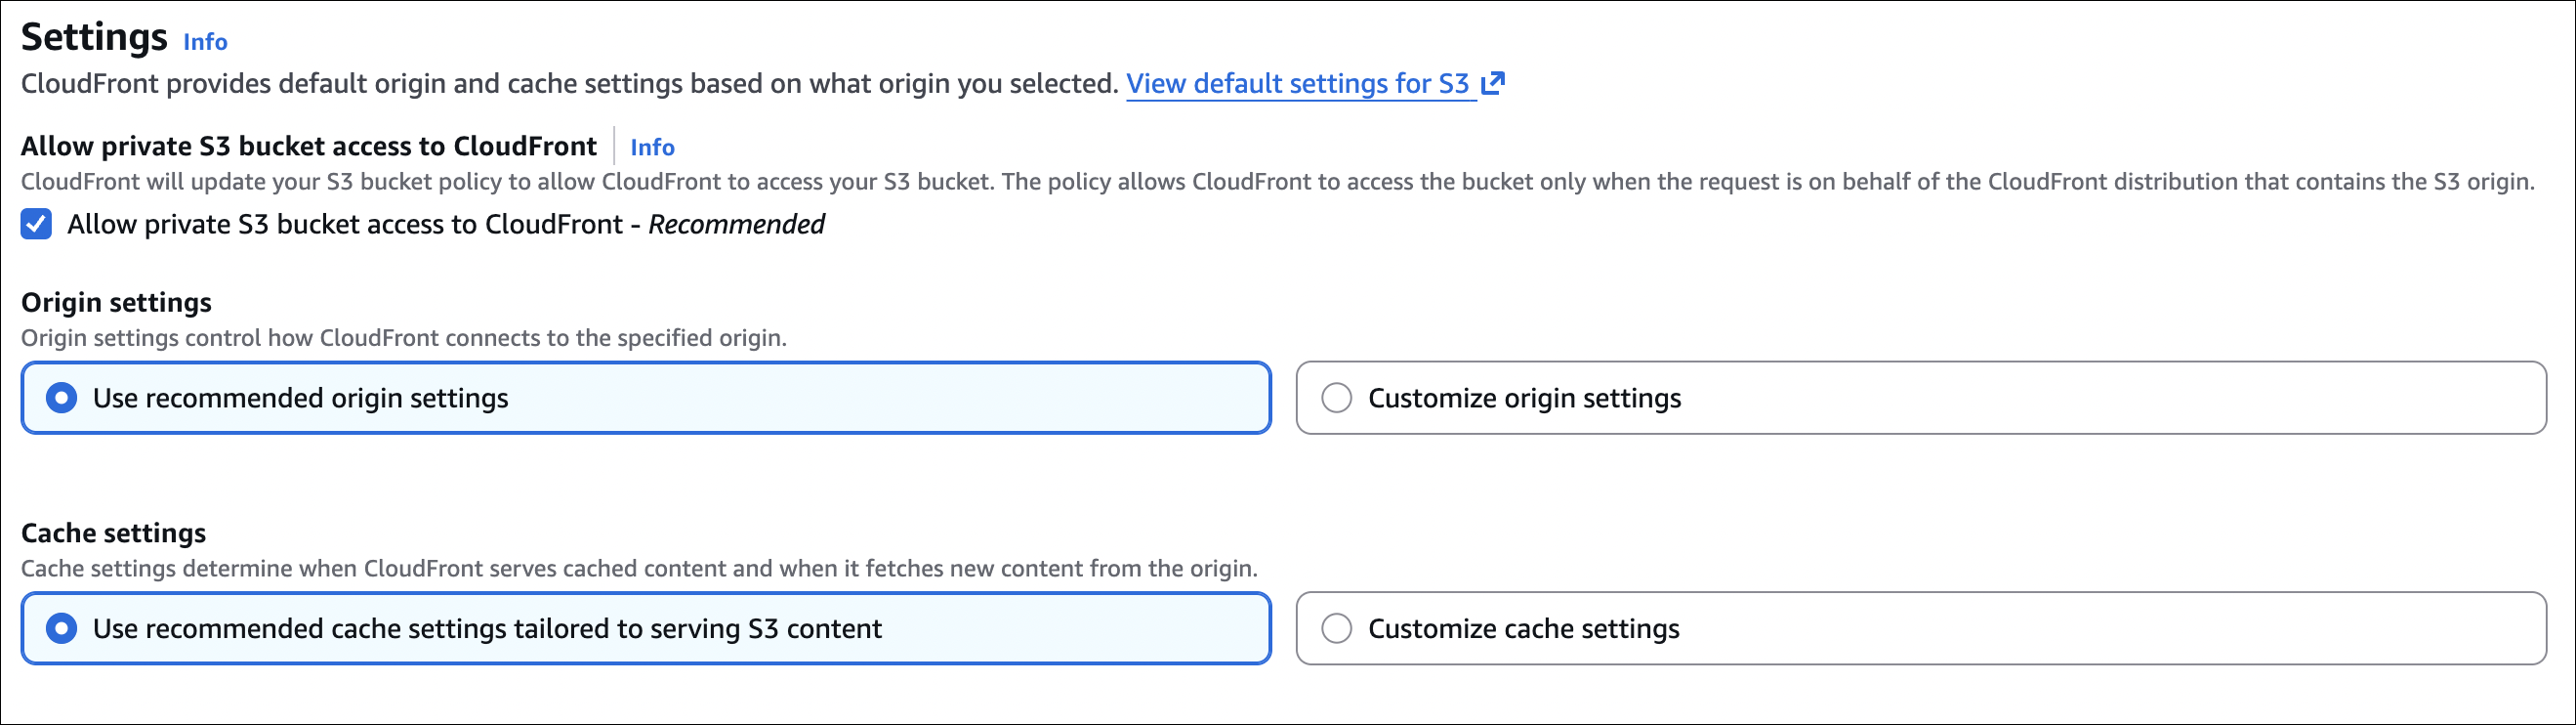
my-cloudfront-test-2024.s3.us-east-1.amazonaws.com) - Origin access: Select “Allow private S3 bucket access to CloudFront - Recommended”
- CloudFront automatically creates an Origin Access Control (OAC) and updates bucket policy
- Click “Update bucket policy” - this automatically adds the policy to your S3 bucket
- Origin domain: Select your S3 bucket (e.g.,
- Default cache behavior:
- Viewer protocol policy: Redirect HTTP to HTTPS
- Allowed HTTP methods: GET, HEAD
- Cache policy: CachingOptimized (or CachingDisabled for testing)
- Distribution settings:
- Price class: Use only North America and Europe (cheaper)
- Alternate domain names: Leave empty (we’ll use CloudFront domain)
- Default root object: Leave empty
- Create distribution
- Wait 10-15 minutes for distribution to deploy (status changes from “In Progress” to “Deployed”)
Note: When you select “Allow private S3 bucket access to CloudFront”, CloudFront automatically:
- Creates an Origin Access Control (OAC)
- Updates your S3 bucket policy to allow CloudFront to access objects
- Your bucket stays private (only CloudFront can access it)
Step 4: Access image via CloudFront
- Go to CloudFront distribution → Copy the distribution domain name (e.g.,
d1234567890abcdef.cloudfront.net) - Access your image:
https://d1234567890abcdef.cloudfront.net/test-image.jpg - Image loads from CloudFront edge location (faster than direct S3)
Test it:
- First request: Goes to origin (S3), gets cached at edge
- Second request: Comes from edge cache (much faster)
- Check response headers: Look for
X-Cache: Hit from cloudfront(cached) orX-Cache: Miss from cloudfront(from origin)
What happened:
Your image is now cached at CloudFront edge locations worldwide. Users get it fast, no matter where they are. S3 bucket stays private (only CloudFront can access it via OAC).
Geo-Restriction
Geo-restriction lets you block or allow access from specific countries. Useful for licensing restrictions, compliance, or content distribution rights.
How to set it up:
- Go to your CloudFront distribution → Security tab
- Scroll down to Security - Web Application Firewall (WAF) section
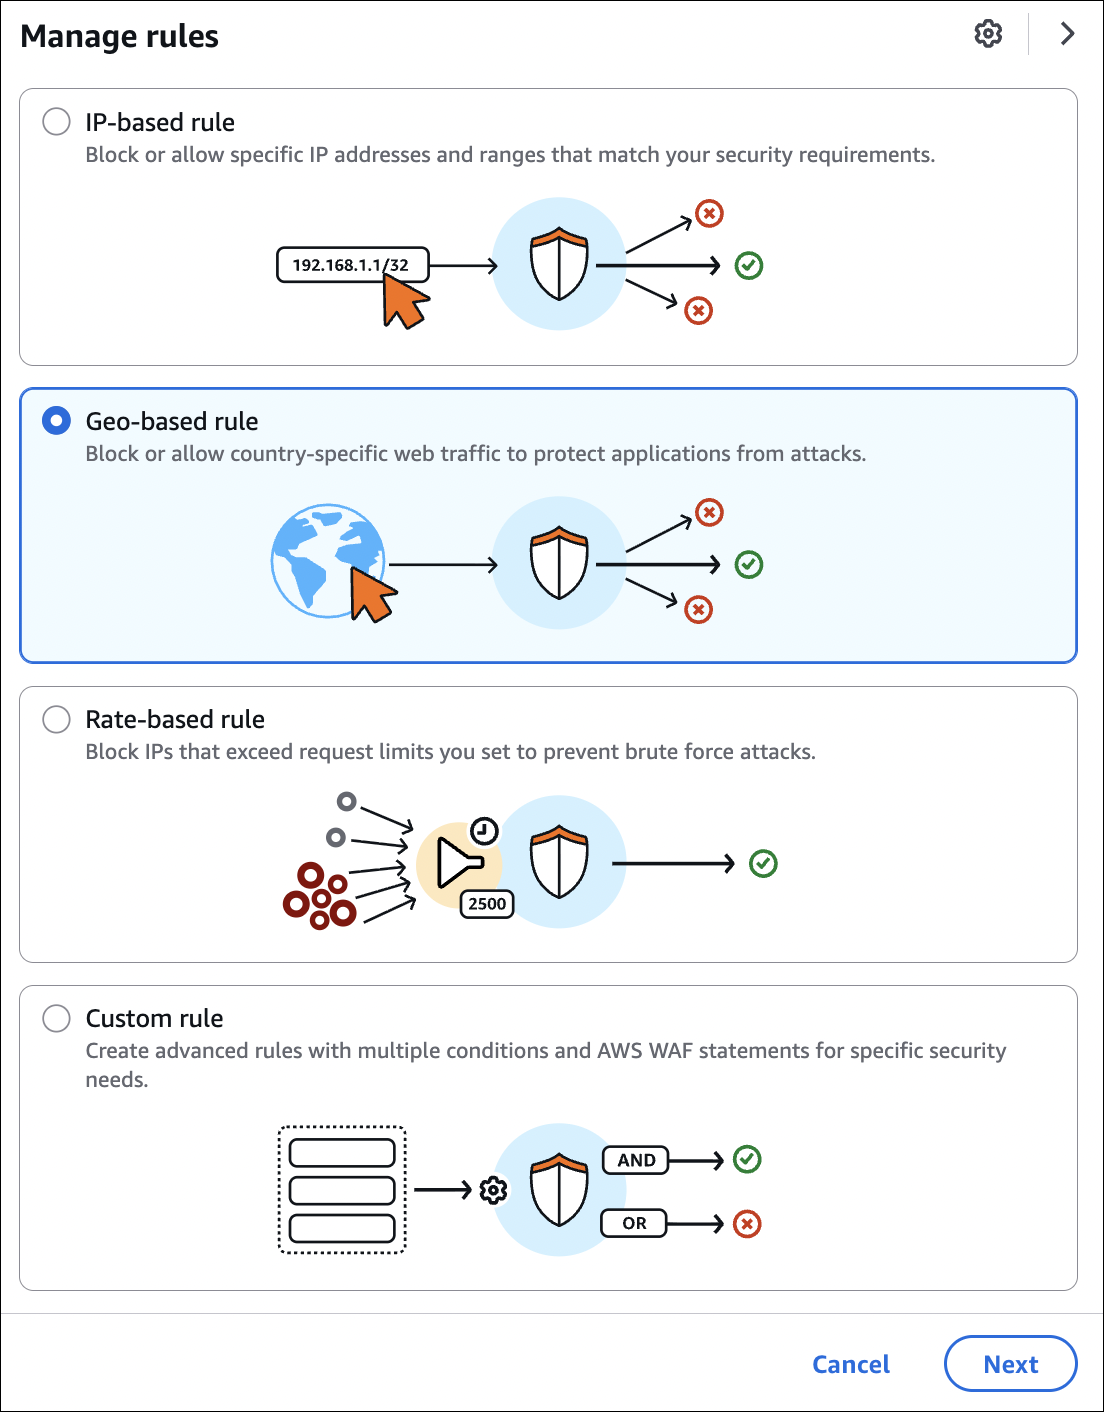
- Click Manage rules
- Select Geo-based rule (Block or allow country-specific web traffic)
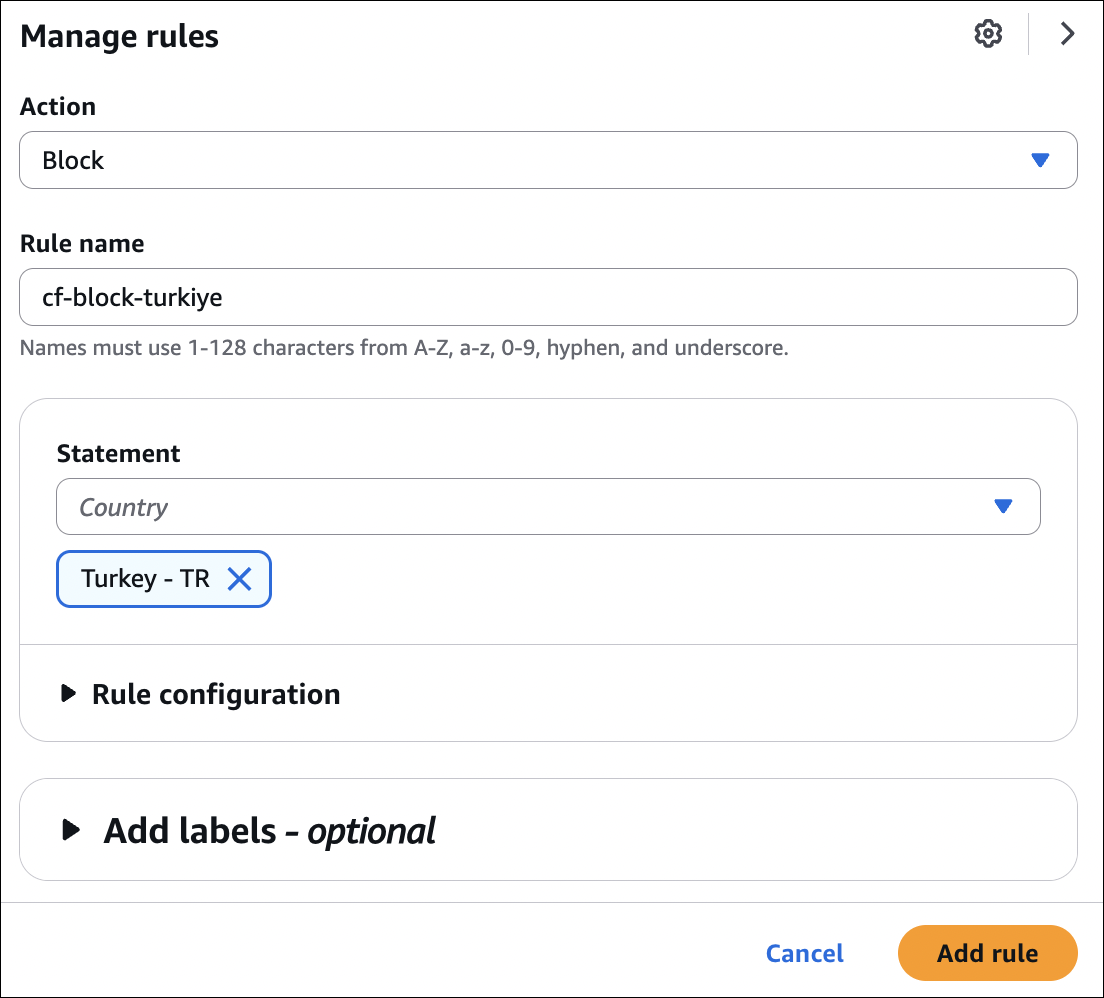
- Action: Choose Block or Allow
- Countries: Select countries to block/allow (e.g., China, Russia, etc.)
- Add rule and save changes
Example scenarios:
- Block specific countries: Content licensed only for certain regions. Block China, Russia, etc.
- Allow only specific countries: Content only available in US and Canada. Allow only those countries.

How it works:
CloudFront checks the user’s IP address location. If country is blocked, user gets 403 Forbidden. If country is allowed (and you’re using allow list), user can access. If country is not in allow list, user gets 403.
Important notes:
- Changes take a few minutes to propagate
- Uses IP geolocation (not 100% accurate, but close)
- Can set different restrictions for different behaviors (paths)
- Blocked users see 403 Forbidden error
- Useful for compliance with licensing agreements
Price Classes
Price class determines which edge locations CloudFront uses. Different locations cost different amounts.
Price Class All (most expensive):
- Uses all edge locations worldwide
- Best performance globally
- Use when: users are worldwide and you need best performance everywhere
Price Class 200 (cheaper):
- Uses edge locations in US, Canada, Europe, Middle East, Africa, Asia
- Excludes some expensive locations (like South America, Australia)
- Use when: most users are in US/Europe/Asia
Price Class 100 (cheapest):
- Uses only US, Canada, and Europe edge locations
- Cheapest option
- Use when: users are only in US/Canada/Europe
How to set:
When creating distribution → Distribution settings → Price class. Choose based on where your users are. If users are only in US, use Price Class 100 (cheapest). If users worldwide, use Price Class All (most expensive but best performance).
Cost impact:
Price Class All costs more because it uses expensive edge locations (like Australia, South America). Price Class 100 is cheapest but slower for users outside US/Canada/Europe. Choose based on your user base location.
Cache Invalidation
Update a file but CloudFront still serves old cached version? Invalidate the cache to force CloudFront to fetch fresh content from origin.
How to do it:
- Go to CloudFront distribution → Invalidations tab
- Click Create invalidation
- Object paths:
/*- clears everything (expensive, use sparingly)/images/photo.jpg- specific file/images/*- all files in images folder/api/*.json- all JSON files in api folder
- Create invalidation
Important:
- Invalidation takes a few minutes to complete
- Costs money (first 1000 paths per month are free, then you pay)
- Use specific paths instead of
/*when possible (cheaper) - Invalidation clears cache immediately (doesn’t wait for TTL)
- After invalidation, next request fetches fresh content from origin

AWS Global Accelerator
Global Accelerator is different from CloudFront. CloudFront caches static content, Global Accelerator improves performance for dynamic applications (APIs, web apps, etc.).
The problem it solves:
You have an API in us-east-1. User in Tokyo connects → goes through public internet, multiple hops, slow. User in London connects → same thing, slow. Each user’s path is different, unpredictable latency.
How it works:
Global Accelerator gives you two static IP addresses (anycast IPs). These IPs are announced from AWS edge locations worldwide. User connects to nearest edge location → AWS’s private network routes traffic to your application → fast, consistent performance.
Simple example:
Without Global Accelerator: User in Tokyo → public internet → multiple ISPs → your API in us-east-1 (slow, unpredictable).
With Global Accelerator: User in Tokyo → AWS edge location in Tokyo → AWS’s private network → your API in us-east-1 (fast, consistent).
Key features:
Static IP addresses: You get two static IPs that don’t change. Put them in firewall rules, DNS, etc. They work from anywhere.
Anycast IPs: Same IP addresses announced from multiple edge locations. User connects to nearest edge automatically. No DNS changes needed.
AWS network: Traffic travels over AWS’s private network (not public internet). Faster, more reliable, less jitter.
Health checks: Automatically checks your endpoints. If one fails, routes traffic to healthy ones. Automatic failover.
Use cases:
- APIs: Fast global access to your API endpoints
- Web applications: Improve performance for dynamic web apps
- Multi-region: Route traffic to closest healthy region automatically
- On-premises: Improve performance to on-premises applications
- Gaming: Low latency for gaming applications
Global Accelerator vs CloudFront:
CloudFront:
- For static content (images, videos, HTML, CSS, JS)
- Caches content at edge locations
- Users get cached content (fast)
- Use when: serving static files
Global Accelerator:
- For dynamic applications (APIs, web apps)
- Doesn’t cache, routes traffic to your application
- Improves routing performance
- Use when: you need fast access to dynamic content
Example:
You have an API that returns user data. CloudFront won’t help (dynamic data, can’t cache). Use Global Accelerator → users get fast, consistent access to your API from anywhere.
How to set up:
- Go to Global Accelerator Console → Create accelerator
- Listener:
- Protocol: TCP or UDP
- Port: e.g., 80, 443
- Endpoint groups:
- Add endpoint group (region where your app is)
- Add endpoints (ALB, NLB, EC2 instances, Elastic IPs)
- Health check: configure health checks
- Create accelerator
- You get two static IP addresses
- Point your DNS to these IPs (or use them directly)
Important notes:
- Two static IPs (IPv4) - same IPs from all edge locations
- Works with ALB, NLB, EC2 instances, Elastic IPs
- Automatic failover if endpoint fails
- Health checks route traffic to healthy endpoints
- Charges for data transfer (but improves performance)
- Works for TCP/UDP traffic (not HTTP caching like CloudFront)